{{}}
{{}}
{{}}
{{}}
{{}}
{{}}
YugabyteDB Anywhere allows you to add an encryption in transit configuration using HashiCorp Vault with a public key infrastructure (PKI) secret engine. This configuration can be used to enable TLS for different clusters and YugabyteDB instances. You can apply this configuration to node-to-node encryption, client-to-node encryption, or both.
## Prerequisites
For the correct configuration, the following criteria must be met:
- HashiCorp Vault is unsealed.
- HashiCorp Vault with the PKI secret engine is configured and enabled.
- HashiCorp Vault URL is accessible by YugabyteDB Anywhere.
- Because HashiCorp Vault is accessed via an authentication token mechanism, a token must be created beforehand while creating a key provider with appropriate permissions.
- HashiCorp Vault needs to be running and always accessible to YugabyteDB Anywhere.
- HashiCorp PKI certificate revocation list (CRL) or CA URLs must be accessible from each node server.
- Appropriate certificates and roles have been created for YugabyteDB Anywhere usage.
- Node servers are able to validate certificates.
- Required permissions have been provided to perform various key management operations.
## Configure HashiCorp Vault
Before you can start configuring HashiCorp Vault, install it on a virtual machine, as per instructions provided in [Install Vault](https://www.vaultproject.io/docs/install). The vault can be set up as a multi-node cluster. Ensure that your vault installation meets the following requirements:
- Has transit secret engine enabled.
- Its seal and unseal mechanism is secure and repeatable.
- Its token creation mechanism is repeatable.
You need to configure HashiCorp Vault in order to use it with YugabyteDB Anywhere, as follows:
1. Create a vault configuration file that references your nodes and specifies the address, as follows:
```properties
storage "raft" {
path = "./vault/data/"
node_id = "node1"
}
listener "tcp" {
address = "127.0.0.1:8200"
tls_disable = "true"
}
api_addr = "http://127.0.0.1:8200"
cluster_addr = "https://127.0.0.1:8201"
ui = true
disable_mlock = true
default_lease_ttl = "768h"
max_lease_ttl = "8760h"
```
Replace `127.0.0.1` with the vault web address.
For additional configuration options, see [Parameters](https://www.vaultproject.io/docs/configuration#parameters).
1. Initialize the vault server by following instructions provided in [Operator init](https://www.vaultproject.io/docs/commands/operator/init).
1. Allow access to the vault by following instructions provided in [Unsealing](https://www.vaultproject.io/docs/concepts/seal#unsealing).
1. Enable the secret engine by executing the following command:
```shell
vault secrets enable pki
```
1. Configure the secret engine, as follows:
- Create a root CA or configure the top-level CA.
- Optionally, create an intermediate CA chain and sign them.
- Create an intermediate CA for YugabyteDB, as per the following example:
```sh
export pki=pki
export pki_int="pki_int"
export role_i=RoleName
export ip="s.test.com"
vault secrets enable -path=$pki_int pki
vault secrets tune -max-lease-ttl=43800h $pki_int
vault write $pki_int/intermediate/generate/internal common_name="test.com Intermediate Authority" ttl=43800h -format=json | jq -r '.data.csr' > pki_int.csr
\# *** dump the output of the preceding command in pki_int.csr
vault write $pki/root/sign-intermediate csr=@pki_int.csr format=pem_bundle ttl=43800h -format=json | jq -r .data.certificate > i_signed.pem
\# *** dump the output in i_signed.pem
vault write $pki_int/intermediate/set-signed certificate=@i_signed.pem
vault write $pki_int/config/urls issuing_certificates="http://127.0.0.1:8200/v1/pki_int/ca" crl_distribution_points="http://127.0.0.1:8200/v1/pki_int/crl"
```
1. Create the vault policy, as per the following example:
```properties
# Enable secrets engine
path "sys/mounts/*" {
capabilities = ["create", "read", "update", "delete", "list"]
}
# List enabled secrets engine
path "sys/mounts" {
capabilities = ["read", "list"]
}
# Work with pki secrets engine
path "pki*" {
capabilities = ["create", "read", "update", "delete", "list", "sudo"]
}
```
1. Generate a token with appropriate permissions (as per the referenced policy) by executing the following command:
```shell
vault token create -no-default-policy -policy=pki_policy
```
You may also specify the following for your token:
- `ttl` — Time to live (TTL). If not specified, the default TTL of 32 days is used, which means that the generated token will expire after 32 days.
- `period` — If specified, the token can be infinitely renewed.
YugabyteDB Anywhere automatically tries to renew the token every 12 hours after it has passed 70% of its expiry window; as a result, you should set the TTL or period to be greater than 12 hours.
For more information, refer to [Tokens](https://developer.hashicorp.com/vault/tutorials/tokens/tokens) in the Hashicorp documentation.
1. Create a role that maps a name in the vault to a procedure for generating a certificate, as follows:
```sh
vault write /roles/ allow_any_name=true allow_subdomains=true max_ttl="8640h"
```
Credentials are generated against this role.
1. Issue certificates for nodes or a YugabyteDB client:
- For a node, execute the following:
```sh
vault write /issue/ common_name="" ip_sans="" ttl="860h"
```
- For YugabyteDB client, execute the following:
```sh
vault write /issue/ common_name=""
```
## Add HashiCorp Vault-provided certificates
When you create a universe, you can enable TLS using certificates provided by HashiCorp Vault, as follows:
1. Navigate to **Integrations > Security > Encryption in Transit**.
1. Click **Add Certificate** to open the **Add Certificate** dialog.
1. Select **Hashicorp**.
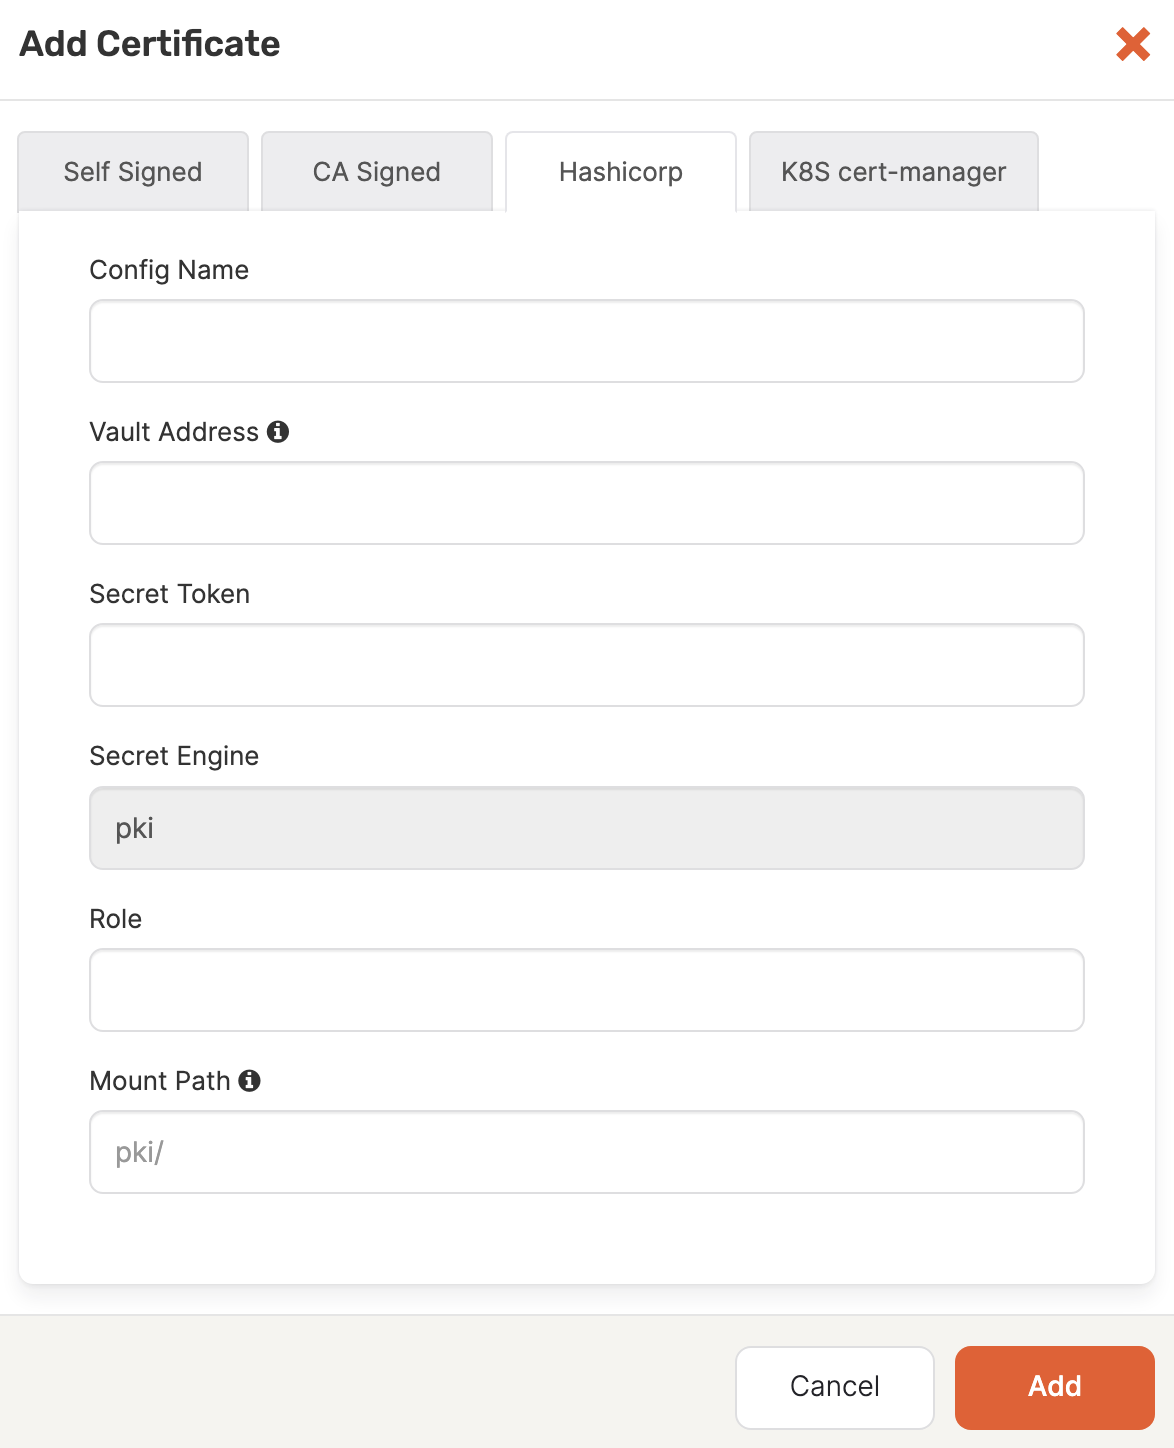
1. In the **Config Name** field, enter a meaningful name for your configuration.
1. In the **Vault Address** field, specify a valid URL that includes the port number. The format is `http://0.0.0.0:0000`, which corresponds to `VAULT_HOSTNAME:0000`
1. In the **Secret Token** field, specify the secret token for the vault.
1. In the **Role** field, specify the role used for creating certificates.
1. Optionally, provide the secret engine path on which the PKI is mounted. If you do not supply this information, `pki/` will be used.
1. Click **Add** to make the certificate available.