This section describes how to configure a YugabyteDB Anywhere (YBA) universe to use OIDC-based authentication for YugabyteDB YSQL database access using JumpCloud as the Identity Provider (IdP).
After OIDC is set up, users can sign in to the YugabyteDB universe database using their JSON Web Token (JWT) as their password.
Note that the yugabyte privileged user will continue to exist as a local database user even after OIDC-based authentication is enabled for a universe.
**Learn more**
- [Enable YugabyteDB Anywhere authentication via OIDC](../../../administer-yugabyte-platform/oidc-authentication/)
- [YFTT: OIDC Authentication in YSQL](https://www.youtube.com/watch?v=KJ0XV6OnAnU&list=PL8Z3vt4qJTkLTIqB9eTLuqOdpzghX8H40&index=1)
## Set up OIDC with JumpCloud on YugabyteDB Anywhere
To enable OIDC authentication with JumpCloud, you need to do the following:
- Create an app registration in JumpCloud - The JumpCloud IdP configuration includes application registration (registering YugabyteDB Anywhere in the JumpCloud tenant) and configuring JumpCloud to send (redirect) tokens with the required claims to YugabyteDB Anywhere.
- Configure OIDC in YugabyteDB Anywhere - The OIDC configuration uses the application you registered. You can also configure YBA to display the user's JSON Web Token (JWT) on the sign in screen.
- Configure the universe to use OIDC - You enable OIDC for universes by setting authentication rules for database access using flags. The database is implicitly configured and picks up the authentication rules you set. The database uses well-known PostgreSQL constructs to translate these authentication rules into database roles for access. Mapping JumpCloud attributes, such as group memberships, roles, and email addresses to database roles, is accomplished using the PostgreSQL `yb_hba.conf` and `yb_ident.conf` files.
### Create an application in JumpCloud
To use JumpCloud for your IdP, do the following:
1. Sign in to JumpCloud using an administrator account.
1. Create an application.
- Under **SSO Applications**, click **Add New Application**.
- Select **Custom Application**, and make sure the integration supports "SSO with OIDC" on the next page.
- Under **Manage Single Sign-On (SSO)**, select **Configure SSO with OIDC**, and click **Next**.
- Under **Enter General Info**, add the application name (for **Display Label**), **Description**, and logo (for **User Portal Image**), and select **Show this application in User Portal**.
- Click **Configure Application**.
1. Configure your application.
Under **SSO > Endpoint Configuration**, configure the following:
- **Redirect URIs** - enter `https:///api/v1/callback?client_name=OidcClient`.
- **Client Authentication Type** - select **Client Secret Post**.
- **Login URL** - enter `https:///login`.
Under **Attribute Mapping**, for **Standard Scopes**, select **Email** and **Profile**.
Click **Activate** when you are done.
You will be prompted in a pop up to save the **Client ID** and **Client Secret**. Save these in a secure location, you will need to provide these credentials in YugabyteDB Anywhere.
1. Configure Attributes and Identity Management as required.
1. Integrate the user in JumpCloud.
- Navigate to **User Groups**, select the user groups you want to access YugabyteDB Anywhere, and click **Save** when you are done.
To [configure](#configure-yugabytedb-anywhere) JumpCloud federated authentication in YugabyteDB Anywhere, you need the following application properties:
- **Client ID** and **Client Secret** of the application you created. These are the credentials you saved when you activated your application. The **Client ID** is also displayed on the **SSO** tab.
For more information, refer to the [JumpCloud](https://jumpcloud.com/support/sso-with-oidc) documentation.
### Configure YugabyteDB Anywhere
To configure YugabyteDB Anywhere for OIDC, you need to be signed in as a Super Admin. You need your JumpCloud application client ID and client secret.
To allow users to access their JWT from the YugabyteDB sign in page, you must enable the OIDC feature via a configuration flag before you configure OIDC.
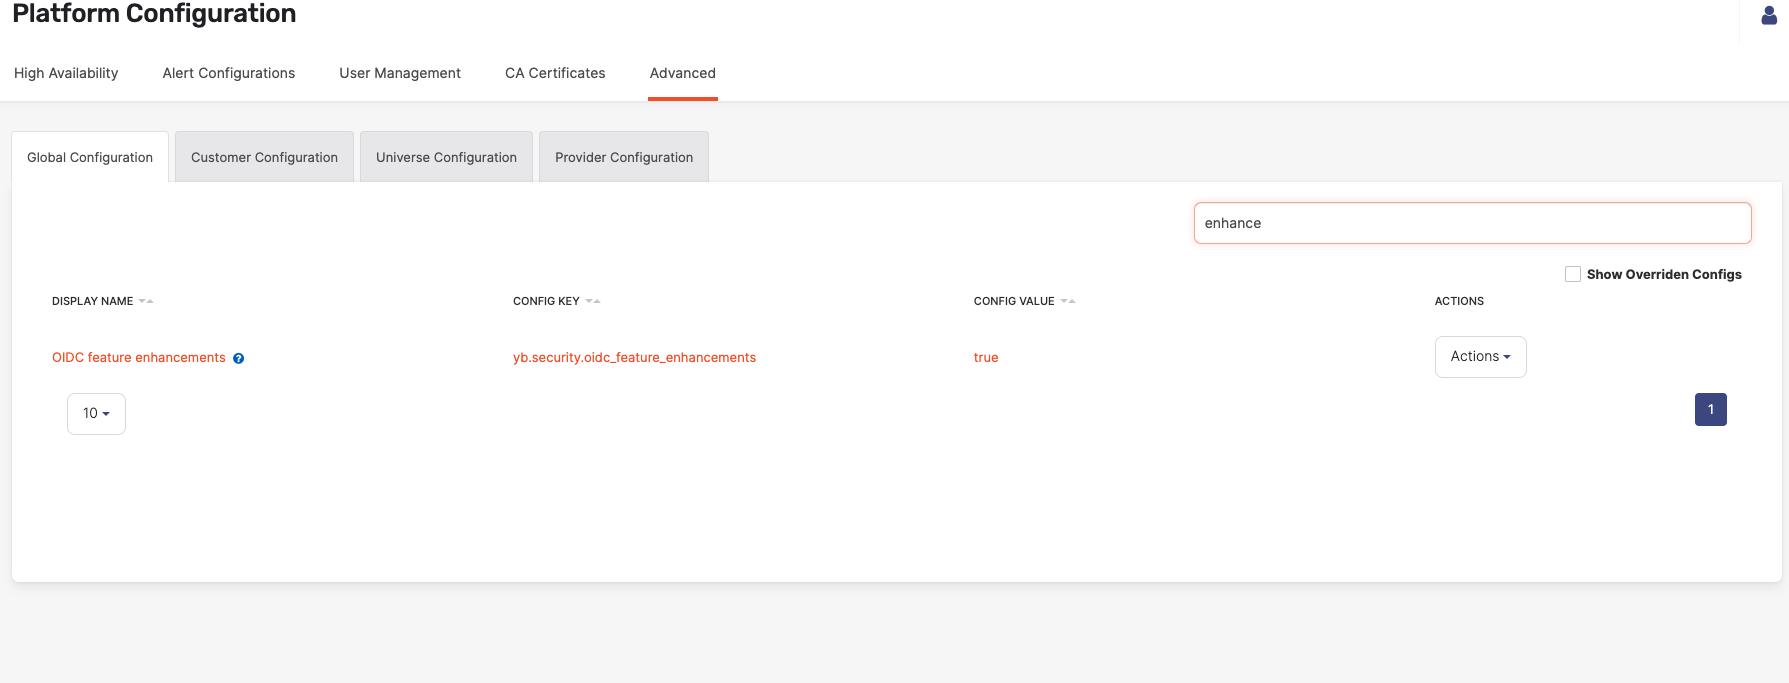
#### Enable OIDC enhancements
To enable some features of the OIDC functionality in Yugabyte Anywhere, you need to set the `yb.security.oidc_feature_enhancements` configuration flag to true as follows:
1. Navigate to **Admin > Advanced > Global Configuration**.
1. Search on OIDC to display the configuration setting and set it to true.
#### Enable OIDC authentication
To configure User authentication in YugabyteDB Anywhere, do the following:
1. Navigate to **Admin > Access Management > User Authentication** and select **ODIC configuration**.
1. Under **OIDC configuration**, configure the following:
- **Client ID** and **Client Secret** - enter the client ID and secret of the JumpCloud application you created.
- **Discovery URL** - enter `https://oauth.id.jumpcloud.com/.well-known/openid-configuration`.
- **Scope** - enter `openid email`. If you are using the Refresh Token feature to allow the Jumpcloud server to return the refresh token (which can be used by YBA to refresh the login), enter `openid offline_access profile email` instead.
- **Email attribute** - enter your registered email.
- **Refresh Token URL** - if you have configured OIDC to use [refresh tokens](https://openid.net/specs/openid-connect-core-1_0.html#RefreshTokens), in the **Refresh Token URL** field, enter the URL of the refresh token endpoint.
- **Display JWT token on login** - select this option to allow users to access their JWT from the YugabyteDB Anywhere sign in page. This allows a user to view and copy their JWT without signing in to YBA. (This option is only available if you enabled the `yb.security.oidc_feature_enhancements` configuration flag.)
1. Click **Save**.
You are redirected to sign in to your IdP to test the connection. After the test connection is successful, OIDC authentication is enabled.
### Configure a universe
To access a universe via OIDC, you need to set the following flags on the universe:
- ysql_hba_conf_csv
- ysql_ident_conf_csv
When the flags are set, YugabyteDB configures the `ysql_hba.conf` and `yb_ident.conf` files on the database nodes and creates the files that hold the JWKS keys for token validation.
For information on configuring flags in YugabyteDB Anywhere, refer to [Edit configuration flags](../../../manage-deployments/edit-config-flags/).
#### ysql_hba_conf_csv
The `ysql_hba_conf_csv` flag must be set to support using JWTs for authentication. The parameters to include in the configuration file record are as follows:
- `jwt_map` - the user-name map used to translate claim values to database roles. Optional if you aren't using the default Subject claim values.
- `jwt_issuers` - the first part of the discovery URL (`https://oauth.id.jumpcloud.com/`)
- `jwt_audiences` - the audience or target app for the token, which in this case is the client ID of the application you registered.
- `jwt_matching_claim_key` - the email attribute you set (for example, `preferred_username`). Optional if you aren't using the default Subject claim values.
- `jwt_jwks_path` - The JSON Web Key Set (JWKS) is a set of keys containing the public keys used to verify any JWT. These can be uploaded as entries in a single file. When configuring the flag in YugabyteDB Anywhere, click **Add JSON web key set (JWKS)** to upload the JWKS.
The following illustration shows an example of setting the `ysql_hba_conf_csv` flag in YugabyteDB Anywhere:
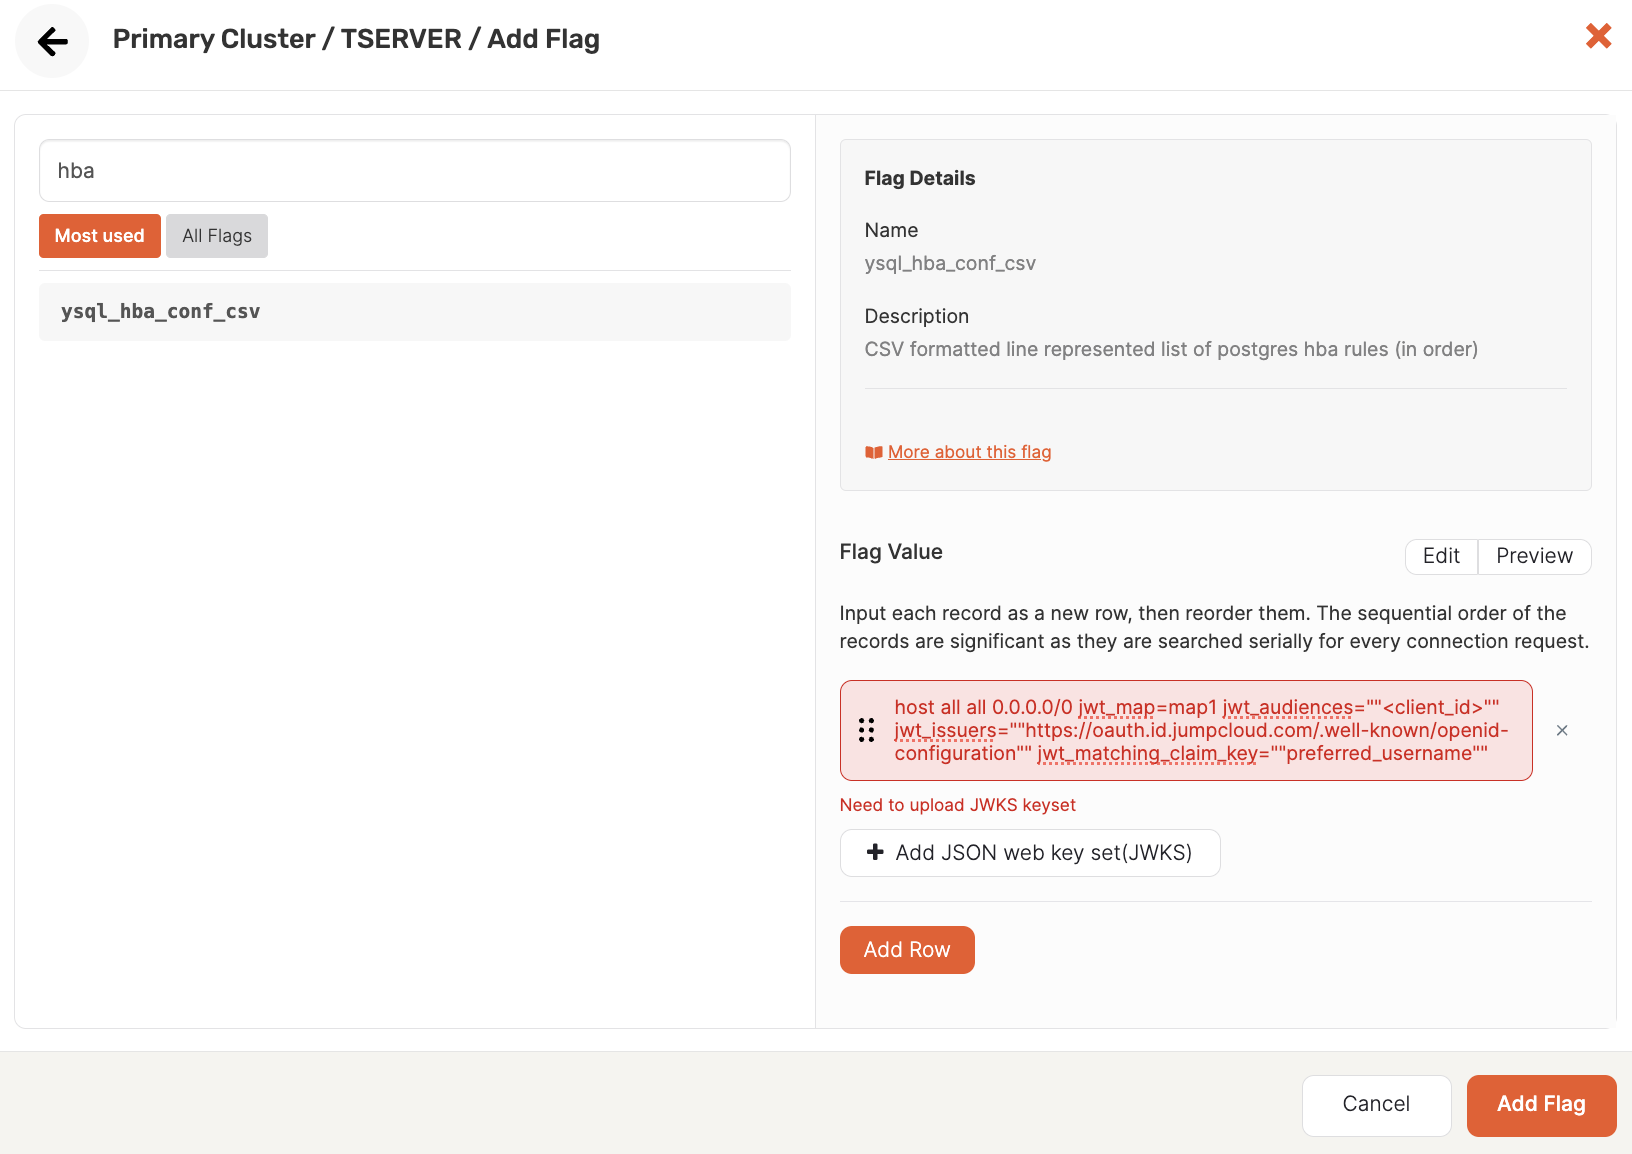
The following shows an example `ysql_hba_conf_csv` flag configuration for OIDC:
```sh
host all all 0.0.0.0/0 jwt_map=map1 jwt_audiences="""" jwt_issuers=""https://oauth.id.jumpcloud.com/"" jwt_matching_claim_key=""preferred_username""
```
For more information on host authentication in YugabyteDB using `ysql_hba_conf_csv`, refer to [Host-based authentication](../../../../secure/authentication/host-based-authentication/).
#### ysql_ident_conf_csv
This flag is used to add translation regex rules that map token claim values to PostgreSQL roles. The flag settings are used as records in the `yb_ident.conf` file as user-name maps. This file is used identically to `pg_ident.conf` to map external identities to database users. For more information, refer to [User name maps](https://www.postgresql.org/docs/15/auth-username-maps.html) in the PostgreSQL documentation.
The following illustration shows an example flag configuration:
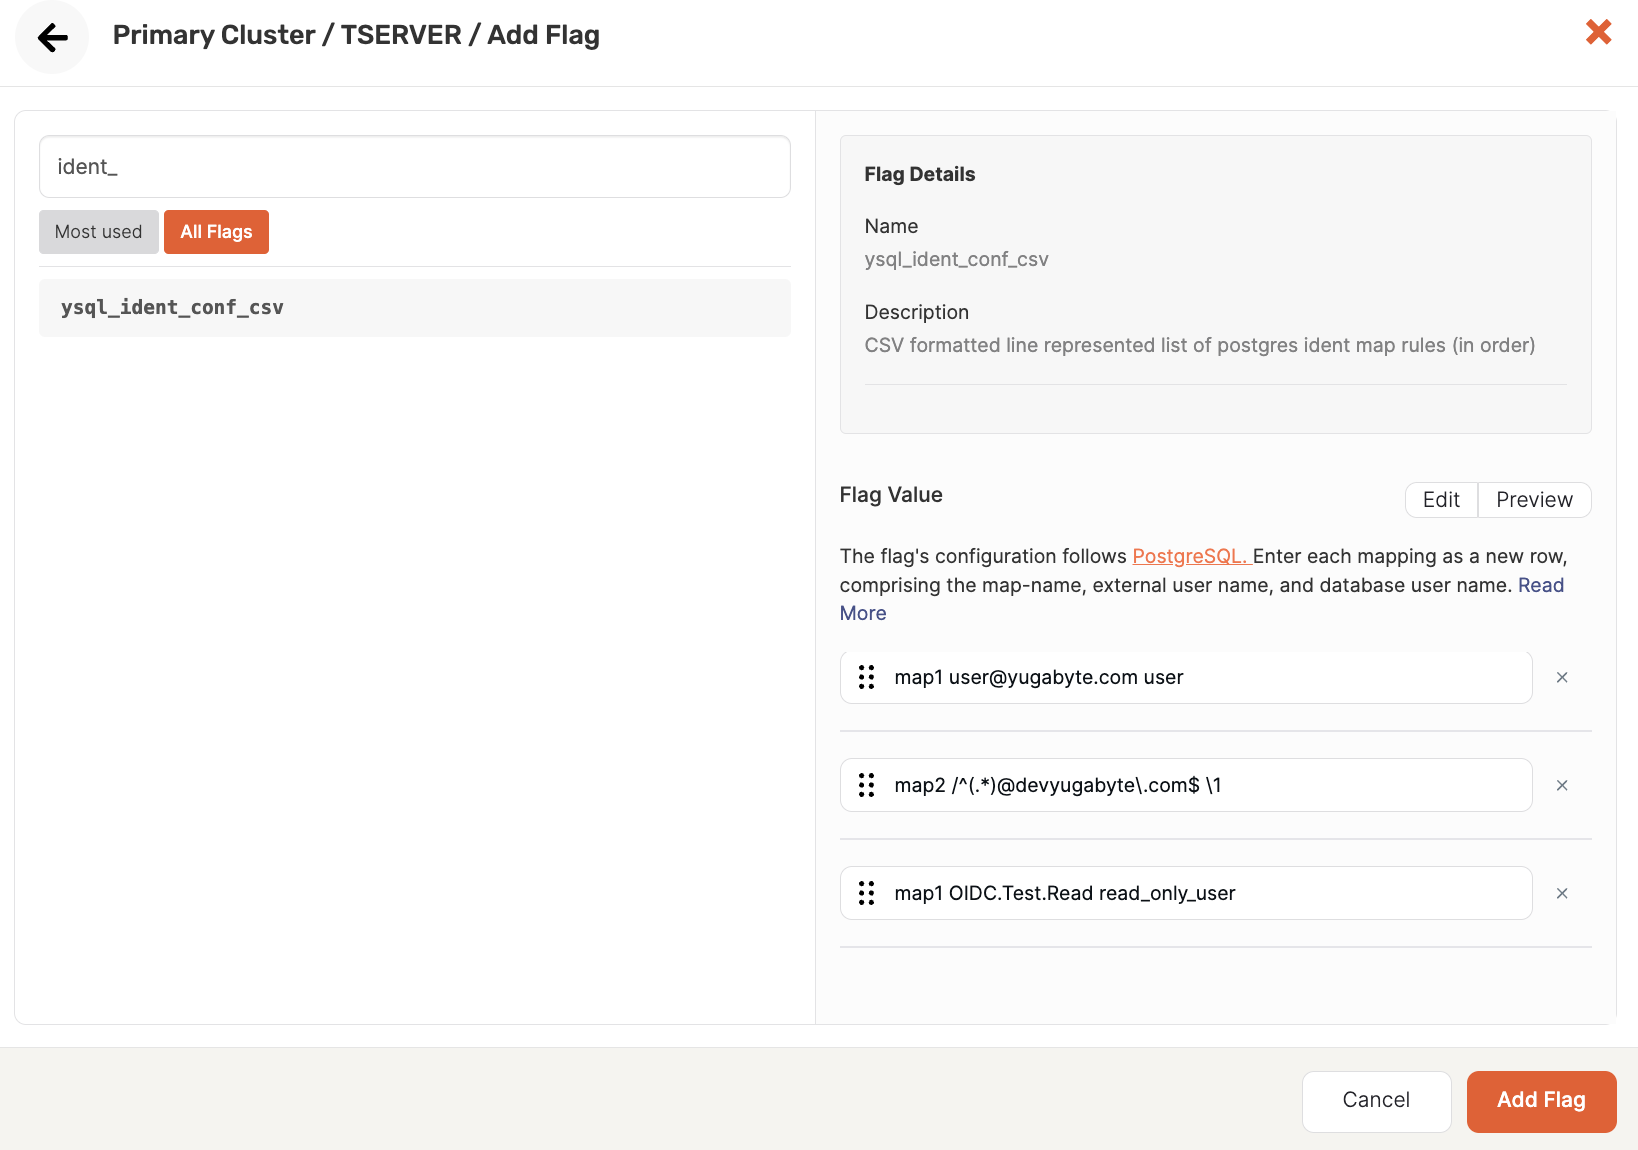
The following are examples of possible rules:
- Map a single user
```sh
map1 user@yugabyte.com user
```
- Map multiple users
```sh
map2 /^(.*)@devyugabyte\.com$ \1
```
- Map Roles <-> Users
```sh
map1 OIDC.Test.Read read_only_user
```
#### yb.security.oidc_feature_enhancements
This flag must be enabled to expose the OIDC functionality in Yugabyte Anywhere. Use the following API to set values for this flag.
```sh
curl -k --location --request PUT '/api/v1/customers//runtime_config/00000000-0000-0000-0000-000000000000/key/yb.security.oidc_feature_enhancements' \
--header 'Content-Type: text/plain' \
--header 'Accept: application/json' \
--header 'X-AUTH-YW-API-TOKEN: ' \
--data 'true'
```
## Manage users and roles
{{< readfile "/stable/yugabyte-platform/security/authentication/oidc-manage-users-include.md" >}}