{{< warning title="Legacy provisioning deprecated" >}}
Legacy provisioning of on-premises nodes is deprecated. Before you can upgrade YugabyteDB Anywhere to v2025.2, all universes must be updated to use node agent and provisioned using the [node agent script](../software-on-prem/#run-the-provisioning-script). For more information, refer to [Prepare to upgrade](../../../upgrade/prepare-to-upgrade/).
{{< /warning >}}
In this mode, you manually install each prerequisite software component. Use this mode if you disallow SSH login to a root-privileged user at setup time and instead have a local sudo-privileged user with CLI access to the VM.
Your responsibility now (to meet prerequisites) is to provide a VM with the following pre-installed:
- [Supported Linux OS](../#linux-os) with an SSH-enabled, root-privileged user. YugabyteDB Anywhere (YBA) uses this user to automatically perform additional Linux configuration, such as creating the `yugabyte` user, updating the file descriptor settings via ulimits, and so on.
- [Additional software](../#additional-software)
- [Additional software for airgapped](../#additional-software-for-airgapped-deployment)
| Save for later | To configure |
| :--- | :--- |
| VM IP addresses | [On-premises provider](../../../configure-yugabyte-platform/on-premises/) |
## Manually provision a VM
After you have created the VM, use the following instructions to provision the VM for use with an on-premises provider.
For each node VM, perform the following:
- [Verify the Python version installed on the node](#verify-the-python-version-installed-on-the-node)
- [Set up time synchronization](#set-up-time-synchronization)
- [Open incoming TCP ports](#open-incoming-tcp-ip-ports)
- [Manually pre-provision the node](#pre-provision-nodes-manually)
- [Install Prometheus Node Exporter](#install-prometheus-node-exporter)
- [Enable yugabyte user processes to run after logout](#enable-yugabyte-user-processes-to-run-after-logout)
- [Install systemd-related database service unit files](#install-systemd-related-database-service-unit-files)
- [Install the node agent](#install-node-agent)
After you have provisioned the VM, reboot the system.
You can then proceed to [Add the instance to the on-prem provider](../../../configure-yugabyte-platform/on-premises-nodes/#add-instances).
{{}}
The following instructions use user-level systemd to provide the necessary access to system resources. Versions prior to v2.20 use root-level systemd or cron. If you have previously provisioned nodes for this provider using either root-level systemd or cron, you should use the same steps, as all nodes in a provider need to be provisioned in the same way. For instructions on provisioning using root-level systemd or cron, see the [instructions for v2.18](https://docs-archive.yugabyte.com/v2.18/yugabyte-platform/configure-yugabyte-platform/set-up-cloud-provider/on-premises-manual/).
{{}}
## Verify the python version installed on the node
Verify that Python 3.5-3.9 is installed on the node. v3.6 is recommended.
In case there is more than one Python 3 version installed, ensure that `python3` refers to the right one. For example:
```sh
sudo alternatives --set python3 /usr/bin/python3.6
sudo alternatives --display python3
python3 -V
```
If you are using Python later than v3.6, install the [selinux](https://pypi.org/project/selinux/) package corresponding to your version of python. For example, using [pip](https://pip.pypa.io/en/stable/installation/), you can install as follows:
```sh
python3 -m pip install selinux
```
Refer to [Ansible playbook fails with libselinux-python aren't installed on RHEL8](https://access.redhat.com/solutions/5674911) for more information.
If you are using Python later than v3.7, set the **Max Python Version (exclusive)** Global Configuration option to the python version. Refer to [Manage runtime configuration settings](../../../administer-yugabyte-platform/manage-runtime-config/). Note that only a Super Admin user can modify Global configuration settings.
## Set up time synchronization
A local Network Time Protocol (NTP) server or equivalent must be available.
Ensure an NTP-compatible time service client is installed in the node OS (chrony is installed by default in the standard AlmaLinux 8 instance used in this example). Then, configure the time service client to use the available time server. The procedure includes this step and assumes chrony is the installed client.
## Open incoming TCP/IP ports
Database servers need incoming TCP/IP access enabled for communications between themselves and YugabyteDB Anywhere.
Refer to [Networking](../../networking/).
## Pre-provision nodes manually
This process carries out all provisioning tasks on the database nodes which require elevated privileges. After the database nodes have been prepared in this way, the universe creation process from YugabyteDB Anywhere will connect with the nodes only via the `yugabyte` user, and not require any elevation of privileges to deploy and operate the YugabyteDB universe.
Physical nodes (or cloud instances) are installed with a standard AlmaLinux 8 server image. The following steps are to be performed on each physical node, prior to universe creation:
1. Log in to each database node as a user with sudo enabled (for example, the `ec2-user` user in AWS).
1. Add the following line to the `/etc/chrony.conf` file:
```text
server prefer iburst
```
Then run the following command:
```sh
sudo chronyc makestep # (force instant sync to NTP server)
```
1. Add a new `yugabyte:yugabyte` user and group with the default login shell `/bin/bash` that you set via the `-s` flag, as follows:
```bash
sudo useradd -u -s /bin/bash --create-home --home-dir yugabyte # (add user yugabyte and create its home directory as specified in )
sudo passwd yugabyte # (add a password to the yugabyte user)
sudo su - yugabyte # (change to yugabyte user for execution of next steps)
```
- `yugabyte_user_uid` is a common UID for the `yugabyte` user across all nodes. Use the same UID for the `yugabyte` user on all nodes in the same cluster. If you don't use a common UID, you may run into issues, for example, if you are using NFS for backups.
- `yugabyte_home` is the path to the Yugabyte home directory. By default, this is `/home/yugabyte`. If you set a custom path for the yugabyte user's home in the YugabyteDB Anywhere UI, you must use the same path here. Otherwise, you can omit the `--home-dir` flag.
Ensure that the `yugabyte` user has permissions to SSH into the YugabyteDB nodes (as defined in `/etc/ssh/sshd_config`).
If you are using a RHEL CIS hardened image and want SSH access to database nodes, you need to manually add the `yugabyte` user to `sshd_config`.
```sh
sudo sed -i '/^AllowUsers / s/$/ yugabyte/' /etc/ssh/sshd_config
sudo systemctl restart sshd
```
1. If the node is running SELinux and the home directory is not the default, set the correct SELinux ssh context, as follows:
```bash
chcon -R -t ssh_home_t
```
The rest of this document assumes a home of `/home/yugabyte`. If you set a custom path for home, change the path in the examples as appropriate.
1. Copy the SSH public key to each DB node. This public key should correspond to the private key entered into the YugabyteDB Anywhere provider.
1. Run the following commands as the `yugabyte` user, after copying the SSH public key file to the user home directory:
```sh
cd ~yugabyte
mkdir .ssh
chmod 700 .ssh
cat >> .ssh/authorized_keys
chmod 400 .ssh/authorized_keys
exit # (exit from the yugabyte user back to previous user)
```
1. Add the following lines to the `/etc/security/limits.conf` file (sudo is required):
```text
* - core unlimited
* - data unlimited
* - fsize unlimited
* - sigpending 119934
* - memlock 64
* - rss unlimited
* - nofile 1048576
* - msgqueue 819200
* - stack 8192
* - cpu unlimited
* - nproc 12000
* - locks unlimited
```
1. Modify the following line in the `/etc/security/limits.d/20-nproc.conf` file:
```text
* soft nproc 12000
```
1. Execute the following to tune kernel settings:
1. Configure the parameter `vm.swappiness` as follows:
```sh
sudo bash -c 'sysctl vm.swappiness=0 >> /etc/sysctl.conf'
sudo sysctl kernel.core_pattern=/home/yugabyte/cores/core_%p_%t_%E
```
1. Configure the parameter `vm.max_map_count` as follows:
```sh
sudo sysctl -w vm.max_map_count=262144
sudo bash -c 'sysctl vm.max_map_count=262144 >> /etc/sysctl.conf'
```
1. Validate the change as follows:
```sh
sysctl vm.max_map_count
```
1. Perform the following to prepare and mount the data volume (separate partition for database data):
- List the available storage volumes, as follows:
```sh
lsblk
```
- Perform the following steps for each available volume (all listed volumes other than the root volume):
```sh
sudo mkdir /data # (or /data1, /data2 etc)
sudo mkfs -t xfs /dev/nvme1n1 # (create xfs filesystem over entire volume)
sudo vi /etc/fstab
```
- Add the following line to `/etc/fstab`:
```text
/dev/nvme1n1 /data xfs noatime 0 0
```
- Exit from vi, and continue, as follows:
```sh
sudo mount -av # (mounts the new volume using the fstab entry, to validate)
sudo chown yugabyte:yugabyte /data
sudo chmod 755 /data
```
### Custom tmp directory for CIS hardened RHEL 8 or 9
For CIS hardened RHEL 8 or 9, if you use the default `/tmp` directory, prechecks fail when deploying universes with an access denied error.
To resolve this, create a custom `tmp` directory called `/new_tmp` on the database nodes:
```sh
sudo mkdir -p /new_tmp; sudo chown yugabyte:yugabyte -R /new_tmp
```
In addition, after you create the [on-premises provider](../../../configure-yugabyte-platform/on-premises-provider/), set the [provider runtime configuration](../../../administer-yugabyte-platform/manage-runtime-config/) flag `yb.filepaths.remoteTmpDirectory` to `/new_tmp`.
Finally, when creating universes using the provider, set YB-Master and YB-TServer [configuration flag](../../../manage-deployments/edit-config-flags/) `tmp_dir` to the custom `/new_tmp` directory.
## Install Prometheus Node Exporter
Download the Prometheus Node Exporter, as follows:
```sh
wget https://github.com/prometheus/node_exporter/releases/download/v1.7.0/node_exporter-1.7.0.linux-amd64.tar.gz
```
If you are doing an airgapped installation, download the Node Exporter using a computer connected to the internet and copy it over to the database nodes.
On each node, perform the following as a user with sudo access:
1. Copy the `node_exporter-1.7.0.linux-amd64.tar.gz` package file that you downloaded into the `/tmp` directory on each of the YugabyteDB nodes. Ensure that this file is readable by the user (for example, `ec2-user`).
1. Run the following commands:
```sh
sudo mkdir /opt/prometheus
sudo mkdir /etc/prometheus
sudo mkdir /var/log/prometheus
sudo mkdir /var/run/prometheus
sudo mkdir -p /tmp/yugabyte/metrics
sudo mv /tmp/node_exporter-1.7.0.linux-amd64.tar.gz /opt/prometheus
sudo adduser --shell /bin/bash prometheus # (also adds group "prometheus")
sudo chown -R prometheus:prometheus /opt/prometheus
sudo chown -R prometheus:prometheus /etc/prometheus
sudo chown -R prometheus:prometheus /var/log/prometheus
sudo chown -R prometheus:prometheus /var/run/prometheus
sudo chown -R yugabyte:yugabyte /tmp/yugabyte/metrics
sudo chmod -R 755 /tmp/yugabyte/metrics
sudo chmod +r /opt/prometheus/node_exporter-1.7.0.linux-amd64.tar.gz
sudo su - prometheus (user session is now as user "prometheus")
```
1. Run the following commands as user `prometheus`:
```sh
cd /opt/prometheus
tar zxf node_exporter-1.7.0.linux-amd64.tar.gz
exit # (exit from prometheus user back to previous user)
```
1. Edit the following file:
```sh
sudo vi /etc/systemd/system/node_exporter.service
```
Add the following to the `/etc/systemd/system/node_exporter.service` file:
```conf
[Unit]
Description=node_exporter - Exporter for machine metrics.
Documentation=https://github.com/William-Yeh/ansible-prometheus
After=network.target
[Install]
WantedBy=multi-user.target
[Service]
Type=simple
User=prometheus
Group=prometheus
ExecStart=/opt/prometheus/node_exporter-1.7.0.linux-amd64/node_exporter --web.listen-address=:9300 --collector.textfile.directory=/tmp/yugabyte/metrics
```
1. Exit from vi, and continue, as follows:
```sh
sudo systemctl daemon-reload
sudo systemctl enable node_exporter
sudo systemctl start node_exporter
```
1. Check the status of the `node_exporter` service with the following command:
```sh
sudo systemctl status node_exporter
```
## Enable yugabyte user processes to run after logout
To enable services to run even when the `yugabyte` user is not logged in, run the following command as the yugabyte user:
```sh
loginctl enable-linger yugabyte
```
Then add the following to `/home/yugabyte/.bashrc`:
```sh
export XDG_RUNTIME_DIR=/run/user/$(id -u yugabyte)
```
## Install systemd-related database service unit files
You can install systemd-specific database service unit files, as follows:
1. Create the directory `.config/systemd/user` in the yugabyte home directory. For example:
```sh
mkdir /home/yugabyte/.config/systemd/user
```
1. Add the following service and timer files to the `/.config/systemd/user` directory you created:
`yb-master.service`
```properties
[Unit]
Description=Yugabyte master service
Requires=network-online.target
After=network.target network-online.target multi-user.target
StartLimitInterval=100
StartLimitBurst=10
[Path]
PathExists=/home/yugabyte/master/bin/yb-master
PathExists=/home/yugabyte/master/conf/server.conf
[Service]
# Start
ExecStartPre=/home/yugabyte/bin/clock-sync.sh
ExecStart=/home/yugabyte/master/bin/yb-master --flagfile /home/yugabyte/master/conf/server.conf
Restart=on-failure
RestartSec=5
# Stop -> SIGTERM - 10s - SIGKILL (if not stopped) [matches existing cron behavior]
KillMode=process
TimeoutStopFailureMode=terminate
KillSignal=SIGTERM
TimeoutStopSec=10
FinalKillSignal=SIGKILL
# Logs
StandardOutput=syslog
StandardError=syslog
# ulimit
LimitCORE=infinity
LimitNOFILE=1048576
LimitNPROC=12000
[Install]
WantedBy=default.target
```
`yb-tserver.service`
```properties
[Unit]
Description=Yugabyte tserver service
Requires=network-online.target
After=network.target network-online.target multi-user.target
StartLimitInterval=100
StartLimitBurst=10
[Path]
PathExists=/home/yugabyte/tserver/bin/yb-tserver
PathExists=/home/yugabyte/tserver/conf/server.conf
[Service]
# Start
ExecStartPre=/home/yugabyte/bin/clock-sync.sh
ExecStart=/home/yugabyte/tserver/bin/yb-tserver --flagfile /home/yugabyte/tserver/conf/server.conf
Restart=on-failure
RestartSec=5
# Stop -> SIGTERM - 10s - SIGKILL (if not stopped) [matches existing cron behavior]
KillMode=process
TimeoutStopFailureMode=terminate
KillSignal=SIGTERM
TimeoutStopSec=10
FinalKillSignal=SIGKILL
# Logs
StandardOutput=syslog
StandardError=syslog
# ulimit
LimitCORE=infinity
LimitNOFILE=1048576
LimitNPROC=12000
[Install]
WantedBy=default.target
```
`yb-zip_purge_yb_logs.service`
```properties
[Unit]
Description=Yugabyte logs
Wants=yb-zip_purge_yb_logs.timer
[Service]
Type=oneshot
WorkingDirectory=/home/yugabyte/bin
ExecStart=/bin/sh /home/yugabyte/bin/zip_purge_yb_logs.sh
[Install]
WantedBy=multi-user.target
```
`yb-zip_purge_yb_logs.timer`
```properties
[Unit]
Description=Yugabyte logs
Requires=yb-zip_purge_yb_logs.service
[Timer]
Unit=yb-zip_purge_yb_logs.service
# Run hourly at minute 0 (beginning) of every hour
OnCalendar=00/1:00
[Install]
WantedBy=timers.target
```
`yb-clean_cores.service`
```properties
[Unit]
Description=Yugabyte clean cores
Wants=yb-clean_cores.timer
[Service]
Type=oneshot
WorkingDirectory=/home/yugabyte/bin
ExecStart=/bin/sh /home/yugabyte/bin/clean_cores.sh
[Install]
WantedBy=multi-user.target
```
`yb-controller.service`
```properties
[Unit]
Description=Yugabyte Controller
Requires=network-online.target
After=network.target network-online.target multi-user.target
StartLimitInterval=100
StartLimitBurst=10
[Path]
PathExists=/home/yugabyte/controller/bin/yb-controller-server
PathExists=/home/yugabyte/controller/conf/server.conf
[Service]
# Start
ExecStart=/home/yugabyte/controller/bin/yb-controller-server \
--flagfile /home/yugabyte/controller/conf/server.conf
Restart=always
RestartSec=5
# Stop -> SIGTERM - 10s - SIGKILL (if not stopped) [matches existing cron behavior]
KillMode=control-group
TimeoutStopFailureMode=terminate
KillSignal=SIGTERM
TimeoutStopSec=10
FinalKillSignal=SIGKILL
# Logs
StandardOutput=syslog
StandardError=syslog
# ulimit
LimitCORE=infinity
LimitNOFILE=1048576
LimitNPROC=12000
[Install]
WantedBy=default.target
```
`yb-clean_cores.timer`
```properties
[Unit]
Description=Yugabyte clean cores
Requires=yb-clean_cores.service
[Timer]
Unit=yb-clean_cores.service
# Run every 10 minutes offset by 5 (5, 15, 25...)
OnCalendar=*:0/10:30
[Install]
WantedBy=timers.target
```
`yb-collect_metrics.service`
```properties
[Unit]
Description=Yugabyte collect metrics
Wants=yb-collect_metrics.timer
[Service]
Type=oneshot
WorkingDirectory=/home/yugabyte/bin
ExecStart=/bin/bash /home/yugabyte/bin/collect_metrics_wrapper.sh
[Install]
WantedBy=multi-user.target
```
`yb-collect_metrics.timer`
```properties
[Unit]
Description=Yugabyte collect metrics
Requires=yb-collect_metrics.service
[Timer]
Unit=yb-collect_metrics.service
# Run every 1 minute
OnCalendar=*:0/1:0
[Install]
WantedBy=timers.target
```
`yb-bind_check.service`
```properties
[Unit]
Description=Yugabyte IP bind check
Requires=network-online.target
After=network.target network-online.target multi-user.target
Before=yb-controller.service yb-tserver.service yb-master.service yb-collect_metrics.timer
StartLimitInterval=100
StartLimitBurst=10
[Path]
PathExists=/home/yugabyte/controller/bin/yb-controller-server
PathExists=/home/yugabyte/controller/conf/server.conf
[Service]
# Start
ExecStart=/home/yugabyte/controller/bin/yb-controller-server \
--flagfile /home/yugabyte/controller/conf/server.conf \
--only_bind --logtostderr
Type=oneshot
KillMode=control-group
KillSignal=SIGTERM
TimeoutStopSec=10
# Logs
StandardOutput=syslog
StandardError=syslog
[Install]
WantedBy=default.target
```
### Ulimits on Red Hat Enterprise Linux 8
On Red Hat Enterprise Linux 8-based systems (Red Hat Enterprise Linux 8, Oracle Enterprise Linux 8.x, Amazon Linux 2), additionally, add the following line to `/etc/systemd/system.conf` and `/etc/systemd/user.conf`:
```sh
DefaultLimitNOFILE=1048576
```
You must reboot the system for these two settings to take effect.
## Install node agent
The YugabyteDB Anywhere node agent is used to manage communication between YugabyteDB Anywhere and the node. When node agent is installed, YugabyteDB Anywhere no longer requires SSH or sudo access to nodes. For more information, refer to [Node agent](/stable/faq/yugabyte-platform/#node-agent) FAQ.
(For legacy automatic and legacy assisted manual provisioning, node agents are installed onto instances automatically when adding instances.)
Use the following procedure to install node agent for fully manual provisioning.
To install the node agent manually, as the `yugabyte` user, do the following:
1. If you are re-provisioning the node (for example, you are [patching the Linux operating system](../../../manage-deployments/upgrade-nodes/), where node agent has previously been installed on the node), you need to [unregister the node agent](#unregister-node-agent) before installing node agent.
1. Download the installer using the YugabyteDB Anywhere [API token](../../../anywhere-automation/#authentication) of the Super Admin. Run the following command from your YugabyteDB nodes:
```sh
curl https:///api/v1/node_agents/download --fail --header 'X-AUTH-YW-API-TOKEN: ' > installer.sh && chmod +x installer.sh
```
To create an API token, navigate to your **User Profile** and click **Generate Key**.
1. Run the following command to download the node agent's `.tgz` file which installs and starts the interactive configuration:
```sh
./installer.sh -c install -u https:// -t
```
For example, if you run the following:
```sh
# To ignore verification of YBA certificate, add --skip_verify_cert.
./installer.sh -c install -u https://10.98.0.42 -t 301fc382-cf06-4a1b-b5ef-0c8c45273aef
```
You should get output similar to the following:
```output
* Starting YB Node Agent install
* Creating Node Agent Directory
* Changing directory to node agent
* Creating Sub Directories
* Downloading YB Node Agent build package
* Getting Linux/amd64 package
* Downloaded Version - 2.17.1.0-PRE_RELEASE
* Extracting the build package
* The current value of Node IP is not set; Enter new value or enter to skip: 10.9.198.2
* The current value of Node Name is not set; Enter new value or enter to skip: Test
* Select your Onprem Provider
1. Provider ID: 41ac964d-1db2-413e-a517-2a8d840ff5cd, Provider Name: onprem
Enter the option number: 1
* Select your Instance Type
1. Instance Code: c5.large
Enter the option number: 1
* Select your Region
1. Region ID: dc0298f6-21bf-4f90-b061-9c81ed30f79f, Region Code: us-west-2
Enter the option number: 1
* Select your Zone
1. Zone ID: 99c66b32-deb4-49be-85f9-c3ef3a6e04bc, Zone Name: us-west-2c
Enter the option number: 1
• Completed Node Agent Configuration
• Node Agent Registration Successful
You can install a systemd service on linux machines by running sudo node-agent-installer.sh -c install_service --user yugabyte (Requires sudo access).
```
1. Run the `install_service` command as a sudo user:
```sh
sudo node-agent-installer.sh -c install_service --user yugabyte
```
This installs node agent as a systemd service. This is required so that the node agent can perform self-upgrade, database installation and configuration, and other functions.
When the installation has been completed, the configurations are saved in the `config.yml` file located in the `node-agent/config/` directory. You should refrain from manually changing values in this file.
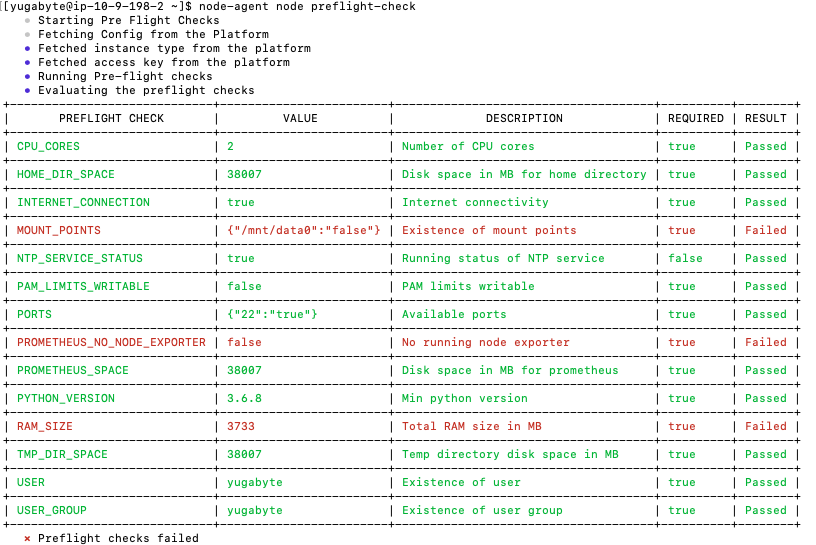
### Preflight check
After the node agent is installed, configured, and connected to YugabyteDB Anywhere, you can perform a series of preflight checks without sudo privileges by using the following command:
```sh
node-agent node preflight-check
```
The result of the check is forwarded to YugabyteDB Anywhere for validation. The validated information is posted in a tabular form on the terminal. If there is a failure against a required check, you can apply a fix and then rerun the preflight check.
Expect an output similar to the following:
If the preflight check is successful, you add the node to the provider (if required) by executing the following:
```sh
node-agent node preflight-check --add_node
```
### Reconfigure a node agent
If you want to use a node that has already been provisioned in a different provider, you can reconfigure the node agent.
To reconfigure a node for use in a different provider, do the following:
1. Remove the node instance from the provider using the following command:
```sh
node-agent node delete-instance
```
1. Run the `configure` command to start the interactive configuration. This also registers the node agent with YBA.
```sh
node-agent node configure -t -u https://
```
For example, if you run the following:
```sh
node-agent node configure -t 1ba391bc-b522-4c18-813e-71a0e76b060a -u https://10.98.0.42
```
```output
* The current value of Node Name is set to node1; Enter new value or enter to skip:
* The current value of Node IP is set to 10.9.82.61; Enter new value or enter to skip:
* Select your Onprem Manually Provisioned Provider.
1. Provider ID: b56d9395-1dda-47ae-864b-7df182d07fa7, Provider Name: onprem-provision-test1
* The current value is Provider ID: b56d9395-1dda-47ae-864b-7df182d07fa7, Provider Name: onprem-provision-test1.
Enter new option number or enter to skip:
* Select your Instance Type.
1. Instance Code: c5.large
* The current value is Instance Code: c5.large.
Enter new option number or enter to skip:
* Select your Region.
1. Region ID: 0a185358-3de0-41f2-b106-149be3bf07dd, Region Code: us-west-2
* The current value is Region ID: 0a185358-3de0-41f2-b106-149be3bf07dd, Region Code: us-west-2.
Enter new option number or enter to skip:
* Select your Zone.
1. Zone ID: c9904f64-a65b-41d3-9afb-a7249b2715d1, Zone Code: us-west-2a
* The current value is Zone ID: c9904f64-a65b-41d3-9afb-a7249b2715d1, Zone Code: us-west-2a.
Enter new option number or enter to skip:
• Completed Node Agent Configuration
• Node Agent Registration Successful
```
If you are running v2.18.5 or earlier, the node must be unregistered first. Use the following procedure:
1. If the node instance has been added to a provider, remove the node instance from the provider.
1. [Unregister node agent](#unregister-node-agent).
1. Stop the systemd service as a sudo user.
```sh
sudo systemctl stop yb-node-agent
```
1. Run the `configure` command to start the interactive configuration. This also registers the node agent with YBA.
```sh
node-agent node configure -t -u https://
```
1. Start the Systemd service as a sudo user.
```sh
sudo systemctl start yb-node-agent
```
1. Verify that the service is up.
```sh
sudo systemctl status yb-node-agent
```
1. Run preflight checks and add the node as `yugabyte` user.
```sh
node-agent node preflight-check --add_node
```
### Unregister node agent
When performing some tasks, you may need to unregister the node agent from a node.
To unregister node agent, run the following command:
```sh
node-agent node unregister
```
After running this command, YBA no longer recognizes the node agent.
If the node agent configuration is corrupted, the command may fail. In this case, unregister the node agent using the API as follows:
- Obtain the node agent ID:
```sh
curl -k --header 'X-AUTH-YW-API-TOKEN:' https:///api/v1/customers//node_agents?nodeIp=
```
You should see output similar to the following:
```output.json
[{
"uuid":"ec7654b1-cf5c-4a3b-aee3-b5e240313ed2",
"name":"node1",
"ip":"10.9.82.61",
"port":9070,
"customerUuid":"f33e3c9b-75ab-4c30-80ad-cba85646ea39",
"version":"2.18.6.0-PRE_RELEASE",
"state":"READY",
"updatedAt":"2023-12-19T23:56:43Z",
"config":{
"certPath":"/opt/yugaware/node-agent/certs/f33e3c9b-75ab-4c30-80ad-cba85646ea39/ec7654b1-cf5c-4a3b-aee3-b5e240313ed2/0",
"offloadable":false
},
"osType":"LINUX",
"archType":"AMD64",
"home":"/home/yugabyte/node-agent",
"versionMatched":true,
"reachable":false
}]
```
- Use the value of the field `uuid` as `` in the following command:
```sh
curl -k -X DELETE --header 'X-AUTH-YW-API-TOKEN:' https:///api/v1/customers//node_agents/
```