Before you can deploy universes to Kubernetes using YugabyteDB Anywhere (YBA), you must create a provider configuration.
## Prerequisites
To deploy YugabyteDB universes on Kubernetes, you need to provide your Kubernetes provider credentials. YBA uses those credentials to automatically provision and de-provision the pods that run YugabyteDB.
Before you create a Kubernetes provider, perform the following:
- Create a `yugabyte-platform-universe-management` service account.
- Create a `kubeconfig` file of the service account you created to configure access to the Kubernetes cluster.
See [To deploy nodes](../../prepare/cloud-permissions/cloud-permissions-nodes/).
## Configure Kubernetes
Navigate to **Integrations > Infrastructure > Managed Kubernetes Service** to see a list of all currently configured Kubernetes providers.
### View and edit providers
To view a provider, select it in the list of Managed Kubernetes Service Configs to display the **Overview**.
To edit the provider, select **Config Details**, make changes, and click **Apply Changes**. For more information, refer to [Provider settings](#provider-settings). Note that, depending on whether the provider has been used to create a universe, you can only edit a subset of options.
To view the universes created using the provider, select **Universes**.
To delete the provider, click **Actions** and choose **Delete Configuration**. You can only delete providers that are not in use by a universe.
### Create a provider
To create a Kubernetes provider:
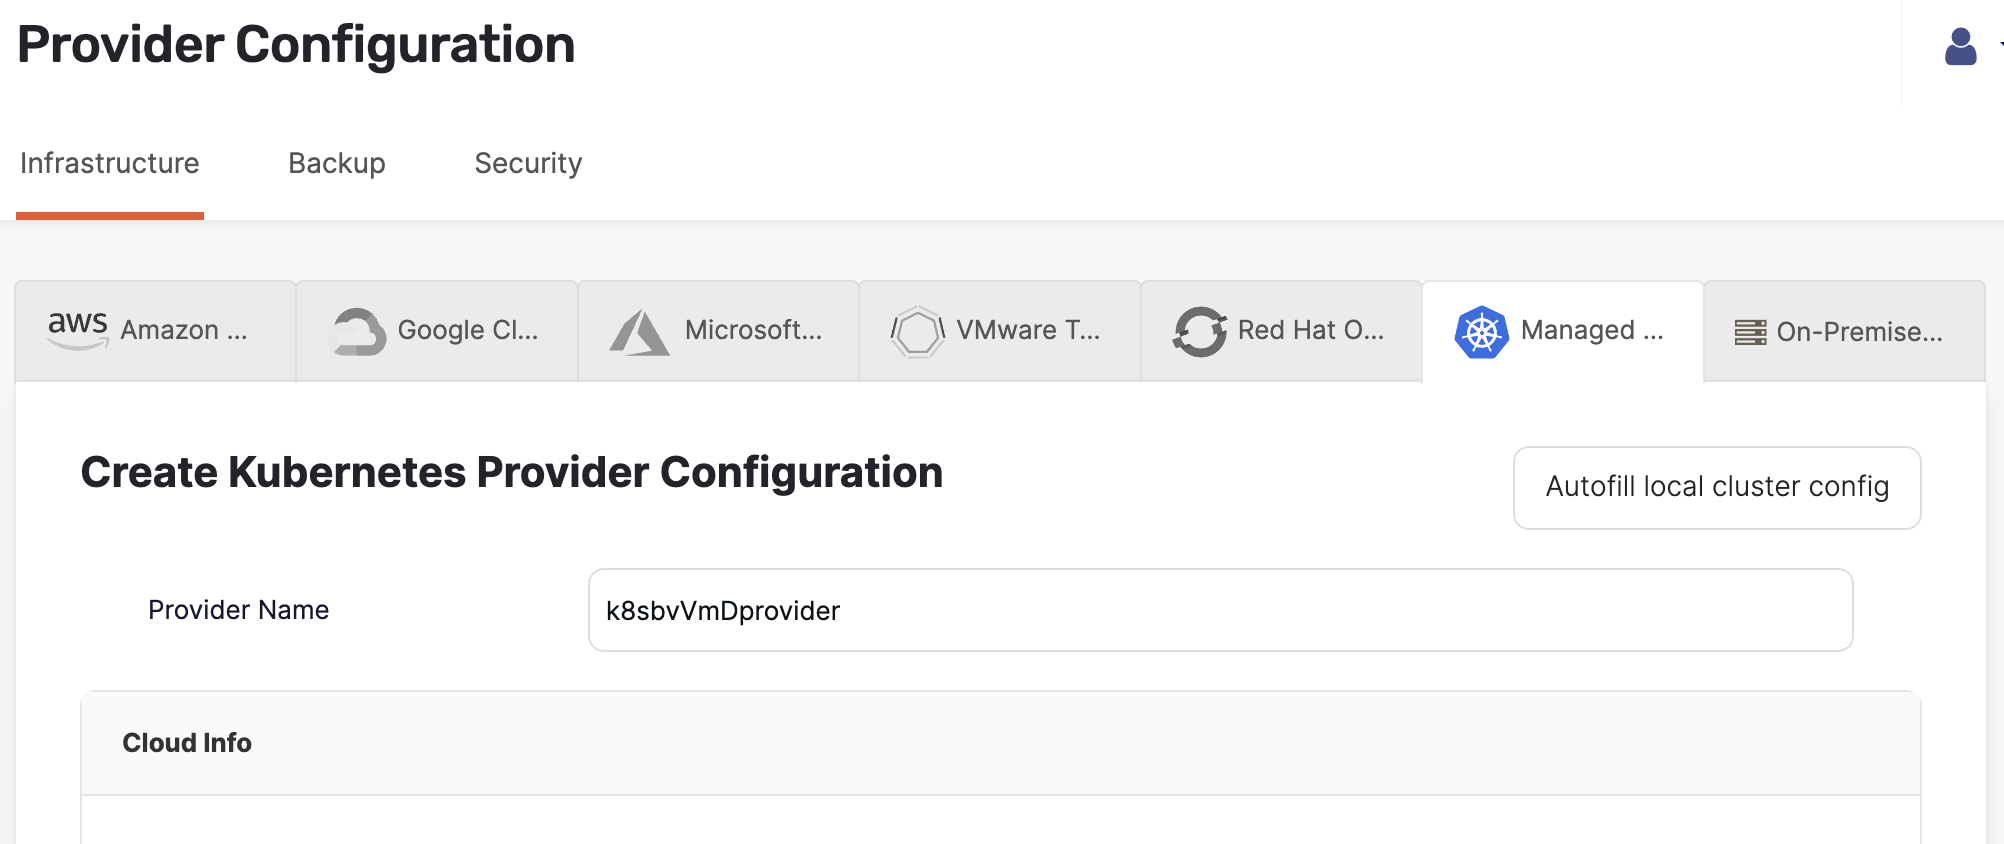
1. Click **Create Config** to open the **Create Kubernetes Provider Configuration** page.
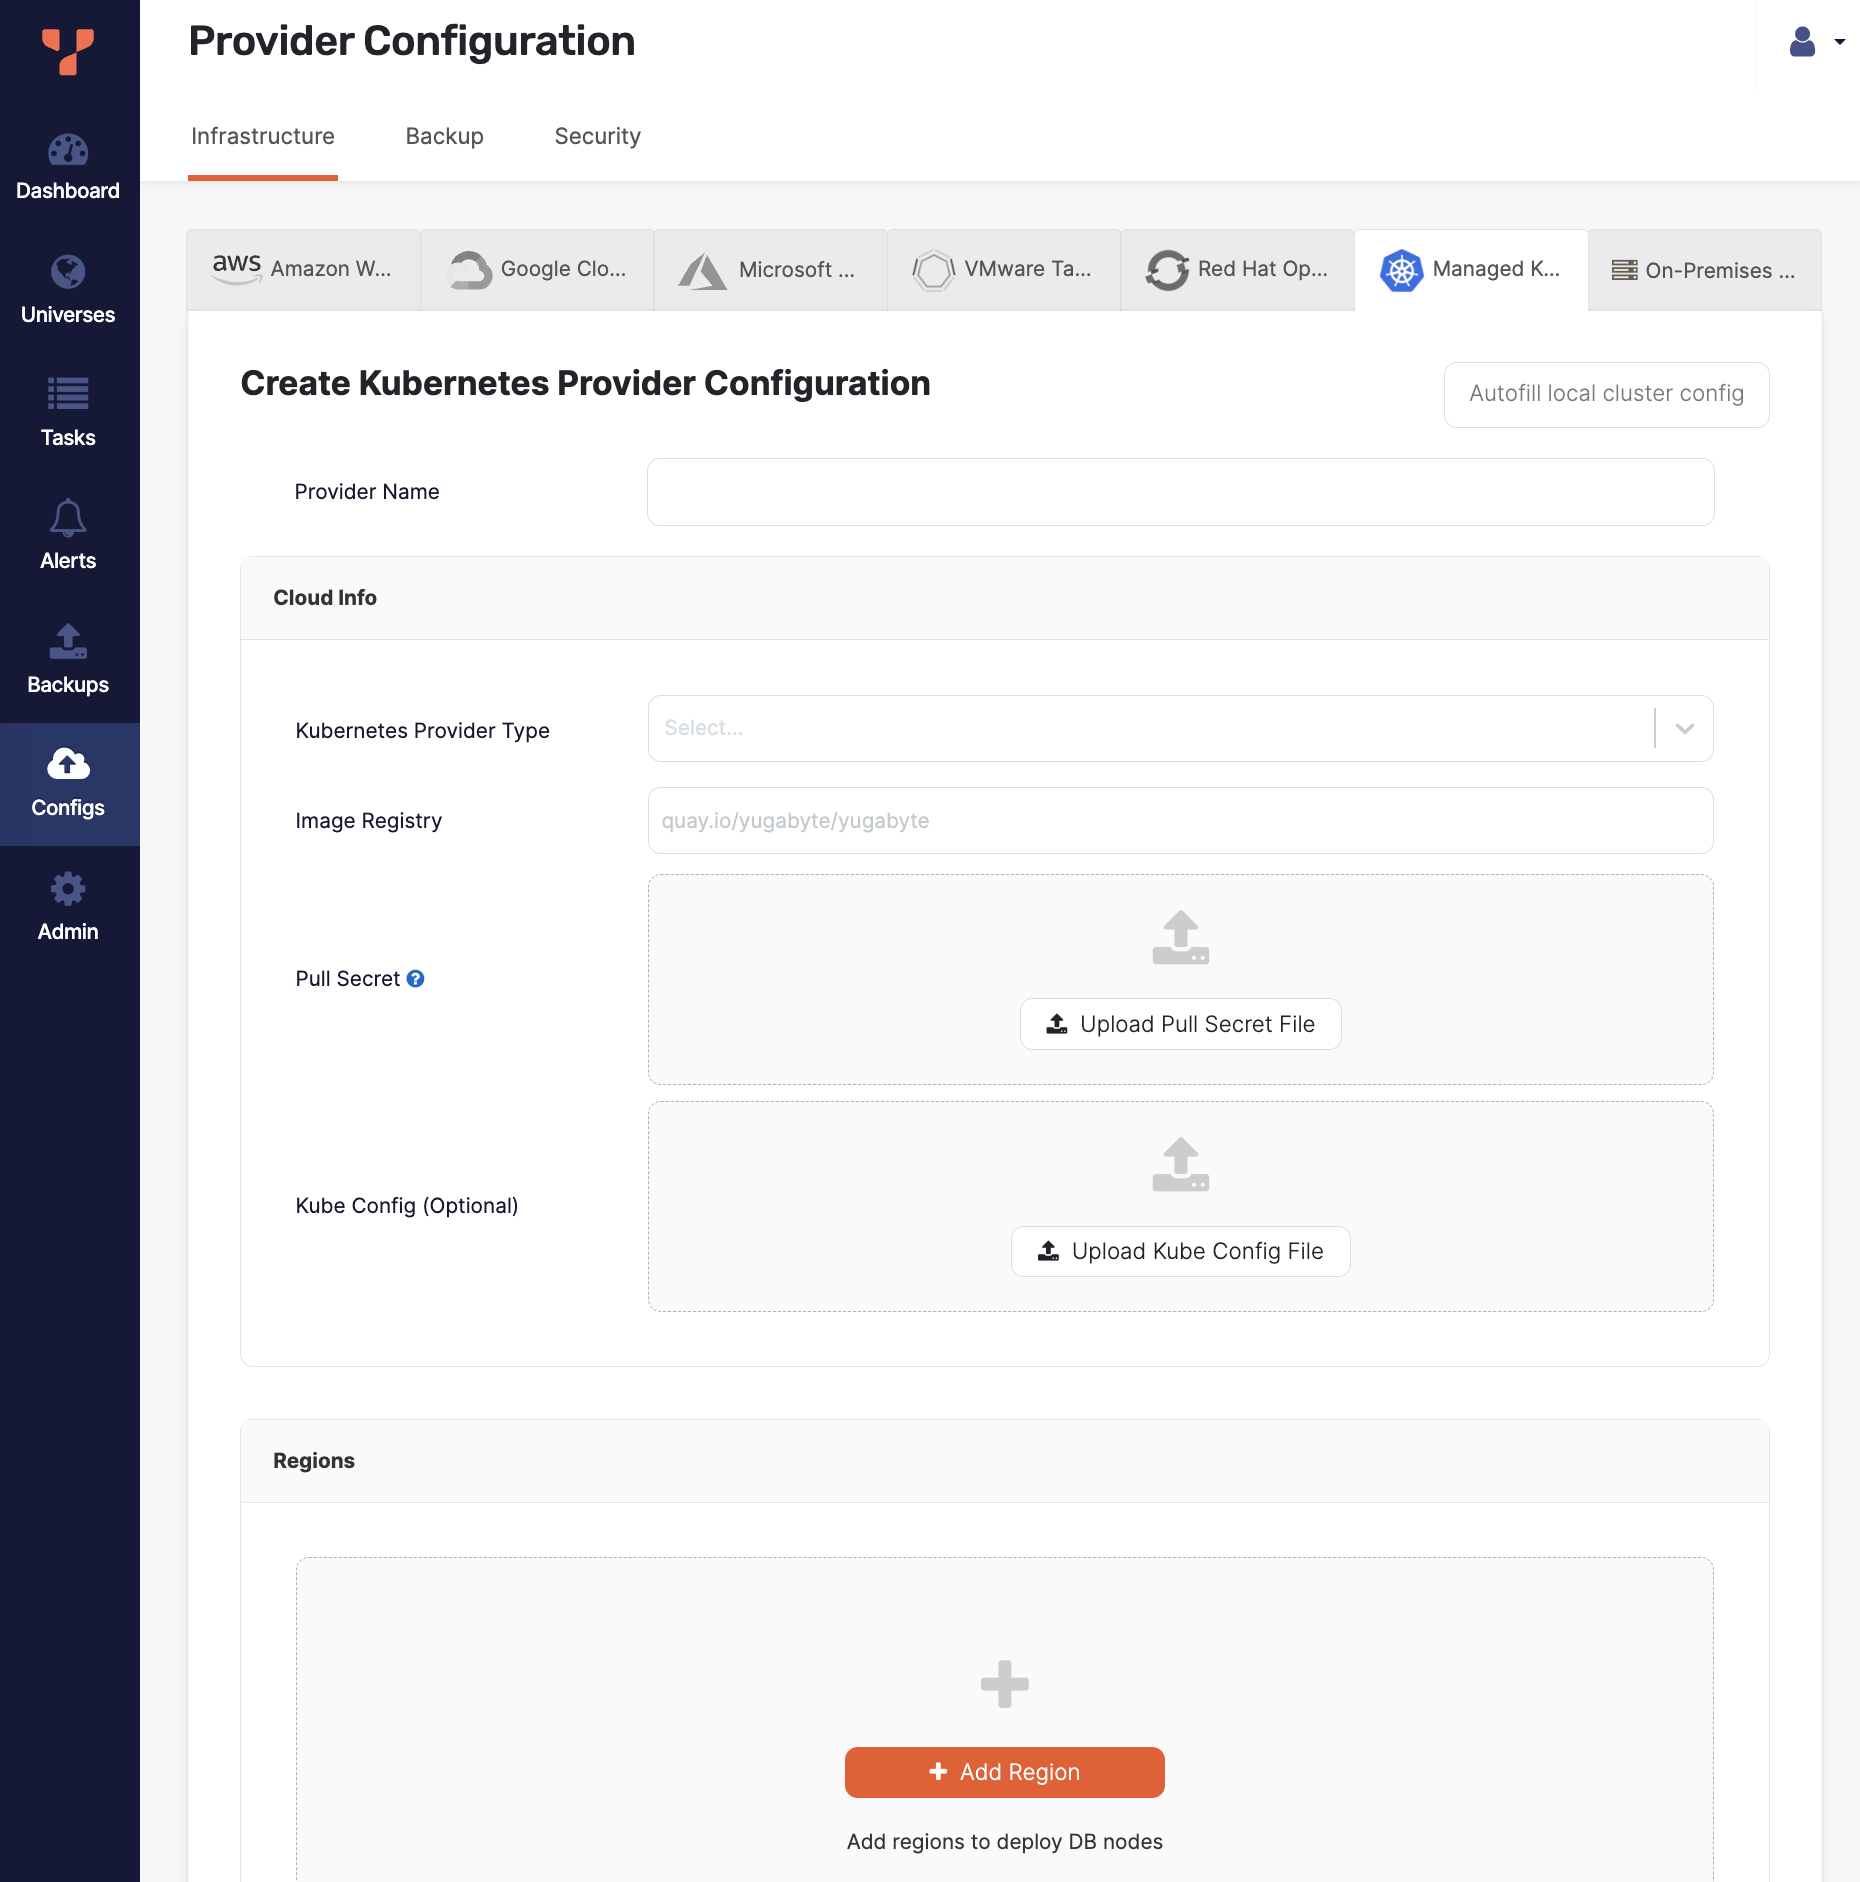
1. Enter the provider details. Refer to [Provider settings](#provider-settings).
To fill the provider configuration values using the configuration of the same Kubernetes cluster that your instance of YBA is installed on, click **Autofill local cluster config**.
1. Click **Validate and Save Configuration** when you are done and wait for the configuration to validate and complete.
If you want to save your progress, you can skip validation by choosing the **Ignore and save provider configuration anyway** option, which saves the provider configuration without validating. Note that you may not be able to create universes using an incomplete or unvalidated provider.
## Provider settings
### Provider Name
Enter a Provider name. The Provider name is an internal tag used for organizing cloud providers.
### Cloud Info
Choose the **Kubernetes Provider Type**.
In the **Image Registry** field, specify from where to pull the YugabyteDB image. Accept the default setting, unless you are hosting the registry, in which case refer to steps described in [Pull and push YugabyteDB Docker images to private container registry](../../prepare/server-nodes-software/software-kubernetes/#pull-and-push-yugabytedb-docker-images-to-private-container-registry).
Use **Pull Secret** to upload the pull secret to download the image of the Enterprise YugabyteDB that is in a private repository. Your Yugabyte sales representative should have provided this secret.
Use **Kube Config** to upload the `kubeconfig` file. If specified, this configuration file is used for all availability zones in all regions.
Alternately, you can define separate `kubeconfig` files for each zone when defining the regions. See [Configure region and zones](#configure-region-and-zones).
### Configure region and zones
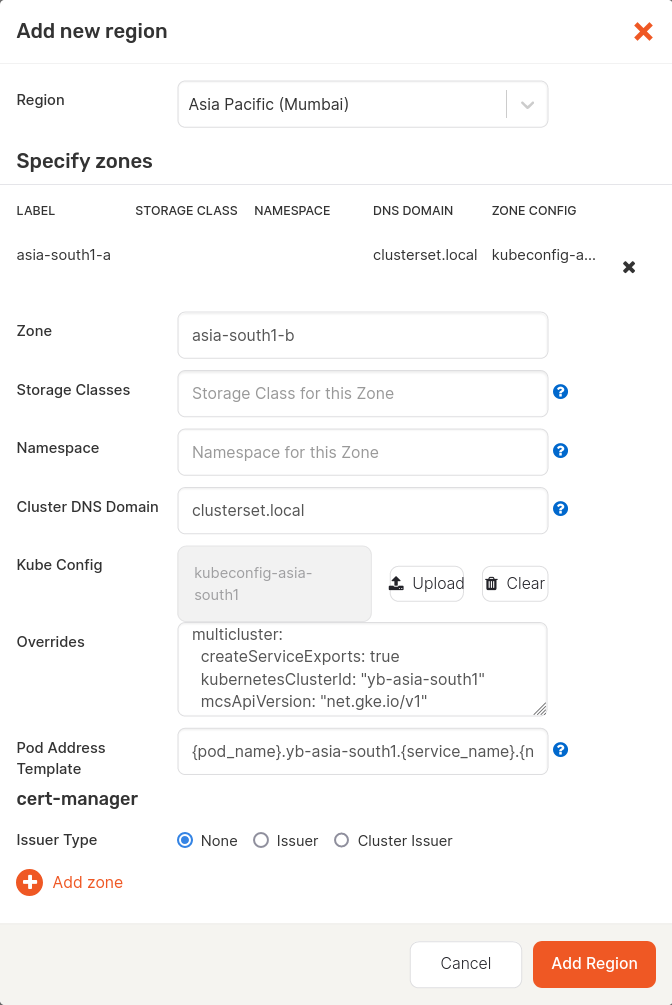
Continue configuring your Kubernetes provider by clicking **Add region** and completing the **Add new region** dialog as follows:
1. Use the **Region** field to select the region.
1. Click **Add Zone** and complete the corresponding portion of the dialog. Notice that there are might be multiple zones.
1. Use the **Zone Code** field to select a zone label that should match the value of failure domain zone label on the nodes. For example, `topology.kubernetes.io/zone` would place the pods in that zone.
1. Optionally, use **Kube Config** to upload the `kubeconfig` file. If this file is available at the provider level, you are not required to supply it.
1. Optionally, use the **Storage Classes** field to enter a comma-delimited value. If you do not specify this value, it would default to standard. You need to ensure that this storage class exists in your Kubernetes cluster. Refer to [Hardware requirements for pods](../../prepare/server-nodes-hardware/).
1. Optionally, use the **Kube Pod Address Template** field to enter the pod address template.
1. Optionally, in the **Kube Domain** field, provide the DNS domain name used in the Kubernetes cluster.
1. Use the **Kube Namespace** field to specify the namespace. If the provided service account has the `Cluster Admin` permissions, you are not required to complete this field. The service account used in the provided `kubeconfig` file should have access to this namespace.
1. Complete the **Overrides** field using one of the provided [options](#overrides). If you do not specify anything, YBA uses defaults specified inside the Helm chart. For additional information, see [Open source Kubernetes](../../../deploy/kubernetes/single-zone/oss/helm-chart/).
1. If you are using [Kubernetes cert-manager](https://cert-manager.io) to manage TLS certificates, specify the issuer kind, enter the issuer name, and optionally provide the issuer group. For more information, refer to [Add certificates](../../security/enable-encryption-in-transit/add-certificate-kubernetes/).
If required, add a new zone by clicking **Add Zone**, as your configuration may have multiple zones.
Click **Add Region** when you are done.
## Overrides
You can enter the following overrides.
### Service-level annotations
Overrides to add service-level annotations:
```yml
serviceEndpoints:
- name: "yb-master-service"
type: "LoadBalancer"
annotations:
service.beta.kubernetes.io/aws-load-balancer-internal: "0.0.0.0/0"
app: "yb-master"
ports:
ui: "7000"
- name: "yb-tserver-service"
type: "LoadBalancer"
annotations:
service.beta.kubernetes.io/aws-load-balancer-internal: "0.0.0.0/0"
app: "yb-tserver"
ports:
ycql-port: "9042"
ysql-port: "5433"
```
### Load balancer
Override to disable LoadBalancer:
```yml
enableLoadBalancer: False
```
### Domain name
Override to change the cluster domain name:
```yml
domainName: my.cluster
```
YugabyteDB servers and other components communicate with each other using the Kubernetes Fully Qualified Domain Names (FQDN). The default domain is `cluster.local`.
### StatefulSet
Overrides to add annotations at StatefulSet level:
```yml
networkAnnotation:
annotation1: 'foo'
annotation2: 'bar'
```
### Resource allocation
Overrides to add custom resource allocation for YB-Master and YB-TServer pods:
```yml
resource:
master:
requests:
cpu: 2
memory: 2Gi
limits:
cpu: 2
memory: 2Gi
tserver:
requests:
cpu: 2
memory: 4Gi
limits:
cpu: 2
memory: 4Gi
```
This overrides instance types selected in the YBA universe creation flow.
### Istio
Overrides to enable Istio compatibility:
```yml
istioCompatibility:
enabled: true
```
This is required when Istio is used with Kubernetes.
### Server broadcast address
Overrides to publish node IP as the server broadcast address.
By default, YB-Master and YB-TServer pod fully-qualified domain names (FQDN) are used in the cluster as the server broadcast address. To publish the IP addresses of the nodes on which YB-TServer pods are deployed, add the following YAML to each zone override configuration:
```yml
tserver:
extraEnv:
- name: NODE_IP
valueFrom:
fieldRef:
fieldPath: status.hostIP
serverBroadcastAddress: "${NODE_IP}"
affinity:
podAntiAffinity:
requiredDuringSchedulingIgnoredDuringExecution:
- labelSelector:
matchExpressions:
- key: app
operator: In
values:
- "yb-tserver"
topologyKey: kubernetes.io/hostname
# Required to esure that the Kubernetes FQDNs are used for
# internal communication between the nodes and node-to-node
# TLS certificates are validated correctly
gflags:
master:
use_private_ip: cloud
tserver:
use_private_ip: cloud
serviceEndpoints:
- name: "yb-master-ui"
type: LoadBalancer
app: "yb-master"
ports:
http-ui: "7000"
- name: "yb-tserver-service"
type: NodePort
externalTrafficPolicy: "Local"
app: "yb-tserver"
ports:
tcp-yql-port: "9042"
tcp-ysql-port: "5433"
```
### Run as non-root
Overrides to run YugabyteDB as a non-root user:
```yml
podSecurityContext:
enabled: true
## Set to false to stop the non-root user validation
runAsNonRoot: true
fsGroup: 10001
runAsUser: 10001
runAsGroup: 10001
```
Note that you cannot change users during the Helm upgrades.
### Tolerations
Overrides to add `tolerations` in YB-Master and YB-TServer pods:
```yml
## Consider the node has the following taint:
## kubectl taint nodes node1 dedicated=experimental:NoSchedule-
master:
tolerations:
- key: dedicated
operator: Equal
value: experimental
effect: NoSchedule
tserver:
tolerations: []
```
Tolerations work in combination with taints: taints are applied on nodes and tolerations are applied to pods. Taints and tolerations ensure that pods do not schedule onto inappropriate nodes. You need to set `nodeSelector` to schedule YugabyteDB pods onto specific nodes, and then use taints and tolerations to prevent other pods from getting scheduled on the dedicated nodes, if required. For more information, see [Tolerations](../../install-yugabyte-platform/install-software/kubernetes/#tolerations) and [Toleration API](https://kubernetes.io/docs/reference/generated/kubernetes-api/v1.24/#toleration-v1-core).
### nodeSelector
Overrides to use `nodeSelector` to schedule YB-Master and YB-TServer pods on dedicated nodes:
```yml
## To schedule a pod on a node that has a topology.kubernetes.io/zone=asia-south2-a label
nodeSelector:
topology.kubernetes.io/zone: asia-south2-a
```
For more information, see [nodeSelector](../../install-yugabyte-platform/install-software/kubernetes/#nodeselector), and [Kubernetes: Node Selector](https://kubernetes.io/docs/concepts/scheduling-eviction/assign-pod-node/#nodeselector) in the Kubernetes documentation.
### Affinity
Overrides to add `affinity` in YB-Master and YB-TServer pods:
```yml
## To prevent scheduling of multiple master pods on single kubernetes node
master:
affinity:
podAntiAffinity:
requiredDuringSchedulingIgnoredDuringExecution:
- labelSelector:
matchExpressions:
- key: app
operator: In
values:
- "yb-master"
topologyKey: kubernetes.io/hostname
tserver:
affinity: {}
```
Affinity allows the Kubernetes scheduler to place a pod on a set of nodes or a pod relative to the placement of other pods. You can use `nodeAffinity` rules to control pod placements on a set of nodes. In contrast, `podAffinity` or `podAntiAffinity` rules provide the ability to control pod placements relative to other pods. For more information, see [Affinity API](https://kubernetes.io/docs/reference/generated/kubernetes-api/v1.27/#affinity-v1-core) in the Kubernetes documentation.
### Annotations
Overrides to add `annotations` to YB-Master and YB-TServer pods:
```yml
master:
podAnnotations:
application: "yugabytedb"
tserver:
podAnnotations: {}
```
The Kubernetes `annotations` can attach arbitrary metadata to objects. For more information, see [Annotations](https://kubernetes.io/docs/concepts/overview/working-with-objects/annotations/) in the Kubernetes documentation.
### Labels
Overrides to add `labels` to YB-Master and YB-TServer pods:
```yml
master:
podLabels:
environment: production
app: yugabytedb
prometheus.io/scrape: true
tserver:
podLabels: {}
```
The Kubernetes `labels` are key-value pairs attached to objects. The `labels` are used to specify identifying attributes of objects that are meaningful and relevant to you. For more information, see [Labels](https://kubernetes.io/docs/concepts/overview/working-with-objects/labels/) in the Kubernetes documentation.
### Use common name with cert-manager
If your certificate issuer (for example, for `aws-privateca-issuer`) requires the certificate to include the common name, set the following override:
```yml
tls:
certManager:
certificates:
commonNameRequired: true
```
### Preflight check
Preflight check overrides, such as DNS address resolution, disk IO, available port, ulimit:
```yml
## Default values
preflight:
## Set to true to skip disk IO check, DNS address resolution, port bind checks
skipAll: false
## Set to true to skip port bind checks
skipBind: false
## Set to true to skip ulimit verification
## SkipAll has higher priority
skipUlimit: false
```
For more information, see [Helm chart: Prerequisites](../../../deploy/kubernetes/single-zone/oss/helm-chart/#prerequisites).
### LDAP secret
Overrides to use a secret for LDAP authentication. Refer to [Create secrets for Kubernetes](../../../secure/authentication/ldap-authentication-ysql/#create-secrets-for-kubernetes).
## Configure Kubernetes multi-cluster environment
If you plan to create multi-region YugabyteDB universes, you can set up [Multi-Cluster Services](https://git.k8s.io/enhancements/keps/sig-multicluster/1645-multi-cluster-services-api) (MCS) across your Kubernetes clusters. This section covers implementation specific details for setting up MCS on various cloud providers and service mesh tools.
{{< warning title="YBA support for MCS is in Early Access" >}}
The Kubernetes MCS API is currently in alpha, though there are various implementations of MCS which are [considered to be stable](https://github.com/kubernetes-sigs/mcs-api/issues/17#issuecomment-1309073682). To know more, see [API versioning](https://kubernetes.io/docs/reference/using-api/#api-versioning) in the Kubernetes documentation.
MCS support in YBA is currently in [Early Access](/stable/releases/versioning/#feature-maturity). Keep in mind following caveats:
- Universe metrics may not display correct metrics for all the pods.
- xCluster replication needs an additional manual step to work on OpenShift MCS.
- {{% support-platform %}} assistance is needed for upgrades.
{{< /warning >}}
### Prepare Kubernetes clusters for GKE MCS
GKE MCS allows clusters to be combined as a fleet on Google Cloud. These fleet clusters can export services, which enables you to do cross-cluster communication. For more information, see [Multi-cluster Services](https://cloud.google.com/kubernetes-engine/docs/concepts/multi-cluster-services) in the Google Cloud documentation.
To enable MCS on your GKE clusters, see [Configuring multi-cluster Services](https://cloud.google.com/kubernetes-engine/docs/how-to/multi-cluster-services). Note down the unique membership name of each cluster in the fleet, it will be used during the cloud provider setup in YBA.
### Prepare OpenShift clusters for MCS
Red Hat OpenShift Container Platform uses the Advanced Cluster Management for Kubernetes (RHACM) and its Submariner add-on to enable MCS. At a very high level this involves following steps:
1. Create a management cluster and install RHACM on it. For details, see [Installing Red Hat Advanced Cluster Management for Kubernetes](https://access.redhat.com/documentation/en-us/red_hat_advanced_cluster_management_for_kubernetes/2.7/html/install/installing) in the Red Hat documentation.
1. Provision the OpenShift clusters which will be connected together.
Ensure that the CIDRs mentioned in the cluster configuration file at `networking.clusterNetwork`, `networking.serviceNetwork`, and `networking.machineNetwork` are non-overlapping across the multiple clusters. You can find more details about these options in provider-specific sections under the [OpenShift Container Platform installation overview](https://docs.openshift.com/container-platform/4.11/installing/index.html) (look for sections named "Installing a cluster on [provider name] with customizations").
1. Import the clusters into RHACM as a cluster set, and install the Submariner add-on on them. For more information, see [Configuring Submariner](https://access.redhat.com/documentation/en-us/red_hat_advanced_cluster_management_for_kubernetes/2.7/html/add-ons/add-ons-overview#configuring-submariner).
1. Note down the cluster names from the cluster set, as these will be used during the cloud provider setup in YBA.
### Prepare Kubernetes clusters for Istio multicluster
An Istio service mesh can span multiple clusters, which allows you to configure MCS. It supports different topologies and network configurations. To install an Istio mesh across multiple Kubernetes clusters, see [Install Multicluster](https://istio.io/latest/docs/setup/install/multicluster/) in the Istio documentation.
The Istio configuration for each cluster should have following options:
```yaml
apiVersion: install.istio.io/v1alpha1
kind: IstioOperator
spec:
meshConfig:
defaultConfig:
proxyMetadata:
ISTIO_META_DNS_CAPTURE: "true"
ISTIO_META_DNS_AUTO_ALLOCATE: "true"
# rest of the configuration…
```
Note that any change to the Istio configuration requires a restart of the YugabyteDB Anywhere pod.
Refer to [Multi-Region YugabyteDB Deployments on Kubernetes with Istio](https://www.yugabyte.com/blog/multi-region-yugabytedb-deployments-on-kubernetes-with-istio/) for a step-by-step guide and an explanation of the options being used.
### Configure the provider configuration for MCS
After you have the cluster set up, follow the instructions in [Create a provider](#create-a-provider), and refer to this section for region and zone configuration required for multi-region universes.
#### Configure region and zone for GKE MCS
Follow the steps in [Configure region and zones](#configure-region-and-zones) and set values for all the zones from your Kubernetes clusters connected via GKE MCS as follows:
1. Specify fields such as Region, Zone, and so on as you would normally.
1. Set the **Cluster DNS Domain** to `clusterset.local`.
1. Upload the correct **Kube Config** of the cluster.
1. Set the **Pod Address Template** to `{pod_name}..{service_name}.{namespace}.svc.{cluster_domain}`, where the `` is the membership name of the Kubernetes cluster set during the fleet setup.
1. Set the **Overrides** as follows:
```yaml
multicluster:
createServiceExports: true
kubernetesClusterId: ""
mcsApiVersion: "net.gke.io/v1"
```
For example, if your cluster membership name is `yb-asia-south1`, then the **Add new region** screen would look as follows:
#### Configure region and zones for OpenShift MCS
Follow the instructions in [Create OpenShift provider configuration](../openshift/) and [Create a provider](#create-a-provider). For all the zones from your OpenShift clusters connected via MCS (Submariner), add a region as follows:
1. Specify fields such as Region, Zone, and so on as you would normally.
1. Set the **Cluster DNS Domain** to `clusterset.local`.
1. Upload the correct **Kube Config** of the cluster.
1. Set the **Pod Address Template** to `{pod_name}..{service_name}.{namespace}.svc.{cluster_domain}`, where the `` is the name of the OpenShift cluster set during the cluster set creation.
1. Set the **Overrides** as follows:
```yaml
multicluster:
createServiceExports: true
kubernetesClusterId: ""
```
For example, if your cluster name is `yb-asia-south1`, then the values will be as follows:
- **Pod Address Template**
`{pod_name}.yb-asia-south1.{service_name}.{namespace}.svc.{cluster_domain}`
- **Overrides**
```yaml
multicluster:
createServiceExports: true
kubernetesClusterId: "yb-asia-south1"
```
#### Configure region and zones for Istio
Follow the steps in [Configure region and zones](#configure-region-and-zones) and set values for all the zones from your Kubernetes clusters connected via Istio as follows.
1. Specify fields such as Region, Zone, and so on as you would normally.
1. Upload the correct **Kube Config** of the cluster.
1. Set the **Pod Address Template** to `{pod_name}.{namespace}.svc.{cluster_domain}`.
1. Set the **Overrides** as follows:
```yaml
istioCompatibility:
enabled: true
multicluster:
createServicePerPod: true
```