Connect your cluster to an application VPC via Azure Private Link.
To use Azure Private Link, you need the following:
- An Azure user account with an active subscription.
- The subscription ID of the service to which to grant access to the cluster endpoint.
To find your subscription, follow the instructions in [Find your Azure subscription](https://learn.microsoft.com/en-us/azure/azure-portal/get-subscription-tenant-id#find-your-azure-subscription).
Make sure that default security group in your application Azure Virtual Network (VNet) allows internal connectivity. Otherwise, your application may not be able to reach the endpoint.
To use Azure Private Link to connect your cluster to an Azure VNet that hosts your application, first create a private service endpoint (PSE) on your cluster, then create a corresponding private endpoint in Azure.
## Create a PSE in YugabyteDB Aeon
You create the PSEs (one for each region) for your cluster on the cluster **Settings** tab, or using [ybm CLI](../../../managed-automation/managed-cli/).
### Use YugabyteDB Aeon
To create or edit a PSE, do the following:
1. Select your cluster.
1. Navigate to **Settings > Network Access > Private Service Endpoint**.
1. Click **Create Private Service Endpoint** or, to edit an existing PSE, **Edit Private Service Endpoint** to display the **Edit Private Service Endpoint** sheet.
1. For each region in your cluster, provide an Azure Subscription ID you want to grant access.
1. Click **Save**.
The endpoints are displayed with the following values:
- **Host** - The host name of the PSE. You will use this to [connect to your cluster](../../../cloud-connect/connect-applications/). The host name of a PSE for Azure always ends in `azure.yugabyte.cloud`.
- **Service Name** - The Service Name is also referred to as an alias in Azure. You will use this name when creating the private endpoint in Azure.
### Use ybm CLI
To create a PSE, do the following:
1. Enter the following command:
```sh
ybm cluster network endpoint create \
--cluster-name \
--region \
--accessibility-type PRIVATE_SERVICE_ENDPOINT \
--security-principals
```
Replace values as follows:
- `yugabytedb_cluster` - name of your cluster.
- `cluster_region` - cluster region where you want to place the PSE. Must match one of the regions where your cluster is deployed (for example, `westus3`), and preferably match the region where your application is deployed.
- `azure_subscription_ids` - comma-separated list of the subscription IDs of Azure subscriptions that you want to grant access.
1. Note the endpoint ID in the response.
You can also display the PSE endpoint ID by entering the following command:
```sh
ybm cluster network endpoint list --cluster-name
```
This outputs the IDs of all the cluster endpoints.
1. After the endpoint becomes ACTIVE, display the service name of the PSE by entering the following command:
```sh
ybm cluster network endpoint describe --cluster-name --endpoint-id
```
Note the following values:
- **Host** - The host name of the PSE. You will use this to [connect to your cluster](../../../cloud-connect/connect-applications/). The host name of a PSE for Azure always ends in `azure.yugabyte.cloud`.
- **Service Name** - The Service Name is also referred to as an alias in Azure. You will use this service name when creating the private endpoint in Azure.
To delete a PSE, enter the following command:
```sh
ybm cluster network endpoint delete \
--cluster-name \
--endpoint-id
```
## Create a private endpoint in Azure
You can create the private endpoint using the [Azure Portal](https://portal.azure.com/) or from the command line using the [Azure CLI](https://learn.microsoft.com/en-us/cli/azure/).
### Use the Azure Portal
#### Create the private endpoint
To create a private endpoint to connect to your cluster PSE, do the following:
1. In the [Azure Portal](https://portal.azure.com/), under the **Azure services** heading, select **Private endpoints**. If you don't see Private endpoints, use the search box to find it.
1. On the **Private endpoints** page, click **+ Create** to display the **Create a private endpoint** wizard.
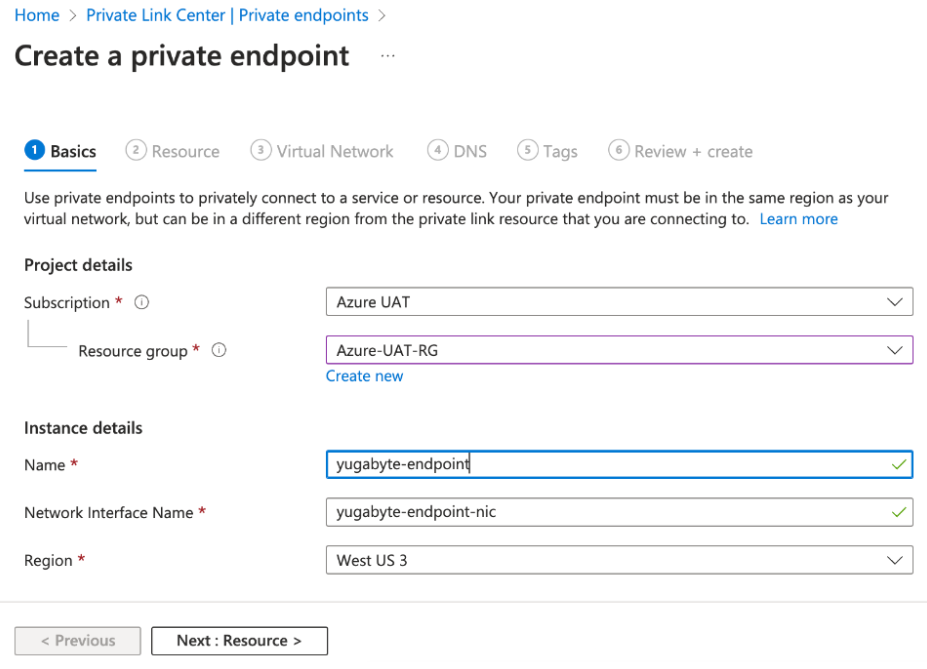
1. On the **Basics** page, provide the following details:
- **Subscription** - select your subscription.
- **Resource group** - select the resource group in which the private endpoint was created.
- **Name** - enter a name for the endpoint.
- **Network interface name** - enter a network interface name for the endpoint.
- **Region** - select the region for the endpoint. This should be the same region where your application resides.
1. Click **Next: Resource** and set the following values:
- **Connection method** - select **Connect to an Azure resource by resource ID or alias**.
- **Resource ID or alias** - enter the Service Name (noted when you [created the PSE](#create-a-pse-in-yugabytedb-aeon)) of the PSE you created for your cluster.
1. Click **Next: Virtual Network** and set the following values:
- Select the Azure virtual network and subnet where your application resides.
1. Click **Next: DNS**, **Next: Tags**, and **Next Review + create >**.
You don't need to provide any values on the **DNS** page; **Tags** are optional.
1. Review the details and click **Create** to create the private endpoint.
The endpoint will take a minute or two to deploy. When complete, the Connection State will be _Approved_.
1. To verify the status of the endpoint, navigate to **Private endpoints** under the **Azure services** heading.

1. Note the **Private IP** address of the endpoint for use in the following steps.
#### Create a private DNS zone
To be able to connect to your cluster using DNS (rather than the bare IP address), you must create a private DNS zone in the same resource group, link the private DNS zone to the VNet containing the private endpoint, and add an A record pointing to the private IP address of the private endpoint.
To create a private DNS zone:
1. In the [Azure Portal](https://portal.azure.com/), under the **Azure services** heading, select **Private DNS zones**.
1. On the **Private DNS zones** page, click **+ Create** to display the **Create Private DNS zone** wizard.
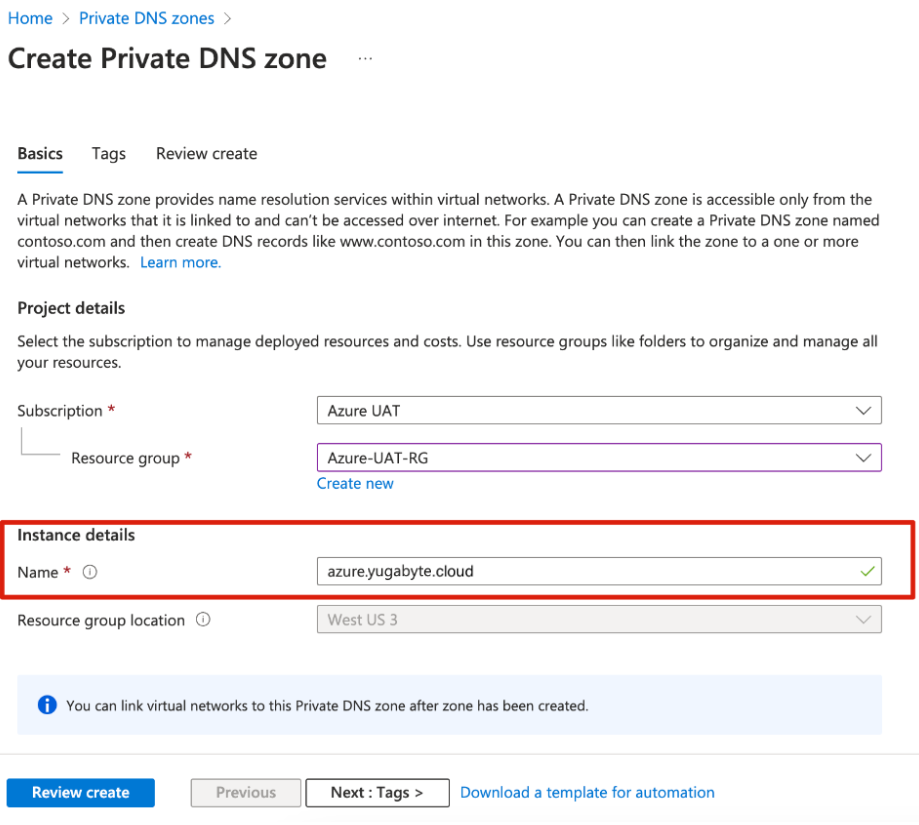
1. Provide the following details:
- **Subscription** - select your subscription.
- **Resource group** - select the resource group in which the private endpoint was created.
- **Instance details** - enter a DNS zone name of `azure.yugabyte.cloud`.
1. Click **Next: Tags**, and **Next Review create >**.
1. Review the details and click **Create** to create the private DNS zone.
The DNS zone will take a minute or two to deploy.
1. To view the private DNS zone, navigate to **Private DNS zones** under the **Azure services** heading.
#### Configure a VNet link in the private DNS zone
1. Navigate to **Private DNS zones** under the **Azure services** heading and select the azure.yugabyte.cloud private DNS zone you created.
1. Under **Settings**, select **Virtual network links** and click **+ Add**.

1. On the **Add virtual network link** page, provide the following details:
- **Link name** - enter a name for the link.
- **Subscription** - select your subscription.
- **Virtual network** - select the virtual network where you created the private endpoint.
1. Click **OK**.
The link is listed in the Virtual network links list.
#### Configure a private DNS name
1. Navigate to **Private DNS zones** under the **Azure services** heading and select the azure.yugabyte.cloud private DNS zone you created.
1. Select **Overview** and click **+ Record set**.
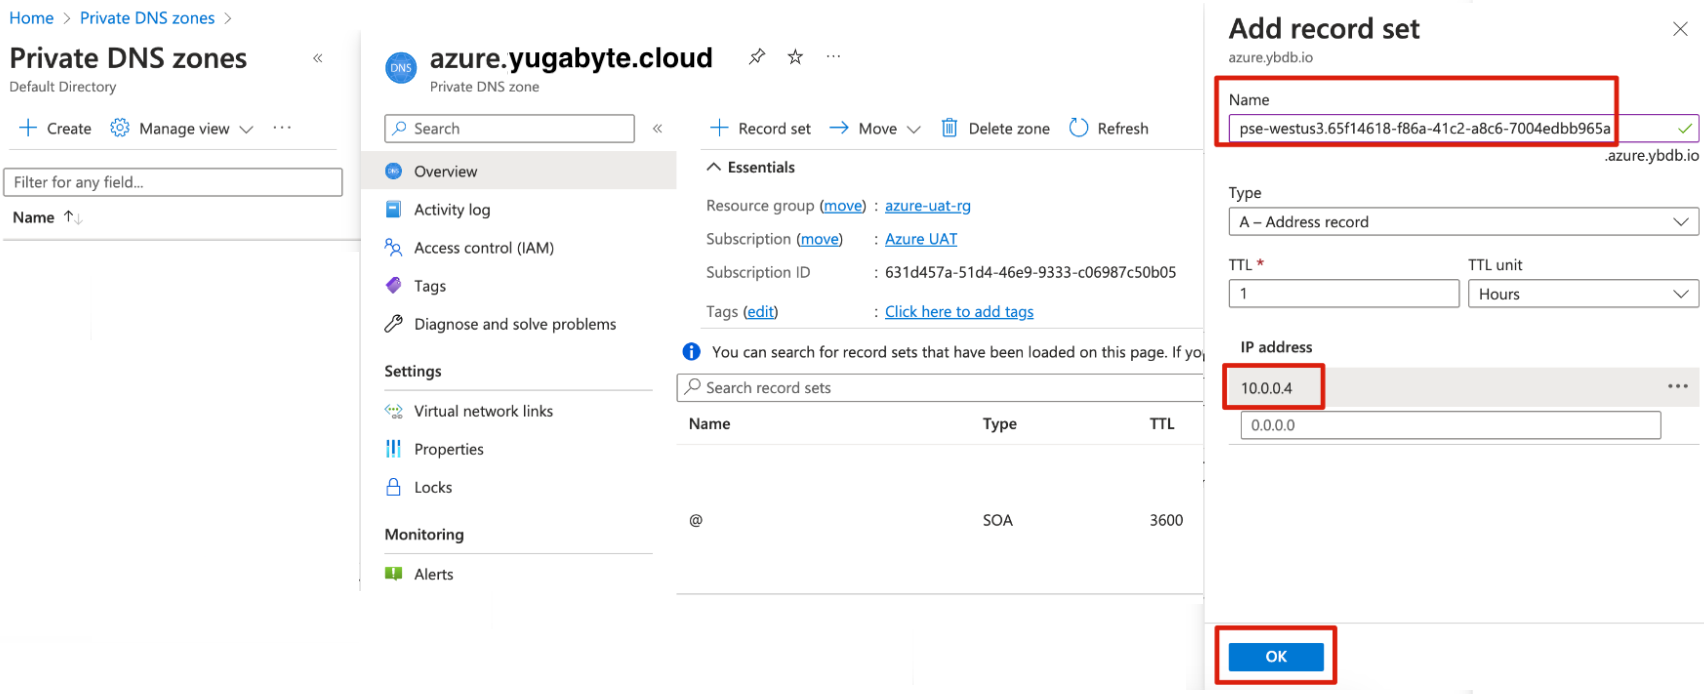
1. Under **Add record set**, set the following values:
- **Name** - enter the _first part_ only of the **Host** name of the cluster PSE (noted when you [created the PSE](#create-a-pse-in-yugabytedb-aeon)). This consists of the text _before_ .azure.yugabyte.cloud.
For example, for the host
```sh
pse-westus3.65f14618-f86a-41c2-a8c6-7004edbb965a.azure.yugabyte.cloud
```
you would enter only
```sh
pse-westus3.65f14618-f86a-41c2-a8c6-7004edbb965a
```
The PSE Host is also displayed in YugabyteDB Aeon under **Connection Parameters** on the cluster **Settings > Infrastructure** tab.
- **Type** - select the **A - Address record** option (this is the default).
- **IP address** - enter the private IP address of your Azure private endpoint (noted earlier).
1. Click **OK**.
You can now connect to your cluster from your application in Azure using your cluster PSE host address (for example, `pse-westus3.65f14618-f86a-41c2-a8c6-7004edbb965a.azure.yugabyte.cloud`).
### Use Azure CLI
#### Create a private endpoint
To create the private endpoint and connect it to your YugabyteDB Aeon PSE (called a private link service in Azure) using the [Azure CLI](https://learn.microsoft.com/en-us/cli/azure/), enter the following command:
```sh
az network private-endpoint create \
--connection-name \
--name \
--private-connection-resource-id \
--resource-group \
--subnet \
--vnet-name \
--location
```
Replace values as follows:
- `private_link_service_connection_name` - provide a name for the private link connection from the private endpoint to the private link service.
- `private_endpoint_name` - provide a name for the private endpoint.
- `pse_service_name` - the Service Name of the PSE, which you noted down when creating the PSE.
- `resource_group_name` - the resource group in which the private endpoint will be created.
- `subnet_name` - the name of the subnet in the resource group in which the private endpoint will be created.
- `private_endpoint_vnet_name` - the name of the VNet where the private endpoint will be created.
- `private_endpoint_region_name` - the Azure region in which the private endpoint and VNet are present.
#### Map the private endpoint DNS
To be able to connect to your cluster using DNS (rather than the bare IP address), create a private DNS zone in the same resource group, link the private DNS zone to the VNet containing the private endpoint, and add an A record pointing to the private IP address of the private endpoint.
1. To create a private DNS zone, enter the following command:
```sh
az network private-dns zone create \
--name azure.yugabyte.cloud \
--resource-group
```
Replace values as follows:
- `resource_group_name` - the resource group in which the private endpoint was created.
All private DNS zones for endpoints that are used with YugabyteDB Aeon are named `azure.yugabyte.cloud`.
1. To link the private DNS zone to the VNet containing the private endpoint, enter the following command:
```sh
az network private-dns link vnet create \
--name \
--registration-enabled true \
--resource-group \
--virtual-network \
--zone-name azure.yugabyte.cloud \
--tags yugabyte
```
Replace values as follows:
- `private_dns_zone_name` - provide a name for the private DNS zone.
- `resource_group_name` - the resource group in which the private endpoint was created.
- `private_endpoint_vnet_name` - the name of VNet in which the private endpoint was created.
1. To obtain the Network Interface (NIC) resource ID for the private endpoint, enter the following command:
```sh
az network private-endpoint show \
--name \
--resource-group
```
Replace values as follows:
- `private_endpoint_name` - the name of the private endpoint.
- `resource_group_name` - the resource group in which the private endpoint was created.
This command returns the NIC resource ID of the private endpoint (`private_endpoint_nic_resource_id` in the following command).
1. To obtain the ipv4 address of the private endpoint, enter the following command:
```sh
az network nic show \
--ids \
--query "ipConfigurations[0].privateIPAddress"
```
This command returns the ipv4 address of the private endpoint (`private_endpoint_ipv4_address` in the following command).
1. To create an A record in the private DNS zone, enter the following command:
```sh
az network private-dns record-set a add-record \
--ipv4-address \
--record-set-name \
--resource-group \
--zone-name azure.yugabyte.cloud
```
Replace values as follows:
- `private_endpoint_ipv4_address` - the IP address of the private endpoint.
- `record_set_name` - provide a name for the record.
- `resource_group_name` - the resource group in which the private endpoint was created.
## Next steps
- [Connect your application](../../../cloud-connect/connect-applications/)
- [Add database users](../../../cloud-secure-clusters/add-users/)