Connect your cluster to an application VPC via AWS PrivateLink.
{{< youtube id="IQ1mfp5XnOQ" title="Set up a private link for clusters deployed in AWS" >}}
To use AWS PrivateLink, you need the following:
- An AWS user account with an IAM user policy that grants permissions to create, modify, describe, and delete endpoints.
- The Amazon resource names (ARN) of [security principals](https://docs.aws.amazon.com/vpc/latest/privatelink/configure-endpoint-service.html#add-remove-permissions) to which to grant access to the endpoint.
Make sure that default security group in your application VPC allows internal connectivity. Otherwise, your application may not be able to reach the endpoint.
Make sure that the **Enable DNS resolution** and **Enable DNS hostnames** DNS settings in your application VPC are enabled. To access these settings, in the AWS [VPC console](https://console.aws.amazon.com/vpc/), select the VPC, click **Actions**, and choose **Edit VPC Settings**.
To use AWS PrivateLink to connect your cluster to a VPC in AWS that hosts your application, first create a private service endpoint (PSE) for each region of your cluster, then create corresponding interface VPC endpoints in AWS.
## Create a PSE in YugabyteDB Aeon
You create the PSEs (one for each region) for your cluster on the cluster **Settings** tab, or using [ybm CLI](../../../managed-automation/managed-cli/).
### Use YugabyteDB Aeon
To create or edit a PSE, do the following:
1. Select your cluster.
1. Navigate to **Settings > Network Access > Private Service Endpoint**.
1. Click **Create Private Service Endpoint** or, to edit an existing PSE, **Edit Private Service Endpoint** to display the **Edit Private Service Endpoint** sheet.
1. For each region in your cluster, provide the ARN of an AWS principal you want to grant access. For example, `arn:aws:iam:::root`.
1. Click **Save**.
The endpoints are displayed with the following values:
- **Host** - The host name of the PSE. You use this to [connect to your cluster](../../../cloud-connect/connect-applications/). The host name of a PSE for AWS always ends in `aws.yugabyte.cloud`.
- **Service Name** - You use this service name when creating the private endpoint in AWS.
You can also create the PSEs during [cluster creation](../../create-clusters/).
### Use ybm CLI
To create a PSE, do the following:
1. Enter the following command:
```sh
ybm cluster network endpoint create \
--cluster-name \
--region \
--accessibility-type PRIVATE_SERVICE_ENDPOINT \
--security-principals
```
Replace values as follows:
- `yugabytedb_cluster` - name of your cluster.
- `cluster_region` - cluster region where you want to place the PSE. Must match one of the regions where your cluster is deployed (for example, `us-west-2`), as well as the region where your application is deployed.
- `amazon_resource_names` - comma-separated list of the ARNs of [AWS principals](https://docs.aws.amazon.com/vpc/latest/privatelink/configure-endpoint-service.html#add-remove-permissions) that you want to grant access. For example, `arn:aws:iam:::root`.
1. Note the endpoint ID in the response.
You can also display the PSE endpoint ID by entering the following command:
```sh
ybm cluster network endpoint list --cluster-name
```
This outputs the IDs of all the cluster endpoints.
1. After the endpoint becomes ACTIVE, display the service name of the PSE by entering the following command:
```sh
ybm cluster network endpoint describe --cluster-name --endpoint-id
```
Note the following values:
- **Host** - The host name of the PSE. You will use this to [connect to your cluster](../../../cloud-connect/connect-applications/). The host name of a PSE for AWS always ends in `aws.yugabyte.cloud`.
- **Service Name** - You will use this service name when creating the private endpoint in AWS.
To delete a PSE, enter the following command:
```sh
ybm cluster network endpoint delete \
--cluster-name \
--endpoint-id \
```
## Create an interface VPC endpoint in AWS
You can create the AWS endpoint using the AWS [VPC console](https://console.aws.amazon.com/vpc/) or from the command line using the [AWS CLI](https://docs.aws.amazon.com/cli/).
### Use the Amazon VPC console
To create an interface endpoint to connect to your cluster PSE, do the following:
1. Open the Amazon [VPC console](https://console.aws.amazon.com/vpc/).
1. Switch to the region where your YugabyteDB cluster is deployed.
1. In the navigation pane, choose **Endpoints** and click **Create endpoint**.
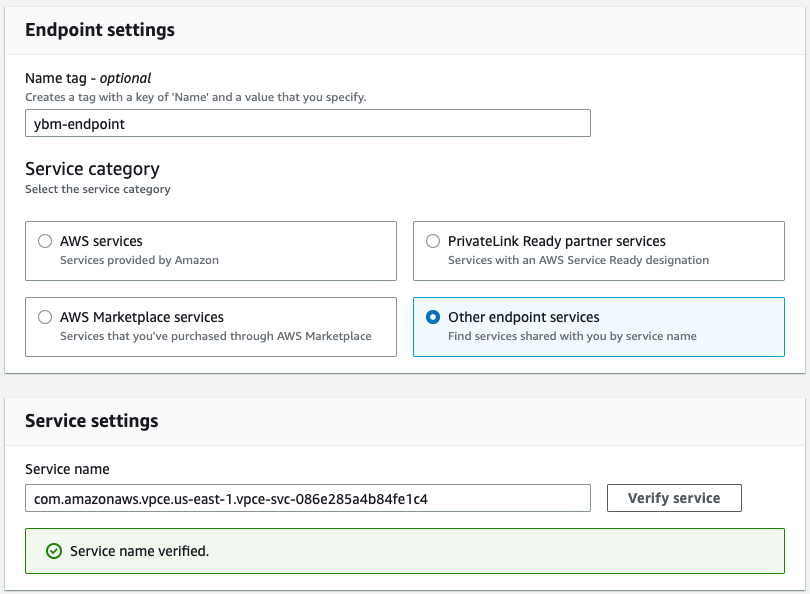
1. Enter a Name tag for the endpoint.
1. Under **Service Category**, select **Other endpoint services**.
1. Under **Service settings**, in the **Service name** field, enter the service name of your cluster PSE and click **Verify service**.
1. In the **VPC** field, enter the ID of the VPC where you want to create the AWS endpoint.
1. Under **Subnets**, select the subnets (Availability Zones) to use.
At least one of the subnets should match the zones in your cluster. The endpoint service can only connect from a subnet in the same availability zone as the PSE; if there isn't a subnet in the same zone, [create one](https://docs.aws.amazon.com/vpc/latest/userguide/create-subnets.html). Always verify the [Availability Zone ID](https://docs.aws.amazon.com/ram/latest/userguide/working-with-az-ids.html) as availability zone names can vary across different accounts.
1. Under **Security groups**, select the security groups to associate with the endpoint network interfaces.
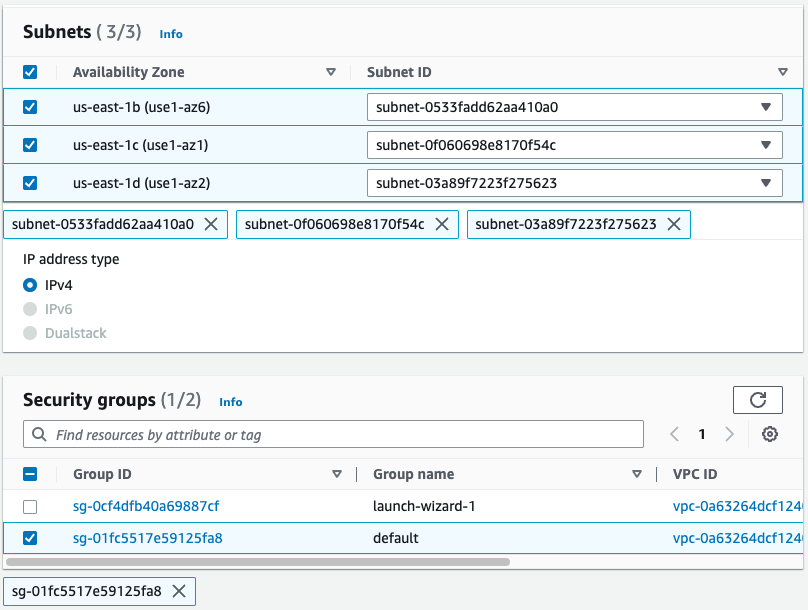
Make sure the security groups in your application VPC allow internal connectivity. Otherwise, your application may not be able to reach the endpoint.
1. Click **Create endpoint**.
The endpoint is added to the Endpoints in AWS.
1. Select the endpoint and on the endpoint details page, click **Actions** and choose **Modify private DNS name** so that the **Private DNS names enabled** setting is set to Yes.
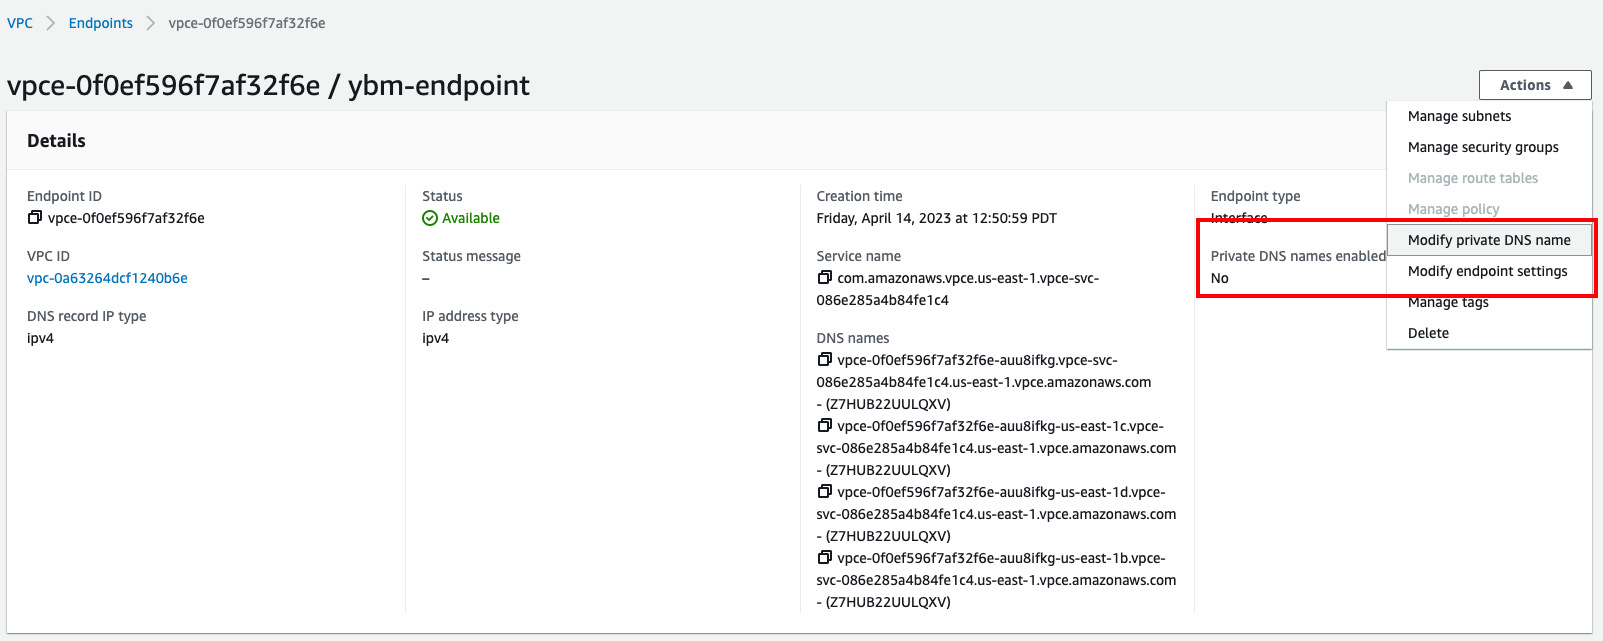
The initial endpoint status is _Pending_. After the link is validated, the status is _Available_. The private DNS name may take a few minutes to propagate before you can connect.
You can now connect to your cluster from your application in AWS using your cluster PSE host address (for example, `pse-us-west-2.65f14618-f86a-41c2-a8c6-7004edbb965a.aws.yugabyte.cloud`).
### Use AWS CLI
#### Set up DNS support
Check if `enableDnsHostnames` and `enableDnsSupport` are set to true for the application VPC where you want to add the interface VPC endpoint:
```sh
aws ec2 describe-vpc-attribute --vpc-id --attribute enableDnsSupport
aws ec2 describe-vpc-attribute --vpc-id --attribute enableDnsHostnames
```
Replace values as follows:
- `application_vpc_id` - ID of the AWS VPC. Find this value on the VPC dashboard in your AWS account.
If they are not set to true, set them as follows:
```sh
aws ec2 modify-vpc-attribute \
--enable-dns-hostnames \
--enable-dns-support \
--vpc-id
```
#### Create a security group for the endpoint
Create a separate security group for the interface endpoint to simplify security management (by default, AWS creates the endpoint in the default security group) and add a rule to allow traffic to the YugabyteDB Aeon PSE. Note that the rule may take a few minutes to propagate to the endpoint NICs in the security group.
```sh
aws ec2 create-security-group \
--group-name ybm-interface-endpoint \
--description "Security group for interface endpoint that connects to ybm pse" \
--vpc-id
```
This command returns the security group ID as, for example, `GroupId: sg-903004f8`. This ID is referred to as `endpoint_security_group_id` in the following commands.
Add an ingress rule for YSQL as follows:
```sh
aws ec2 authorize-security-group-ingress \
--group-id \
--port 5433 \
--source-group \
--protocol tcp
```
And an ingress rule for YCQL as follows:
```sh
aws ec2 authorize-security-group-ingress \
--group-id \
--port 9042 \
--source-group \
--protocol tcp
```
Replace values as follows:
- `endpoint_security_group_id` - the security group ID of the endpoint
- `application_security_group_id` - the security group ID of the application VPC
#### Create an interface VPC endpoint
Obtain the [subnet](https://docs.aws.amazon.com/vpc/latest/userguide/modify-subnets.html) IDs of the application VPC, as follows:
```sh
aws ec2 describe-subnets \
--filters "Name=vpc-id,Values=" \
--query "Subnets[*].SubnetId"
```
This command returns the subnet IDs of the application VPC (`subnet_ids` in the following command). Note that the interface endpoint can connect only from a subnet in the same availability zone as the PSE. If there isn't a subnet in the same zone, create one.
Create the interface VPC endpoint, as follows:
```sh
aws ec2 create-vpc-endpoint \
--vpc-endpoint-type Interface \
--vpc-id \
--service-name \
--subnet-ids \
--security-group-ids \
--private-dns-enabled
```
Replace values as follows:
- `application_vpc_id` - ID of the AWS VPC. Find this value on the VPC dashboard in your AWS account.
- `pse_service_name` - service name of your PSE, which you noted down when creating the PSE.
- `subnet_ids` - the subnet IDs, separated by whitespace, that your application VPC uses. You can also find these values under **Subnets** in your AWS VPC console. The endpoint service can connect only from a subnet in the same availability zone as the PSE. If there isn't a subnet in the same zone, [create one](https://docs.aws.amazon.com/vpc/latest/userguide/create-subnets.html). Always verify the [Availability Zone ID](https://docs.aws.amazon.com/ram/latest/userguide/working-with-az-ids.html) as availability zone names can vary across different accounts.
- `endpoint_security_group_id` - the security group ID of the endpoint
## Next steps
- [Connect your application](../../../cloud-connect/connect-applications/)
- [Add database users](../../../cloud-secure-clusters/add-users/)