
<ul class="nav nav-tabs-alt nav-tabs-yb">
  <li>
    <a href="../../quick-start-yugabytedb-managed/" class="nav-link">
      <img src="/icons/cloud.svg" alt="Cloud Icon">
      Use a cloud cluster
    </a>
  </li>
  <li class="active">
    <a href="../macos/" class="nav-link">
      <img src="/icons/database.svg" alt="Server Icon">
      Use a local cluster
    </a>
  </li>
</ul>

The local cluster setup on a single host is intended for development and learning. For production deployment, performance benchmarking, or deploying a true multi-node on multi-host setup, see [Deploy YugabyteDB](/stable/deploy/).

<ul class="nav nav-tabs-alt nav-tabs-yb">
  <li>
    <a href="../macos/" class="nav-link">
      <i class="fa-brands fa-apple" aria-hidden="true"></i>
      macOS
    </a>
  </li>
  <li>
    <a href="../linux/" class="nav-link">
      <i class="fa-brands fa-linux" aria-hidden="true"></i>
      Linux
    </a>
  </li>
  <li>
    <a href="../docker/" class="nav-link">
      <i class="fa-brands fa-docker" aria-hidden="true"></i>
      Docker
    </a>
  </li>
  <li class="active">
    <a href="../kubernetes/" class="nav-link">
      <i class="fa-regular fa-dharmachakra" aria-hidden="true"></i>
      Kubernetes
    </a>
  </li>
</ul>

## Install YugabyteDB

Installing YugabyteDB involves completing [prerequisites](#prerequisites), [starting Kubernetes](#start-kubernetes), and [downloading Helm chart](#download-yugabytedb-helm-chart).

### Prerequisites

Before installing YugabyteDB, ensure that you have the following installed:

- [Minikube](https://github.com/kubernetes/minikube) on your localhost machine.

    The Kubernetes version used by Minikube should be 1.18.0 or later. The default Kubernetes version being used by Minikube displays when you run the `minikube start` command. To install Minikube, see [Install Minikube](https://kubernetes.io/docs/tasks/tools/install-minikube/) in the Kubernetes documentation.

- [kubectl](https://kubernetes.io/docs/reference/kubectl/overview/).

    To install `kubectl`, see [Install kubectl](https://kubernetes.io/docs/tasks/tools/install-kubectl/) in the Kubernetes documentation.

- [Helm 3.4 or later](https://helm.sh/).

    To install `helm`, see [Install helm](https://helm.sh/docs/intro/install/) in the Helm documentation.

### Start Kubernetes

To start Kubernetes, perform the following:

- Start Kubernetes using Minikube by running the following command. Note that minikube by default brings up a single-node Kubernetes environment with 2GB RAM, 2 CPUS, and a disk of 20GB. You should start minkube with at least 8GB RAM, 4 CPUs and 40GB disk, as follows:

    ```sh
    minikube start --memory=8192 --cpus=4 --disk-size=40g --vm-driver=virtualbox
    ```

    ```output
    ...
    Configuring environment for Kubernetes v1.14.2 on Docker 18.09.6
    ...
    ```

- Review Kubernetes dashboard by running the following command:

    ```sh
    minikube dashboard
    ```

- Confirm that your kubectl is configured correctly by running the following command:

    ```sh
    kubectl version
    ```

    ```output
    Client Version: version.Info{Major:"1", Minor:"14+", GitVersion:"v1.14.10-dispatcher", ...}
    Server Version: version.Info{Major:"1", Minor:"14", GitVersion:"v1.14.2", ...}
    ```

- Confirm that your Helm is configured correctly by running the following command:

    ```sh
    helm version
    ```

    ```output
    version.BuildInfo{Version:"v3.0.3", GitCommit:"...", GitTreeState:"clean", GoVersion:"go1.13.6"}
    ```

### Download YugabyteDB Helm chart

To start YugabyteDB Helm chart, perform the following:

- Add the charts repository using the following command:

    ```sh
    helm repo add yugabytedb https://charts.yugabyte.com
    ```

- Fetch updates from the repository by running the following command:

    ```sh
    helm repo update
    ```

- Validate the chart version, as follows:

    ```sh
    helm search repo yugabytedb/yugabyte --version {{<yb-version version="stable" format="short">}}
    ```

    ```output
    NAME                 CHART VERSION  APP VERSION    DESCRIPTION
  yugabytedb/yugabyte  {{<yb-version version="stable" format="short">}}         {{<yb-version version="stable" format="build">}}  YugabyteDB is the high-performance distributed ...
  ```

Now you are ready to create a local YugabyteDB cluster.

## Create a local cluster

Create a YugabyteDB cluster in Minikube using the following commands. Note that for Helm, you have to first create a namespace:

```sh
kubectl create namespace yb-demo
helm install yb-demo yugabytedb/yugabyte \
--version {{<yb-version version="stable" format="short">}} \
--set resource.master.requests.cpu=0.5,resource.master.requests.memory=0.5Gi,\
resource.tserver.requests.cpu=0.5,resource.tserver.requests.memory=0.5Gi,\
replicas.master=1,replicas.tserver=1 --namespace yb-demo
```

Because load balancers are not available in a Minikube environment, the LoadBalancers for `yb-master-ui` and `yb-tserver-service` remain in pending state. To disable these services, you can pass the `enableLoadBalancer=False` flag, as follows:

```sh
helm install yb-demo yugabytedb/yugabyte \
--version {{<yb-version version="stable" format="short">}} \
--set resource.master.requests.cpu=0.5,resource.master.requests.memory=0.5Gi,\
resource.tserver.requests.cpu=0.5,resource.tserver.requests.memory=0.5Gi,\
replicas.master=1,replicas.tserver=1,enableLoadBalancer=False --namespace yb-demo
```

### Check cluster status with kubectl

Run the following command to verify that you have two services with one running pod in each: one YB-Master pod (`yb-master-0`) and one YB-TServer pod (`yb-tserver-0`). For details on the roles of these pods in a YugabyteDB cluster (also known as universe), see [Architecture](/stable/architecture/).

```sh
kubectl --namespace yb-demo get pods
```

```output
NAME           READY     STATUS              RESTARTS   AGE
yb-master-0    0/2       ContainerCreating   0          5s
yb-tserver-0   0/2       ContainerCreating   0          4s
```

Eventually, all the pods will have the Running state, as per the following output:

```output
NAME           READY     STATUS    RESTARTS   AGE
yb-master-0    2/2       Running   0          13s
yb-tserver-0   2/2       Running   0          12s
```

To check the status of the three services, run the following command:

```sh
kubectl --namespace yb-demo get services
```

```output
NAME                 TYPE           CLUSTER-IP     EXTERNAL-IP   PORT(S)                                        AGE
yb-master-ui         LoadBalancer   10.98.66.255   <pending>     7000:31825/TCP                                 119s
yb-masters           ClusterIP      None           <none>        7100/TCP,7000/TCP                              119s
yb-tserver-service   LoadBalancer   10.106.5.69    <pending>     6379:31320/TCP,9042:30391/TCP,5433:30537/TCP   119s
yb-tservers          ClusterIP      None           <none>        7100/TCP,9000/TCP,6379/TCP,9042/TCP,5433/TCP   119s
```

### Check cluster status with Admin UI

The cluster you have created consists of two processes: [YB-Master](/stable/architecture/yb-master/) that keeps track of various metadata (list of tables, users, roles, permissions, and so on) and [YB-TServer](/stable/architecture/yb-tserver/) that is responsible for the actual end-user requests for data updates and queries.

Each of the processes exposes its own Admin UI that can be used to check the status of the corresponding process and perform certain administrative operations.

To access the Admin UI, you first need to set up port forwarding for port 7000, as follows:

```sh
kubectl --namespace yb-demo port-forward svc/yb-master-ui 7000:7000
```

{{< note title="Note" >}}

If you've created the cluster with `enableLoadBalancer=False`, then the service `yb-master-ui` won't be created and you have to run `kubectl --namespace yb-demo port-forward svc/yb-masters 7000:7000` instead.

{{< /note >}}

Now you can view the [yb-master-0 Admin UI](/stable/reference/configuration/yb-master/#admin-ui) at <http://localhost:7000>.

#### Overview and YB-Master status

The following illustration shows the YB-Master home page with a cluster with a replication factor of 1, a single node, and no tables. The YugabyteDB version is also displayed.

![master-home](/images/admin/master-home-kubernetes-rf1.png)

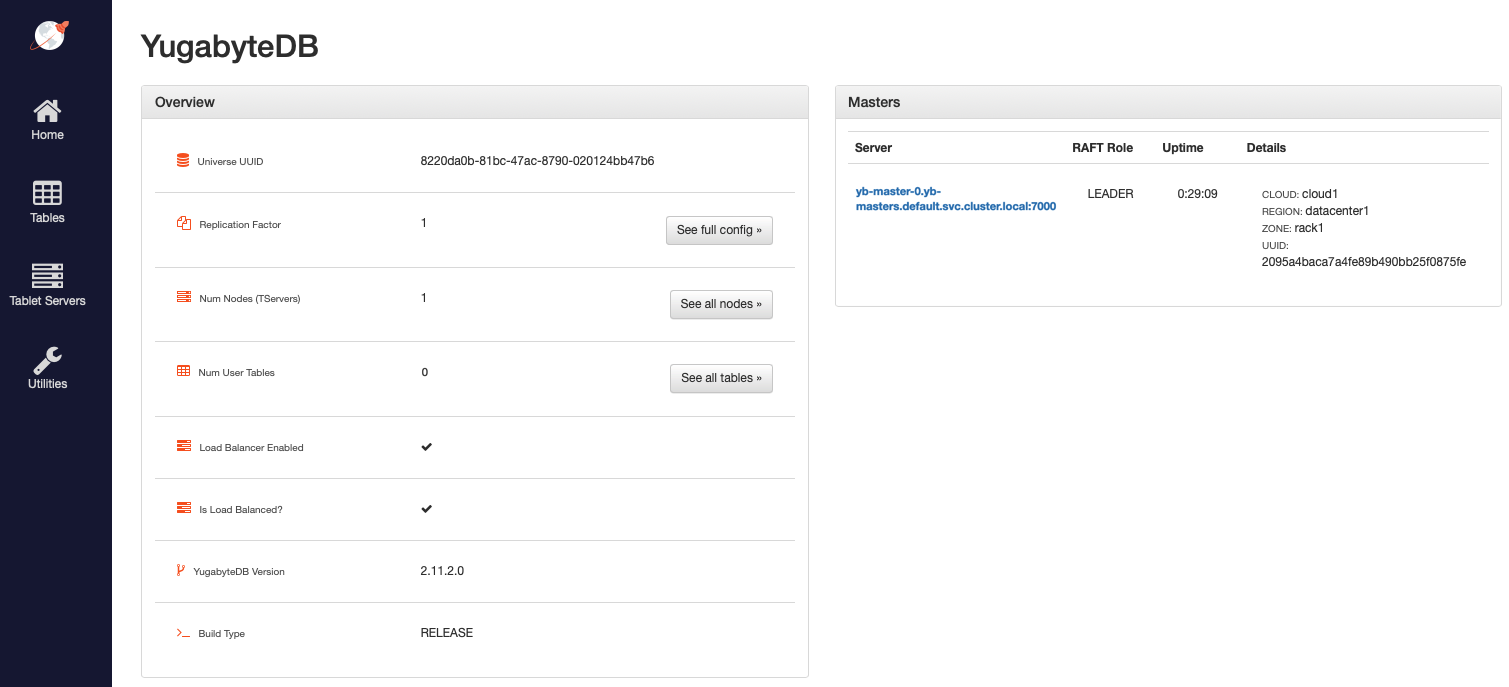
The **Masters** section shows the 1 YB-Master along with its corresponding cloud, region, and zone placement.
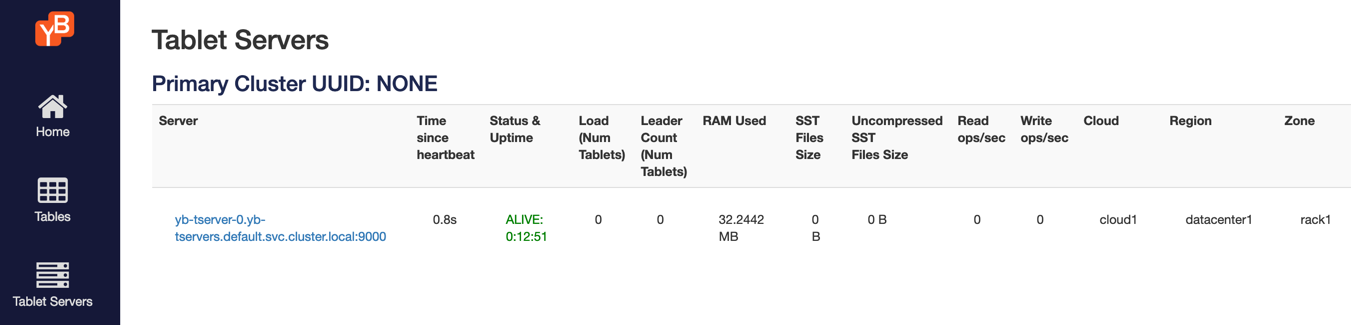
#### YB-TServer status

Click **See all nodes** to open the **Tablet Servers** page that lists the YB-TServer along with the time since it last connected to the YB-Master using regular heartbeats, as per the following illustration:

![tserver-list](/images/admin/master-tservers-list-kubernetes-rf1.png)

## Connect to the database

Using the YugabyteDB SQL shell, [ysqlsh](/stable/api/ysqlsh/), you can connect to your cluster and interact with it using distributed SQL. ysqlsh is installed with YugabyteDB and is located in the bin directory of the YugabyteDB home directory.

To open the YSQL shell (ysqlsh), run the following.

```sh
$ kubectl --namespace yb-demo exec -it yb-tserver-0 -- sh -c "cd /home/yugabyte && ysqlsh -h yb-tserver-0 --echo-queries"
```

```output
ysqlsh (15.2-YB-{{< yb-version version="stable">}}-b0)
Type "help" for help.

yugabyte=#
```

To load sample data and explore an example using ysqlsh, refer to [Retail Analytics](/stable/sample-data/retail-analytics/).

<!--## Build a Java application

### Prerequisites

Before building a Java application, perform the following:

- While YugabyteDB is running, use the [yb-ctl](/stable/admin/yb-ctl/#root) utility to create a universe with a 3-node RF-3 cluster with some fictitious geo-locations assigned, as follows:

  ```sh
  cd <path-to-yugabytedb-installation>

  ./bin/yb-ctl create --rf 3 --placement_info "aws.us-west.us-west-2a,aws.us-west.us-west-2a,aws.us-west.us-west-2b"
  ```

- Ensure that Java Development Kit (JDK) 1.8 or later is installed. JDK installers can be downloaded from [OpenJDK](http://jdk.java.net/).
- Ensure that [Apache Maven](https://maven.apache.org/index.html) 3.3 or later is installed.

### Create and configure the Java project

Perform the following to create a sample Java project:

1. Create a project called DriverDemo, as follows:

    ```sh
    mvn archetype:generate \
        -DgroupId=com.yugabyte \
        -DartifactId=DriverDemo \
        -DarchetypeArtifactId=maven-archetype-quickstart \
        -DinteractiveMode=false

    cd DriverDemo
    ```

1. Open the `pom.xml` file in a text editor and add the following block below the `<url>` element:

    ```xml
    <properties>
      <maven.compiler.source>1.8</maven.compiler.source>
      <maven.compiler.target>1.8</maven.compiler.target>
    </properties>
    ```

1. Add the following dependencies for the driver HikariPool in the `<dependencies>` element in `pom.xml`:

    ```xml
    <dependency>
      <groupId>com.yugabyte</groupId>
      <artifactId>jdbc-yugabytedb</artifactId>
      <version>{{< version-driver-java >}}</version>
    </dependency>

    <!-- https://mvnrepository.com/artifact/com.zaxxer/HikariCP -->
<!--    <dependency>
      <groupId>com.zaxxer</groupId>
      <artifactId>HikariCP</artifactId>
      <version>5.0.0</version>
    </dependency>
    ```

1. Save and close the `pom.xml` file.

1. Install the added dependency by executing the following command:

    ```sh
    mvn install
    ```

### Create a sample Java application

The following steps demonstrate how to create two Java applications, `UniformLoadBalance` and `TopologyAwareLoadBalance`. In each, you can create connections in one of two ways: using the `DriverManager.getConnection()` API or using `YBClusterAwareDataSource` and `HikariPool`. Both approaches are described.

#### Uniform load balancing

1. Create a file called `./src/main/java/com/yugabyte/UniformLoadBalanceApp.java` by executing the following command:

    ```sh
    touch ./src/main/java/com/yugabyte/UniformLoadBalanceApp.java
    ```

1. Paste the following into `UniformLoadBalanceApp.java`:

    ```java
    package com.yugabyte;

    import com.zaxxer.hikari.HikariConfig;
    import com.zaxxer.hikari.HikariDataSource;

    import java.sql.Connection;
    import java.sql.DriverManager;
    import java.sql.SQLException;
    import java.util.ArrayList;
    import java.util.List;
    import java.util.Properties;
    import java.util.Scanner;

    public class UniformLoadBalanceApp {

      public static void main(String[] args) {
        makeConnectionUsingDriverManager();
        makeConnectionUsingYbClusterAwareDataSource();

        System.out.println("Execution of Uniform Load Balance Java App complete!!");
      }

      public static void makeConnectionUsingDriverManager() {
        // List to store the connections so that they can be closed at the end
        List<Connection> connectionList = new ArrayList<>();

        System.out.println("Lets create 6 connections using DriverManager");

        String yburl = "jdbc:yugabytedb://127.0.0.1:5433/yugabyte?user=yugabyte&password=yugabyte&load-balance=true";

        try {
          for(int i=0; i<6; i++) {
            Connection connection = DriverManager.getConnection(yburl);
            connectionList.add(connection);
          }

          System.out.println("You can verify the load balancing by visiting http://<host>:13000/rpcz as discussed before");
          System.out.println("Enter a integer to continue once verified:");
          int x = new Scanner(System.in).nextInt();

          System.out.println("Closing the connections!!");
          for(Connection connection : connectionList) {
             connection.close();
          }
        }
        catch (SQLException exception) {
          exception.printStackTrace();
        }
      }

      public static void makeConnectionUsingYbClusterAwareDataSource() {
        System.out.println("Now, Lets create 10 connections using YbClusterAwareDataSource and Hikari Pool");

        Properties poolProperties = new Properties();
        poolProperties.setProperty("dataSourceClassName", "com.yugabyte.ysql.YBClusterAwareDataSource");
        // The pool will create  10 connections to the servers
        poolProperties.setProperty("maximumPoolSize", String.valueOf(10));
        poolProperties.setProperty("dataSource.serverName", "127.0.0.1");
        poolProperties.setProperty("dataSource.portNumber", "5433");
        poolProperties.setProperty("dataSource.databaseName", "yugabyte");
        poolProperties.setProperty("dataSource.user", "yugabyte");
        poolProperties.setProperty("dataSource.password", "yugabyte");
        // If you want to provide additional end points
        String additionalEndpoints = "127.0.0.2:5433,127.0.0.3:5433";
        poolProperties.setProperty("dataSource.additionalEndpoints", additionalEndpoints);

        HikariConfig config = new HikariConfig(poolProperties);
        config.validate();
        HikariDataSource hikariDataSource = new HikariDataSource(config);

        System.out.println("Wait for some time for Hikari Pool to set up and create the connections...");
        System.out.println("You can verify the load balancing by visiting http://<host>:13000/rpcz as discussed before.");
        System.out.println("Enter a integer to continue once verified:");
        int x = new Scanner(System.in).nextInt();

        System.out.println("Closing the Hikari Connection Pool!!");
        hikariDataSource.close();

      }

    }
    ```

    When using `DriverManager.getConnection()`, you need to include the `load-balance=true` property in the connection URL. In the case of `YBClusterAwareDataSource`, load balancing is enabled by default.

1. Run the application, as follows:

    ```sh
    mvn -q package exec:java -DskipTests -Dexec.mainClass=com.yugabyte.UniformLoadBalanceApp
    ```

#### Topology-aware load balancing

1. Create a file called `./src/main/java/com/yugabyte/TopologyAwareLoadBalanceApp.java` by executing the following command:

    ```sh
    touch ./src/main/java/com/yugabyte/TopologyAwareLoadBalanceApp.java
    ```

1. Paste the following into `TopologyAwareLoadBalanceApp.java`:

    ```java
    package com.yugabyte;

    import com.zaxxer.hikari.HikariConfig;
    import com.zaxxer.hikari.HikariDataSource;

    import java.sql.Connection;
    import java.sql.DriverManager;
    import java.sql.SQLException;
    import java.util.ArrayList;
    import java.util.List;
    import java.util.Properties;
    import java.util.Scanner;

    public class TopologyAwareLoadBalanceApp {

      public static void main(String[] args) {

        makeConnectionUsingDriverManager();
        makeConnectionUsingYbClusterAwareDataSource();

        System.out.println("Execution of Uniform Load Balance Java App complete!!");
      }

      public static void makeConnectionUsingDriverManager() {
        // List to store the connections so that they can be closed at the end
        List<Connection> connectionList = new ArrayList<>();

        System.out.println("Lets create 6 connections using DriverManager");
        String yburl = "jdbc:yugabytedb://127.0.0.1:5433/yugabyte?user=yugabyte&password=yugabyte&load-balance=true"
          + "&topology-keys=aws.us-west.us-west-2a";

        try {
          for(int i=0; i<6; i++) {
            Connection connection = DriverManager.getConnection(yburl);
            connectionList.add(connection);
          }

          System.out.println("You can verify the load balancing by visiting http://<host>:13000/rpcz as discussed before");
          System.out.println("Enter a integer to continue once verified:");
          int x = new Scanner(System.in).nextInt();

          System.out.println("Closing the connections!!");
          for(Connection connection : connectionList) {
            connection.close();
          }

        }
        catch (SQLException exception) {
          exception.printStackTrace();
        }

      }

      public static void makeConnectionUsingYbClusterAwareDataSource() {
        System.out.println("Now, Lets create 10 connections using YbClusterAwareDataSource and Hikari Pool");

        Properties poolProperties = new Properties();
        poolProperties.setProperty("dataSourceClassName", "com.yugabyte.ysql.YBClusterAwareDataSource");
        // The pool will create  10 connections to the servers
        poolProperties.setProperty("maximumPoolSize", String.valueOf(10));
        poolProperties.setProperty("dataSource.serverName", "127.0.0.1");
        poolProperties.setProperty("dataSource.portNumber", "5433");
        poolProperties.setProperty("dataSource.databaseName", "yugabyte");
        poolProperties.setProperty("dataSource.user", "yugabyte");
        poolProperties.setProperty("dataSource.password", "yugabyte");
        // If you want to provide additional end points
        String additionalEndpoints = "127.0.0.2:5433,127.0.0.3:5433";
        poolProperties.setProperty("dataSource.additionalEndpoints", additionalEndpoints);

        // If you want to load balance between specific geo locations using topology keys
        String geoLocations = "aws.us-west.us-west-2a";
        poolProperties.setProperty("dataSource.topologyKeys", geoLocations);
        HikariConfig config = new HikariConfig(poolProperties);
        config.validate();
        HikariDataSource hikariDataSource = new HikariDataSource(config);

        System.out.println("Wait for some time for Hikari Pool to set up and create the connections...");
        System.out.println("You can verify the load balancing by visiting http://<host>:13000/rpcz as discussed before.");
        System.out.println("Enter a integer to continue once verified:");
        int x = new Scanner(System.in).nextInt();

        System.out.println("Closing the Hikari Connection Pool!!");
        hikariDataSource.close();

      }

    }
    ```

    When using `DriverManager.getConnection()`, you need to include the `load-balance=true` property in the connection URL. In the case of `YBClusterAwareDataSource`, load balancing is enabled by default, but you must set property `dataSource.topologyKeys`.

1. Run the application, as follows:

    ```sh
     mvn -q package exec:java -DskipTests -Dexec.mainClass=com.yugabyte.TopologyAwareLoadBalanceApp
    ```-->

## YugabyteDB Kubernetes Operator

The YugabyteDB Kubernetes Operator automates the deployment, scaling, and management of YugabyteDB clusters in Kubernetes environments. It streamlines database operations, reducing manual effort for developers and operators.

For more information, refer to the [YugabyteDB Kubernetes Operator](https://github.com/yugabyte/yugabyte-k8s-operator) GitHub project.

## Next steps

- [Explore YugabyteDB](/stable/explore/)
- [Develop for YugabyteDB](/stable/develop/)
