
<ul class="nav nav-tabs-alt nav-tabs-yb">
  <li>
    <a href="../../quick-start-yugabytedb-managed/" class="nav-link">
      <img src="/icons/cloud.svg" alt="Cloud Icon">
      Use a cloud cluster
    </a>
  </li>
  <li class="active">
    <a href="../macos/" class="nav-link">
      <img src="/icons/database.svg" alt="Server Icon">
      Use a local cluster
    </a>
  </li>
</ul>

The local cluster setup on a single host is intended for development and learning. For production deployment, performance benchmarking, or deploying a true multi-node on multi-host setup, see [Deploy YugabyteDB](/stable/deploy/).

<ul class="nav nav-tabs-alt nav-tabs-yb">
  <li>
    <a href="../macos/" class="nav-link">
      <i class="fa-brands fa-apple" aria-hidden="true"></i>
      macOS
    </a>
  </li>
  <li>
    <a href="../linux/" class="nav-link">
      <i class="fa-brands fa-linux" aria-hidden="true"></i>
      Linux
    </a>
  </li>
  <li class="active">
    <a href="../docker/" class="nav-link">
      <i class="fa-brands fa-docker" aria-hidden="true"></i>
      Docker
    </a>
  </li>
  <li>
    <a href="../kubernetes/" class="nav-link">
      <i class="fa-regular fa-dharmachakra" aria-hidden="true"></i>
      Kubernetes
    </a>
  </li>
</ul>

Note that the Docker option to run local clusters is recommended only for advanced Docker users. This is due to the fact that running stateful applications such as YugabyteDB in Docker is more complex and error-prone than running stateless applications.

## Install YugabyteDB

### Prerequisites

Before installing YugabyteDB, ensure that you have the Docker runtime installed on your localhost. To download and install Docker, select one of the following environments:

<i class="fa-brands fa-apple" aria-hidden="true"></i> [Docker for Mac](https://store.docker.com/editions/community/docker-ce-desktop-mac)

<i class="fa-brands fa-centos"></i> [Docker for CentOS](https://store.docker.com/editions/community/docker-ce-server-centos)

<i class="fa-brands fa-ubuntu"></i> [Docker for Ubuntu](https://store.docker.com/editions/community/docker-ce-server-ubuntu)

<i class="icon-debian"></i> [Docker for Debian](https://store.docker.com/editions/community/docker-ce-server-debian)

<i class="fa-brands fa-windows" aria-hidden="true"></i> [Docker for Windows](https://store.docker.com/editions/community/docker-ce-desktop-windows)

### Install

Pull the YugabyteDB container by executing the following command:

```sh
docker pull yugabytedb/yugabyte:{{< yb-version version="stable" format="build">}}
```

## Create a local cluster

Use the [yugabyted](/stable/reference/configuration/yugabyted/) utility to create and manage universes.

To create a 1-node cluster with a replication factor (RF) of 1, run the following command:

```sh
docker run -d --name yugabyte \
        -p 7000:7000 -p 9000:9000 -p 15433:15433 -p 5433:5433 -p 9042:9042 \
        yugabytedb/yugabyte:{{< yb-version version="stable" format="build">}} bin/yugabyted start \
        --background=false
```

If you are running macOS Monterey, replace `-p 7000:7000` with `-p 7001:7000`. This is necessary because Monterey enables AirPlay receiving by default, which listens on port 7000. This conflicts with YugabyteDB and causes `yugabyted start` to fail unless you forward the port as shown. Alternatively, you can disable AirPlay receiving, then start YugabyteDB normally, and then, optionally, re-enable AirPlay receiving.

Run the following command to check the container status:

```sh
docker ps
```

```output
CONTAINER ID   IMAGE                               COMMAND                  CREATED         STATUS         PORTS                                                                                                                                                                                               NAMES
c1c98c29149b   yugabytedb/yugabyte:{{< yb-version version="stable" format="build">}}   "/sbin/tini -- bin/y…"   7 seconds ago   Up 5 seconds   0.0.0.0:5433->5433/tcp, 6379/tcp, 7100/tcp, 0.0.0.0:7000->7000/tcp, 0.0.0.0:9000->9000/tcp, 7200/tcp, 9100/tcp, 10100/tcp, 11000/tcp, 0.0.0.0:9042->9042/tcp, 0.0.0.0:15433->15433/tcp, 12000/tcp   yugabyte
```

Run the following command to check the cluster status:

```sh
docker exec -it yugabyte yugabyted status
```

```output
+----------------------------------------------------------------------------------------------------------+
|                                                yugabyted                                                 |
+----------------------------------------------------------------------------------------------------------+
| Status              : Running.                                                                           |
| Replication Factor  : 1                                                                                  |
| YugabyteDB UI       : http://172.17.0.2:15433                                                            |
| JDBC                : jdbc:postgresql://172.17.0.2:5433/yugabyte?user=yugabyte&password=yugabyte                  |
| YSQL                : bin/ysqlsh -h 172.17.0.2  -U yugabyte -d yugabyte                                  |
| YCQL                : bin/ycqlsh 172.17.0.2 9042 -u cassandra                                            |
| Data Dir            : /root/var/data                                                                     |
| Log Dir             : /root/var/logs                                                                     |
| Universe UUID       : f4bae205-4b4f-4dcc-9656-a04354cb9301                                               |
+----------------------------------------------------------------------------------------------------------+
```

### Run Docker in a persistent volume

In the preceding `docker run` command, the data stored in YugabyteDB does not persist across container restarts. To make YugabyteDB persist data across restarts, you can add a volume mount option to the docker run command, as follows:

- Create a `~/yb_data` directory by executing the following command:

  ```sh
  mkdir ~/yb_data
  ```

- Run Docker with the volume mount option by executing the following command:

  ```sh
  docker run -d --name yugabyte01 --hostname yugabyte01 \
            -p 7000:7000 -p 9000:9000 -p 15433:15433 -p 5433:5433 -p 9042:9042 \
            yugabytedb/yugabyte:{{< yb-version version="stable" format="build">}} bin/yugabyted start \
            --base_dir=/home/yugabyte/yb_data \
            --background=false
  ```

  If running macOS Monterey, replace `-p 7000:7000` with `-p 7001:7000`.

{{< note title="Base directory" >}}

yugabyted uses `$HOME/var` by default to store data, configurations, and logs. You can change the base directory when starting a cluster using the `--base_dir` flag. If you change the base directory, you _must_ specify the base directory using the `--base-dir` flag when running subsequent commands on the cluster.

For example, to get the status of the cluster you just created, you would enter `bin/yugabyted status --base_dir=/home/yugabyte/yb_data`.
{{< /note >}}

{{< note title="Hostname" >}}

It is important to use a static container hostname to avoid startup errors if the hostname changes, such as when recreating the container with the same volume.

{{< /note >}}

## Connect to the database

The cluster you have created consists of two processes:

- [YB-Master](/stable/architecture/yb-master/) keeps track of various metadata (list of tables, users, roles, permissions, and so on).
- [YB-TServer](/stable/architecture/yb-tserver/) is responsible for the actual end user requests for data updates and queries.

Using the YugabyteDB SQL shell, [ysqlsh](/stable/api/ysqlsh/), you can connect to your cluster and interact with it using distributed SQL. ysqlsh is installed with YugabyteDB and is located in the bin directory of the YugabyteDB home directory.

To open the YSQL shell, run ysqlsh.

```sh
docker exec -it yugabyte bash -c '/home/yugabyte/bin/ysqlsh --echo-queries --host $(hostname)'
```

```output
ysqlsh (15.2-YB-{{<yb-version version="stable">}}-b0)
Type "help" for help.

yugabyte=#
```

To load sample data and explore an example using ysqlsh, refer to [Retail Analytics](/stable/sample-data/retail-analytics/).

## Monitor your cluster

When you start a cluster using yugabyted, you can monitor the cluster using the YugabyteDB UI, available at [localhost:15433](http://localhost:15433).

![YugabyteDB UI Cluster Overview](/images/quick_start/quick-start-ui-overview.png)

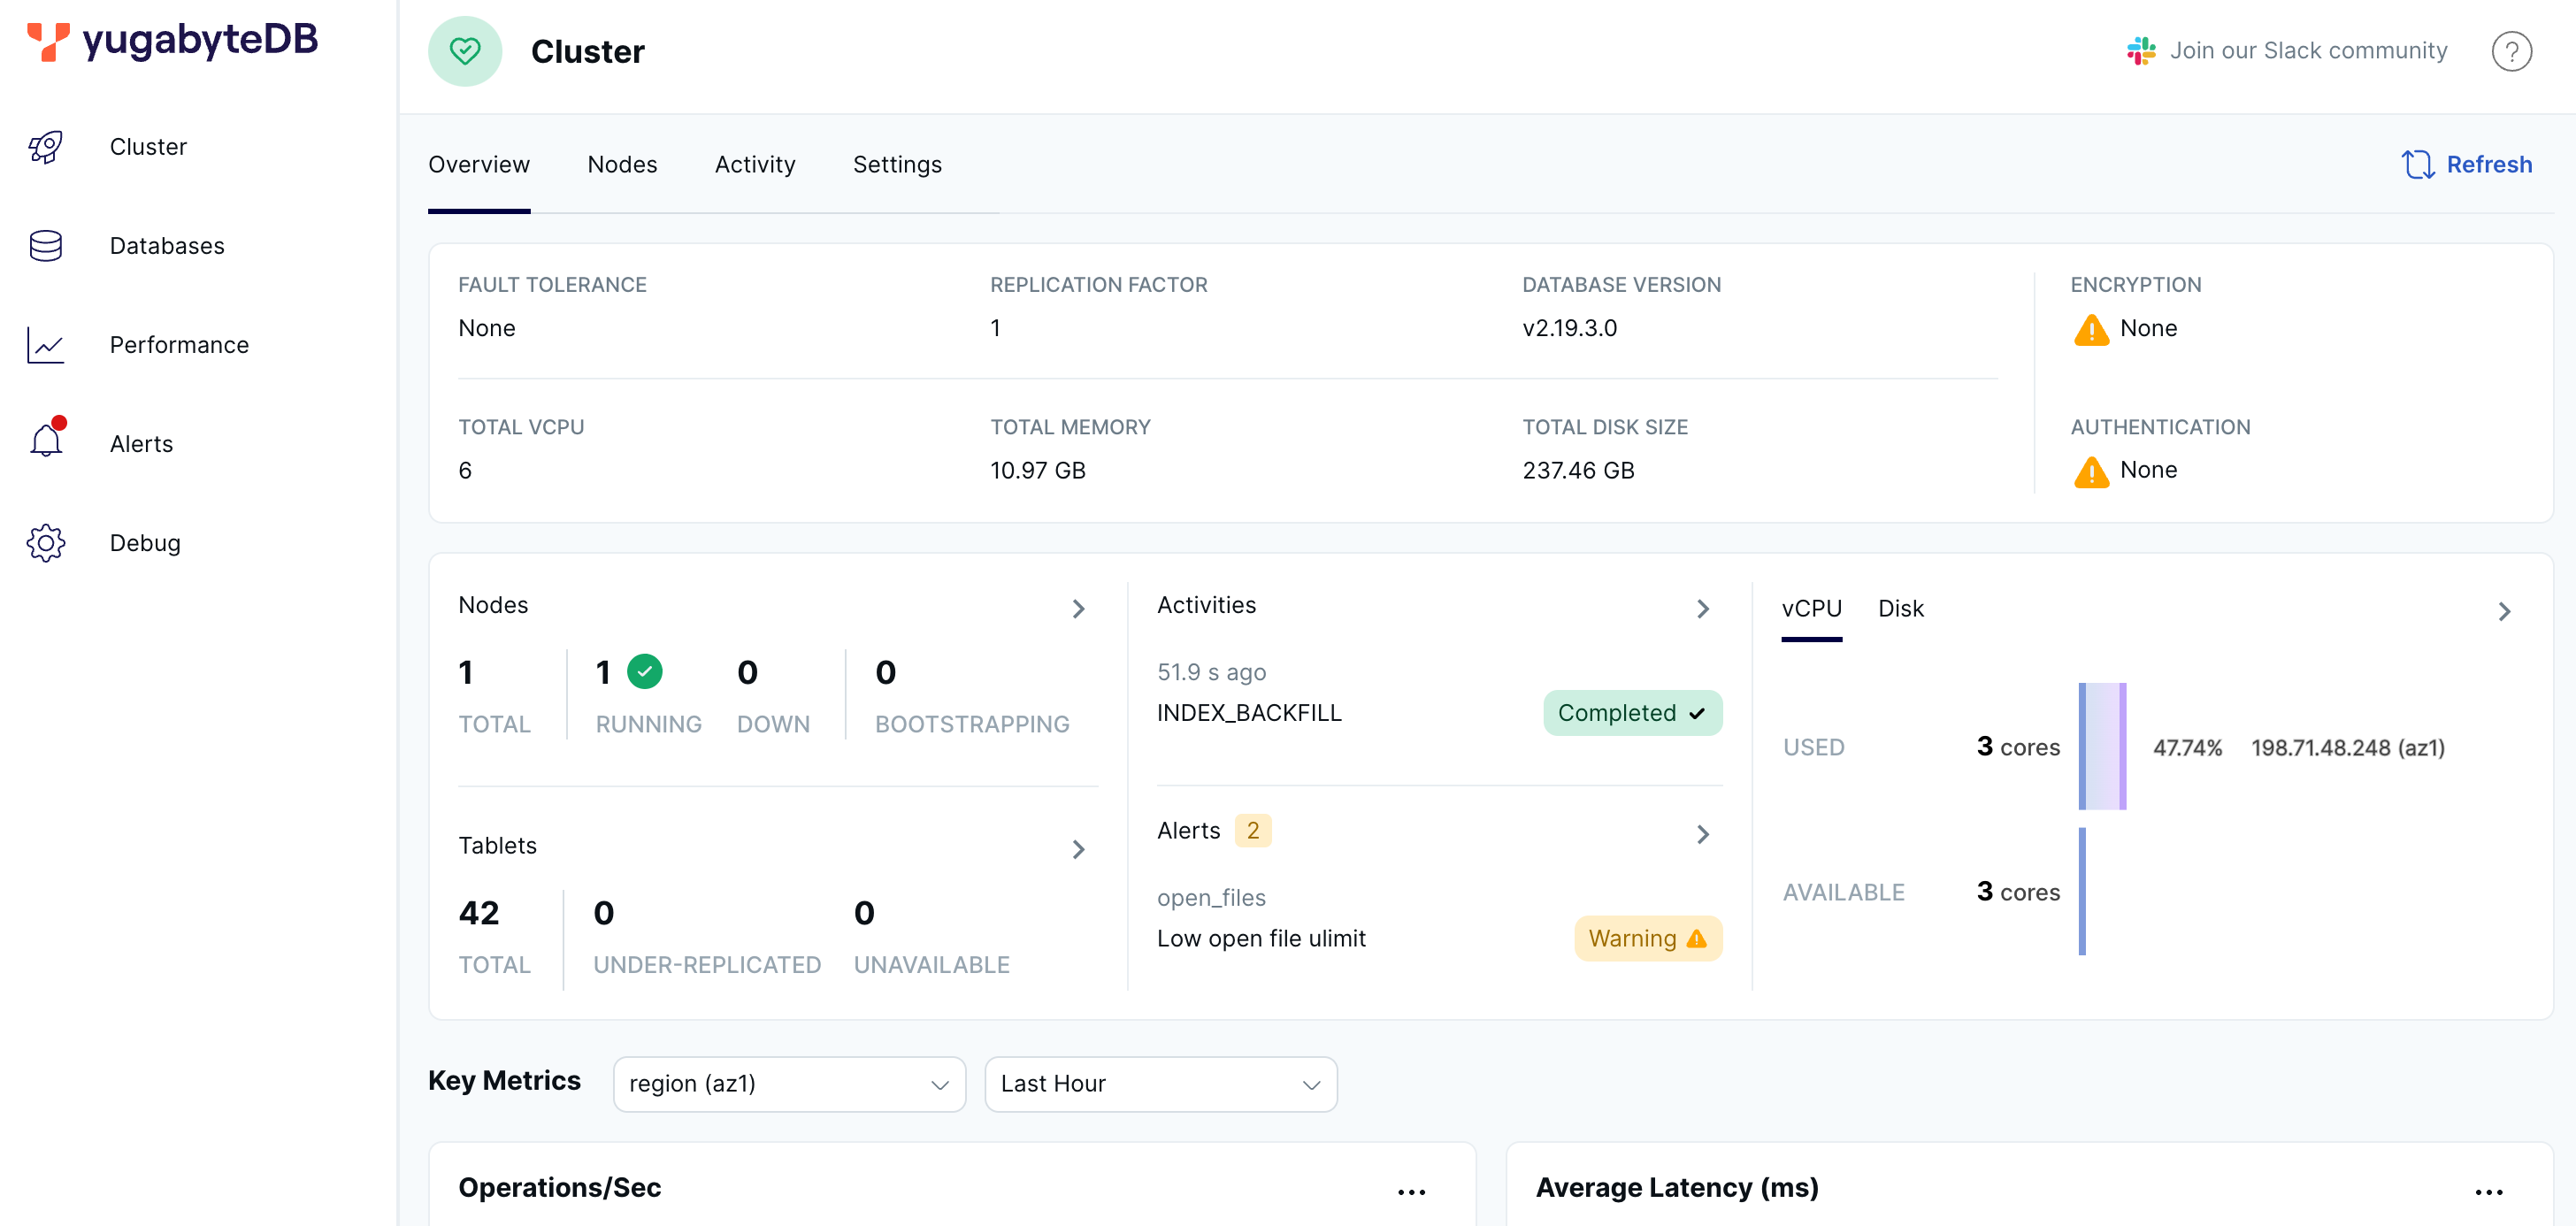
The YugabyteDB UI provides cluster status, node information, performance metrics, and more.

<!--## Build a Java application

### Prerequisites

Before building a Java application, perform the following:

- While YugabyteDB is running, use the [yb-ctl](/stable/admin/yb-ctl/#root) utility to create a universe with a 3-node RF-3 cluster with some fictitious geo-locations assigned, as follows:

  ```sh
  cd <path-to-yugabytedb-installation>

  ./bin/yb-ctl create --rf 3 --placement_info "aws.us-west.us-west-2a,aws.us-west.us-west-2a,aws.us-west.us-west-2b"
  ```

- Ensure that Java Development Kit (JDK) 1.8 or later is installed. JDK installers can be downloaded from [OpenJDK](http://jdk.java.net/).
- Ensure that [Apache Maven](https://maven.apache.org/index.html) 3.3 or later is installed.

### Create and configure the Java project

Perform the following to create a sample Java project:

1. Create a project called DriverDemo, as follows:

    ```sh
    mvn archetype:generate \
        -DgroupId=com.yugabyte \
        -DartifactId=DriverDemo \
        -DarchetypeArtifactId=maven-archetype-quickstart \
        -DinteractiveMode=false

    cd DriverDemo
    ```

1. Open the `pom.xml` file in a text editor and add the following below the `<url>` element:

    ```xml
    <properties>
      <maven.compiler.source>1.8</maven.compiler.source>
      <maven.compiler.target>1.8</maven.compiler.target>
    </properties>
    ```

1. Add the following dependencies for the driver HikariPool in the `<dependencies>` element in `pom.xml`:

    ```xml
    <dependency>
      <groupId>com.yugabyte</groupId>
      <artifactId>jdbc-yugabytedb</artifactId>
      <version>{{< version-driver-java >}}</version>
    </dependency>

    <!-- https://mvnrepository.com/artifact/com.zaxxer/HikariCP -->
<!--    <dependency>
      <groupId>com.zaxxer</groupId>
      <artifactId>HikariCP</artifactId>
      <version>5.0.0</version>
    </dependency>
    ```

1. Save and close the `pom.xml` file.

1. Install the added dependency by executing the following command:

    ```sh
    mvn install
    ```

### Create a sample Java application

The following steps demonstrate how to create two Java applications, `UniformLoadBalance` and `TopologyAwareLoadBalance`. In each, you can create connections in one of two ways: using the `DriverManager.getConnection()` API or using `YBClusterAwareDataSource` and `HikariPool`. Both approaches are described.

#### Uniform load balancing

1. Create a file called `./src/main/java/com/yugabyte/UniformLoadBalanceApp.java` by executing the following command:

    ```sh
    touch ./src/main/java/com/yugabyte/UniformLoadBalanceApp.java
    ```

1. Paste the following into `UniformLoadBalanceApp.java`:

    ```java
    package com.yugabyte;

    import com.zaxxer.hikari.HikariConfig;
    import com.zaxxer.hikari.HikariDataSource;

    import java.sql.Connection;
    import java.sql.DriverManager;
    import java.sql.SQLException;
    import java.util.ArrayList;
    import java.util.List;
    import java.util.Properties;
    import java.util.Scanner;

    public class UniformLoadBalanceApp {

      public static void main(String[] args) {
        makeConnectionUsingDriverManager();
        makeConnectionUsingYbClusterAwareDataSource();

        System.out.println("Execution of Uniform Load Balance Java App complete!!");
      }

      public static void makeConnectionUsingDriverManager() {
        // List to store the connections so that they can be closed at the end
        List<Connection> connectionList = new ArrayList<>();

        System.out.println("Lets create 6 connections using DriverManager");

        String yburl = "jdbc:yugabytedb://127.0.0.1:5433/yugabyte?user=yugabyte&password=yugabyte&load-balance=true";

        try {
          for(int i=0; i<6; i++) {
            Connection connection = DriverManager.getConnection(yburl);
            connectionList.add(connection);
          }

          System.out.println("You can verify the load balancing by visiting http://<host>:13000/rpcz as discussed before");
          System.out.println("Enter a integer to continue once verified:");
          int x = new Scanner(System.in).nextInt();

          System.out.println("Closing the connections!!");
          for(Connection connection : connectionList) {
             connection.close();
          }
        }
        catch (SQLException exception) {
          exception.printStackTrace();
        }
      }

      public static void makeConnectionUsingYbClusterAwareDataSource() {
        System.out.println("Now, Lets create 10 connections using YbClusterAwareDataSource and Hikari Pool");

        Properties poolProperties = new Properties();
        poolProperties.setProperty("dataSourceClassName", "com.yugabyte.ysql.YBClusterAwareDataSource");
        // The pool will create  10 connections to the servers
        poolProperties.setProperty("maximumPoolSize", String.valueOf(10));
        poolProperties.setProperty("dataSource.serverName", "127.0.0.1");
        poolProperties.setProperty("dataSource.portNumber", "5433");
        poolProperties.setProperty("dataSource.databaseName", "yugabyte");
        poolProperties.setProperty("dataSource.user", "yugabyte");
        poolProperties.setProperty("dataSource.password", "yugabyte");
        // If you want to provide additional end points
        String additionalEndpoints = "127.0.0.2:5433,127.0.0.3:5433";
        poolProperties.setProperty("dataSource.additionalEndpoints", additionalEndpoints);

        HikariConfig config = new HikariConfig(poolProperties);
        config.validate();
        HikariDataSource hikariDataSource = new HikariDataSource(config);

        System.out.println("Wait for some time for Hikari Pool to set up and create the connections...");
        System.out.println("You can verify the load balancing by visiting http://<host>:13000/rpcz as discussed before.");
        System.out.println("Enter a integer to continue once verified:");
        int x = new Scanner(System.in).nextInt();

        System.out.println("Closing the Hikari Connection Pool!!");
        hikariDataSource.close();

      }

    }
    ```

    When using `DriverManager.getConnection()`, you need to include the `load-balance=true` property in the connection URL. In the case of `YBClusterAwareDataSource`, load balancing is enabled by default.

1. Run the application, as follows:

    ```sh
    mvn -q package exec:java -DskipTests -Dexec.mainClass=com.yugabyte.UniformLoadBalanceApp
    ```

#### Topology-aware load balancing

1. Create a file called `./src/main/java/com/yugabyte/TopologyAwareLoadBalanceApp.java` by executing the following command:

    ```sh
    touch ./src/main/java/com/yugabyte/TopologyAwareLoadBalanceApp.java
    ```

1. Paste the following into `TopologyAwareLoadBalanceApp.java`:

    ```java
    package com.yugabyte;

    import com.zaxxer.hikari.HikariConfig;
    import com.zaxxer.hikari.HikariDataSource;

    import java.sql.Connection;
    import java.sql.DriverManager;
    import java.sql.SQLException;
    import java.util.ArrayList;
    import java.util.List;
    import java.util.Properties;
    import java.util.Scanner;

    public class TopologyAwareLoadBalanceApp {

      public static void main(String[] args) {

        makeConnectionUsingDriverManager();
        makeConnectionUsingYbClusterAwareDataSource();

        System.out.println("Execution of Uniform Load Balance Java App complete!!");
      }

      public static void makeConnectionUsingDriverManager() {
        // List to store the connections so that they can be closed at the end
        List<Connection> connectionList = new ArrayList<>();

        System.out.println("Lets create 6 connections using DriverManager");
        String yburl = "jdbc:yugabytedb://127.0.0.1:5433/yugabyte?user=yugabyte&password=yugabyte&load-balance=true"
          + "&topology-keys=aws.us-west.us-west-2a";

        try {
          for(int i=0; i<6; i++) {
            Connection connection = DriverManager.getConnection(yburl);
            connectionList.add(connection);
          }

          System.out.println("You can verify the load balancing by visiting http://<host>:13000/rpcz as discussed before");
          System.out.println("Enter a integer to continue once verified:");
          int x = new Scanner(System.in).nextInt();

          System.out.println("Closing the connections!!");
          for(Connection connection : connectionList) {
            connection.close();
          }

        }
        catch (SQLException exception) {
          exception.printStackTrace();
        }

      }

      public static void makeConnectionUsingYbClusterAwareDataSource() {
        System.out.println("Now, Lets create 10 connections using YbClusterAwareDataSource and Hikari Pool");

        Properties poolProperties = new Properties();
        poolProperties.setProperty("dataSourceClassName", "com.yugabyte.ysql.YBClusterAwareDataSource");
        // The pool will create  10 connections to the servers
        poolProperties.setProperty("maximumPoolSize", String.valueOf(10));
        poolProperties.setProperty("dataSource.serverName", "127.0.0.1");
        poolProperties.setProperty("dataSource.portNumber", "5433");
        poolProperties.setProperty("dataSource.databaseName", "yugabyte");
        poolProperties.setProperty("dataSource.user", "yugabyte");
        poolProperties.setProperty("dataSource.password", "yugabyte");
        // If you want to provide additional end points
        String additionalEndpoints = "127.0.0.2:5433,127.0.0.3:5433";
        poolProperties.setProperty("dataSource.additionalEndpoints", additionalEndpoints);

        // If you want to load balance between specific geo locations using topology keys
        String geoLocations = "aws.us-west.us-west-2a";
        poolProperties.setProperty("dataSource.topologyKeys", geoLocations);
        HikariConfig config = new HikariConfig(poolProperties);
        config.validate();
        HikariDataSource hikariDataSource = new HikariDataSource(config);

        System.out.println("Wait for some time for Hikari Pool to set up and create the connections...");
        System.out.println("You can verify the load balancing by visiting http://<host>:13000/rpcz as discussed before.");
        System.out.println("Enter a integer to continue once verified:");
        int x = new Scanner(System.in).nextInt();

        System.out.println("Closing the Hikari Connection Pool!!");
        hikariDataSource.close();

      }

    }
    ```

    When using `DriverManager.getConnection()`, you need to include the `load-balance=true` property in the connection URL. In the case of `YBClusterAwareDataSource`, load balancing is enabled by default, but you must set property `dataSource.topologyKeys`.

1. Run the application, as follows:

    ```sh
     mvn -q package exec:java -DskipTests -Dexec.mainClass=com.yugabyte.TopologyAwareLoadBalanceApp
    ```-->

## Next steps

- [Explore YugabyteDB](/stable/explore/)
- [Develop for YugabyteDB](/stable/develop/)
