The following tutorial describes how to use [Spark SQL](https://spark.apache.org/sql/) with YugabyteDB, and perform YSQL queries.
## Prerequisites
This tutorial assumes that you have:
- YugabyteDB running. If you are new to YugabyteDB, follow the steps in [Quick start](/stable/quick-start/macos/).
- Java Development Kit (JDK) 1.8. JDK installers for Linux and macOS can be downloaded from [OpenJDK](http://jdk.java.net/), [AdoptOpenJDK](https://adoptopenjdk.net/), or [Azul Systems](https://www.azul.com/downloads/zulu-community/). Homebrew users on macOS can install using `brew install AdoptOpenJDK/openjdk/adoptopenjdk8`.
- [Apache Spark 3.5.4](https://spark.apache.org/downloads.html).
## Start Spark SQL shell with YugabyteDB driver
From your Spark installation directory, use the following command to start `spark-sql`, and pass the YugabyteDB driver package with the `--packages` parameter. The command fetches the YugabyteDB driver from local cache (if present), or installs the driver from [maven central](https://search.maven.org/).
```sh
./bin/spark-sql --packages com.yugabyte:jdbc-yugabytedb:{{< version-driver-java >}}
```
The Spark prompt should be available as `spark-sql>`.
## Set up the database
Create the database and table you will read and write to as follows:
1. From your YugabyteDB installation directory, use [ysqlsh](../../../api/ysqlsh/) shell to read and write directly to the database as follows:
```sh
./bin/ysqlsh
```
1. Create a database for `spark-sql` and connect to it using the following:
```sql
yugabyte=# CREATE DATABASE ysql_spark_sql;
yugabyte=# \c ysql_spark_sql;
```
```output
You are now connected to database "ysql_spark_sql" as user "yugabyte".
ysql_spark_sql=#
```
1. Create a table in the `ysql_spark_sql` database to read and write data through the JDBC connector from `spark-sql` as follows:
```sql
ysql_spark_sql=# CREATE TABLE test AS SELECT generate_series(1,100000) AS id, random(), ceil(random() * 20);
```
## Store and retrieve data
1. Create a table `test_ref` in the `spark-sql` shell, referencing the table `test` through the configuration properties using the JDBC connector:
```sql
spark-sql> CREATE TABLE test_ref USING org.apache.spark.sql.jdbc OPTIONS (
url "jdbc:yugabytedb://localhost:5433/ysql_spark_sql",
dbtable "test",
user "yugabyte",
password "yugabyte",
driver "com.yugabyte.Driver"
);
```
You can now read and write data through the table `test_ref`.
1. Run the following commands to fetch some data:
```sql
spark-sql> SELECT ceil, sum(id) FROM test_ref GROUP BY ceil LIMIT 10;
```
```output
8.0 498169906
7.0 508260550
18.0 501050266
1.0 501584522
4.0 492761124
11.0 507580062
14.0 518283840
3.0 486508876
19.0 497964478
2.0 505807396
```
```sql
spark-sql> SELECT COUNT(*) FROM test_ref;
```
```output
100000
```
1. Insert data with the `INSERT` command as follows:
```sql
spark-sql> INSERT INTO test_ref VALUES(1234543,0.951123432168208551,22.0);
```
1. Append all the data to `test_ref` table from the same table as follows:
```sql
spark-sql> INSERT INTO test_ref SELECT * FROM test_ref;
```
1. Verify that the data is inserted as follows:
```sql
spark-sql> SELECT COUNT(*) from test_ref;
```
```output
200002
```
## Parallelism
To maintain parallelism while fetching the table content, create a DataFrame for the table `test` with some specific options as follows:
```sql
spark-sql> CREATE TABLE test_partitions USING org.apache.spark.sql.jdbc OPTIONS (
url "jdbc:yugabytedb://localhost:5433/ysql_spark_sql",
dbtable "test",
user "yugabyte",
password "yugabyte",
driver "com.yugabyte.Driver",
numPartitions 5,
partitionColumn "ceil",
lowerBound 0,
upperBound 20) ;
```
```sql
spark-sql> SELECT SUM(ceil) FROM test_partitions WHERE id > 50000;
```
```output
+---------+
|sum(ceil)|
+---------+
|1045214.0|
+---------+
```
The options used in the example help in breaking down the whole task into `numPartitions` parallel tasks on the basis of the `partitionColumn`, with the help of minimum and maximum value of the column; where,
- `numPartitions` - divides the whole task to `numPartitions` parallel tasks.
- `lowerBound` - minimum value of the `partitionColumn` in a table.
- `upperBound` - maximum value of the `partitionColumn` in a table.
- `partitionColumn` - the column on the basis of which a partition occurs.
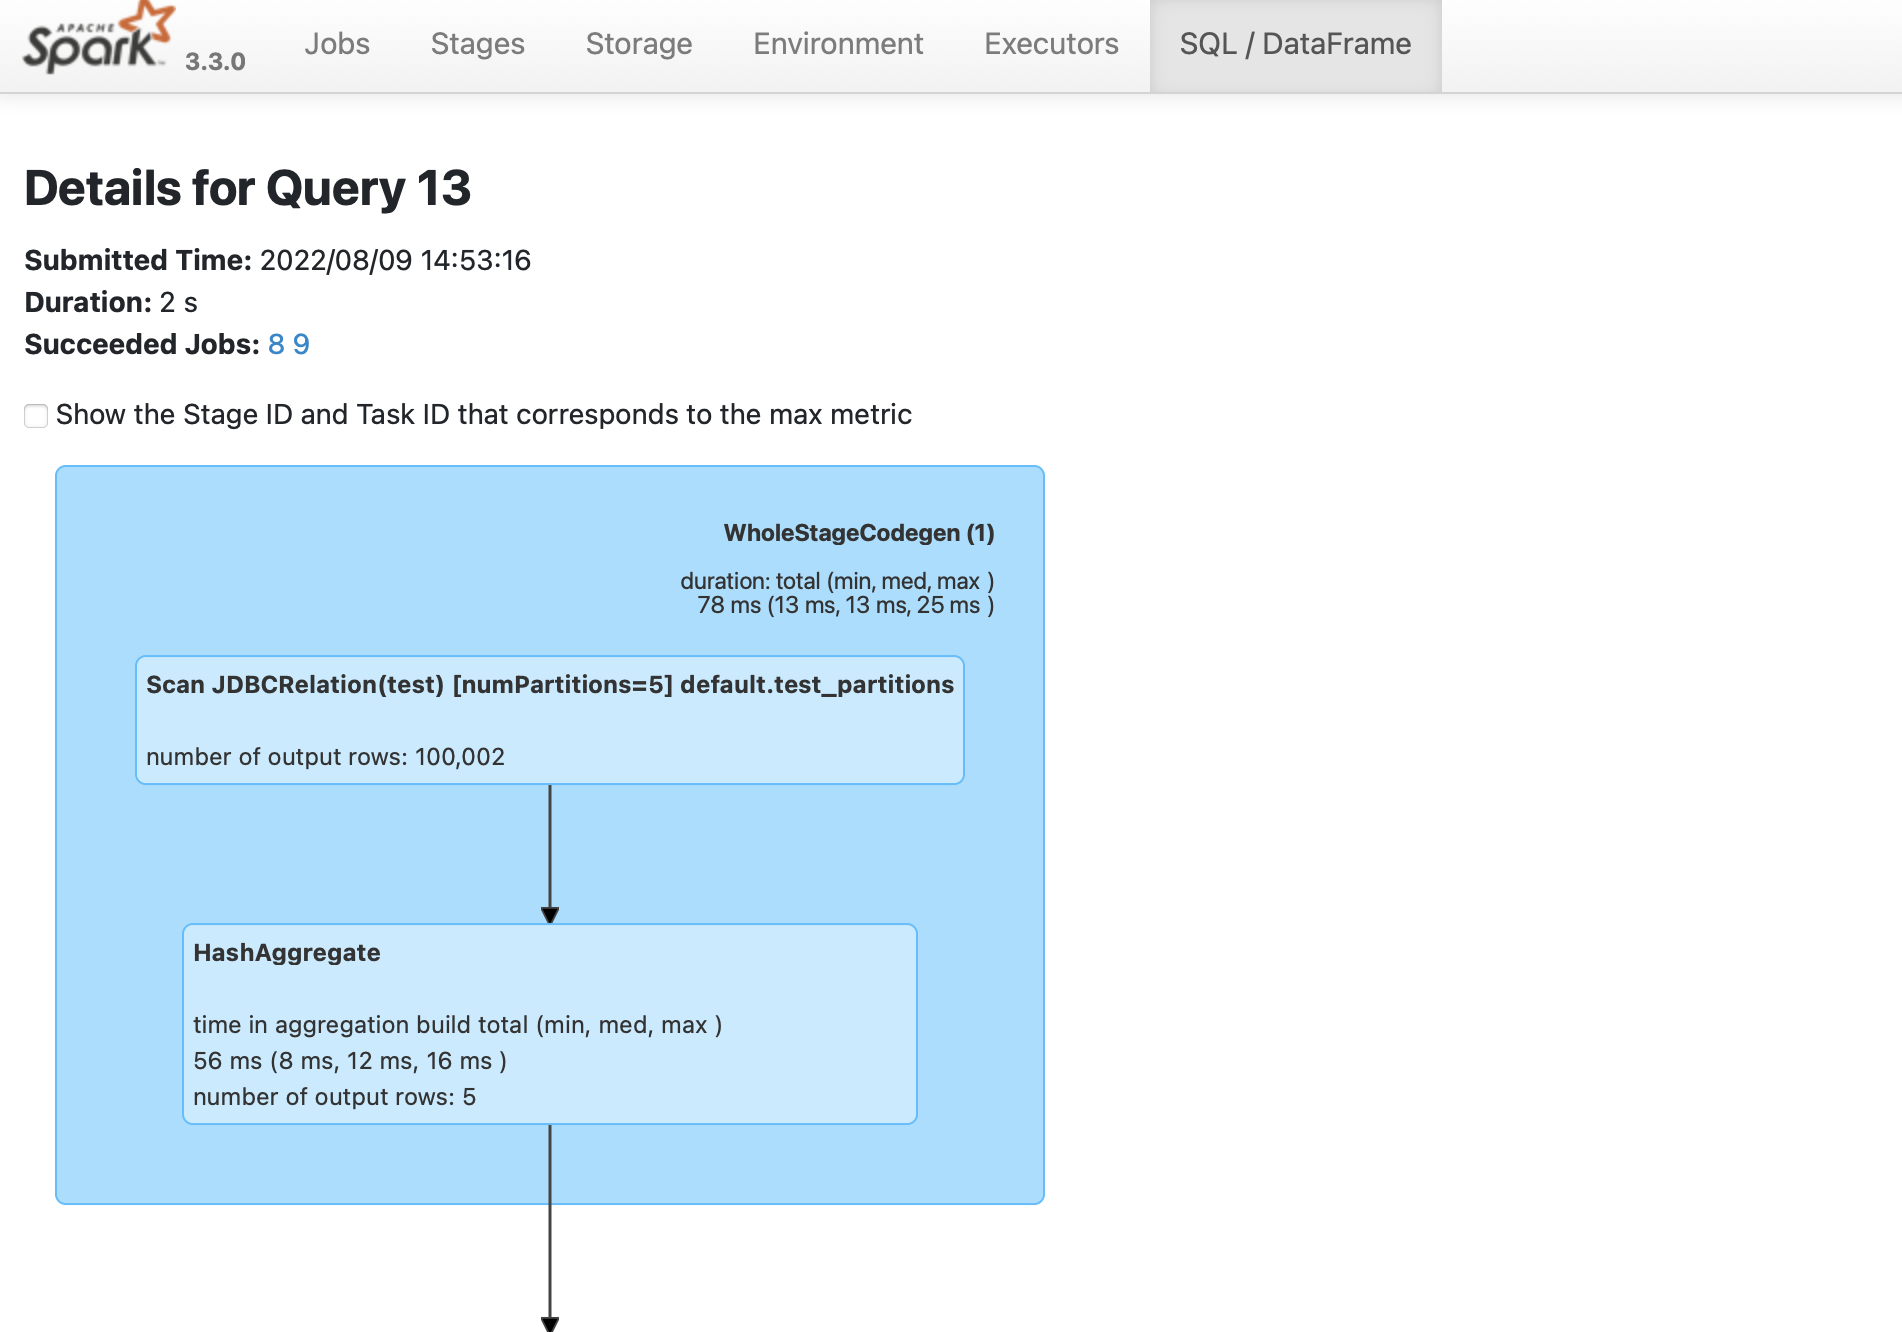
### Verify parallelism
To verify that the Spark job is created,
1. Navigate to the Spark UI using . If your port 4040 is in use, then change the port to the one mentioned when you started the [`spark-sql`](#start-python-spark-shell-with-yugabytedb-driver) shell.
1. From the **SQL/DataFrame** tab, click the last executed SQL statement to see if `numPartitions=5` is displayed as shown in the following illustration: