The following tutorial describes how to use Scala's Spark API [`spark-shell`](https://spark.apache.org/docs/latest/quick-start.html) with YugabyteDB, and perform YSQL queries.
## Prerequisites
This tutorial assumes that you have:
- YugabyteDB running. If you are new to YugabyteDB, follow the steps in [Quick start](/stable/quick-start/macos/).
- Java Development Kit (JDK) 1.8. JDK installers for Linux and macOS can be downloaded from [OpenJDK](http://jdk.java.net/), [AdoptOpenJDK](https://adoptopenjdk.net/), or [Azul Systems](https://www.azul.com/downloads/zulu-community/). Homebrew users on macOS can install using `brew install AdoptOpenJDK/openjdk/adoptopenjdk8`.
- [Apache Spark 3.5.4](https://spark.apache.org/downloads.html).
## Start Scala Spark shell with YugabyteDB driver
From your Spark installation directory, use the following command to start `spark-shell`, and pass the YugabyteDB driver package with the `--packages` parameter. The command fetches the YugabyteDB driver from local cache (if present), or installs the driver from [maven central](https://search.maven.org/).
```sh
./bin/spark-shell --packages com.yugabyte:jdbc-yugabytedb:{{< version-driver-java >}}
```
The Scala prompt should be available as follows:
```output
Welcome to
____ __
/ __/__ ___ _____/ /__
_\ \/ _ \/ _ `/ __/ '_/
/___/ .__/\_,_/_/ /_/\_\ version 3.5.4
/_/
Using Scala version 2.12.15 (OpenJDK 64-Bit Server VM, Java 1.8.0_292)
Type in expressions to have them evaluated.
Type :help for more information.
scala>
```
## Set up the database
1. From your YugabyteDB installation directory, use [ysqlsh](../../../api/ysqlsh/) shell to read and write directly to the database as follows:
```sh
./bin/ysqlsh
```
1. Create a database `ysql_spark_shell` and connect to it using the following:
```sql
yugabyte=# CREATE DATABASE ysql_spark_shell;
yugabyte=# \c ysql_spark_shell;
```
```output
You are now connected to database "ysql_spark_shell" as user "yugabyte".
ysql_spark_shell=#
```
1. Create a table in the `ysql_spark_shell` database to read and write data through the JDBC connector as follows:
```sql
ysql_spark_shell=# CREATE TABLE test AS SELECT generate_series(1,100000) AS id, random(), ceil(random() * 20);
```
## Set up connectivity with YugabyteDB
From your Scala prompt, set up the connection URL and properties to read and write data through the JDBC connector to YugabyteDB.
```scala
scala> val jdbcUrl = s"jdbc:yugabytedb://localhost:5433/ysql_spark_shell"
scala> import java.util.Properties
scala> val connectionProperties = new Properties()
scala> connectionProperties.put("user", s"yugabyte")
scala> connectionProperties.put("password", s"yugabyte")
scala> connectionProperties.setProperty("Driver", "com.yugabyte.Driver")
```
```output
jdbcUrl: String = jdbc:yugabytedb://localhost:5433/ysql_spark_shell
import java.util.Properties
connectionProperties: java.util.Properties = {user=yugabyte, password=yugabyte, Driver=com.yugabyte.Driver}
res60: Object = null
```
## Store and retrieve data
To store and retrieve data using the JDBC connector, create a [DataFrame](https://archive.apache.org/dist/spark/docs/1.5.1/api/java/org/apache/spark/sql/DataFrame.html) in one of the following ways:
### Use DataFrame API
Create a DataFrame for the `test` table to read data via the JDBC connector using the following:
```scala
scala> val test_Df = spark.read.jdbc(jdbcUrl, "test", connectionProperties)
```
### Use SQL queries
Alternatively, you can use SQL queries to create a DataFrame which pushes down the queries to YugabyteDB through the JDBC connector to fetch the rows, and create a DataFrame for that result.
```scala
scala> val test_Df = spark.read.jdbc(jdbcUrl, table="(select * from test) test_alias", connectionProperties)
```
Output the schema of the DataFrame created as follows:
```scala
scala> test_Df.printSchema
```
```output
root
|-- id: integer (nullable = true)
|-- random: double (nullable = true)
|-- ceil: double (nullable = true)
```
Read some data from the table using the DataFrame APIs:
```scala
scala>test_Df.select("id","ceil").groupBy("ceil").sum("id").limit(10).show
```
```output
+--------+---------+
|ceil | sum(id)|
+--------+---------+
| 8.0|248688663|
| 7.0|254438906|
| 18.0|253717793|
| 1.0|253651826|
| 4.0|251144069|
| 11.0|252091080|
| 14.0|244487874|
| 19.0|256220339|
| 3.0|247630466|
| 2.0|249126085|
+--------+---------+
```
### Use `spark.sql()` API
Another alternative is to use the `spark.sql()` API to directly execute SQL queries from Scala shell using the following code:
```scala
scala>test_Df.createOrReplaceTempView("test")
scala>spark.sql("select ceil, sum(id) from test group by ceil limit 10").show
```
The output will be similar to [SQL queries](#using-sql-queries).
The following spark query renames the column of the table `test` from `ceil` to `round_off` in the DataFrame, then creates a new table with the schema of the changed DataFrame, inserts all its data in the new table, and names it as `test_copy` using the JDBC connector.
```scala
scala> spark.table("test").withColumnRenamed("ceil", "round_off").write.jdbc(jdbcUrl, "test_copy", connectionProperties)
```
Verify that the new table `test_copy` is created with the changed schema, and all the data from `test` is copied to it using the following commands from your ysqlsh terminal:
```sql
ysql_spark_shell=# \dt
```
```output
List of relations
Schema | Name | Type | Owner
--------+-----------+-------+----------
public | test_copy | table | yugabyte
public | test | table | yugabyte
(2 rows)
```
```sql
ysql_spark_shell=# \d test_copy
```
```output
Table "public.test_copy"
Column | Type | Collation | Nullable | Default
-----------+------------------+-----------+----------+---------
id | integer | | |
random | double precision | | |
round_off | double precision | | |
```
```sql
ysql_spark_shell=# SELECT COUNT(*) FROM test_copy;
```
```output
count
--------
100000
(1 row)
```
Use the `append` [SaveMode](https://spark.apache.org/docs/latest/sql-data-sources-load-save-functions.html#save-modes) to append data from `test_copy` to the `test` table as follows:
```scala
scala> import org.apache.spark.sql.SaveMode
scala> val test_copy_Df = spark.read.jdbc(jdbcUrl, table="(select * from test_copy) test_copy_alias"connectionProperties)
scala>test_copy_Df.createOrReplaceTempView("test_copy")
scala> spark.table("test_copy").write.mode(SaveMode.Append).jdbc(jdbcUrl, "test", connectionProperties)
```
Verify the changes using ysqlsh:
```sql
ysql_spark_shell=# SELECT COUNT(*) FROM test;
```
```output
count
--------
200000
(1 row)
```
## Parallelism
To maintain parallelism while fetching the table content, create a DataFrame for the table `test` with some specific options as follows:
```scala
scala> val new_test_df = spark.read.format("jdbc")
.option("url", "jdbc:yugabytedb://127.0.0.1:5433/ysql_spark_shell")
.option("dbtable", "test")
.option("user", "yugabyte")
.option("password", "yugabyte")
.option("driver", "com.yugabyte.Driver")
.option("load-balance", "true")
.option("numPartitions", 5)
.option("partitionColumn", "ceil")
.option("lowerBound", 0)
.option("upperBound", 20)
.option("pushDownPredicate", true)
.option("pushDownAggregate", true).load
```
```scala
scala> new_test_df.createOrReplaceTempView("test")
scala> spark.sql("select sum(ceil) from test where id > 50000").show
```
```output
+---------+
|sum(ceil)|
+---------+
|1049414.0|
+---------+
```
The options help in breaking down the whole task into `numPartitions` parallel tasks on the basis of the `partitionColumn`, with the help of minimum and maximum value of the column; where,
- `numPartitions` - divides the whole task to `numPartitions` parallel tasks.
- `lowerBound` - minimum value of the `partitionColumn` in a table.
- `upperBound` - maximum value of the `partitionColumn` in a table.
- `partitionColumn` - the column on the basis of which a partition occurs.
Additionally, the following two options help in optimizing the SQL queries executing on this DataFrame if those SQL queries consist of some filters or aggregate functions by pushing down those _filters_ or _aggregates_ to YugabyteDB using the JDBC connector.
- `pushDownPredicate` - optimizes the query by pushing down the filters to YugabyteDB using the JDBC connector.
- `pushDownAggregate` - optimizes the query by pushing down the aggregates to YugabyteDB using the JDBC connector.
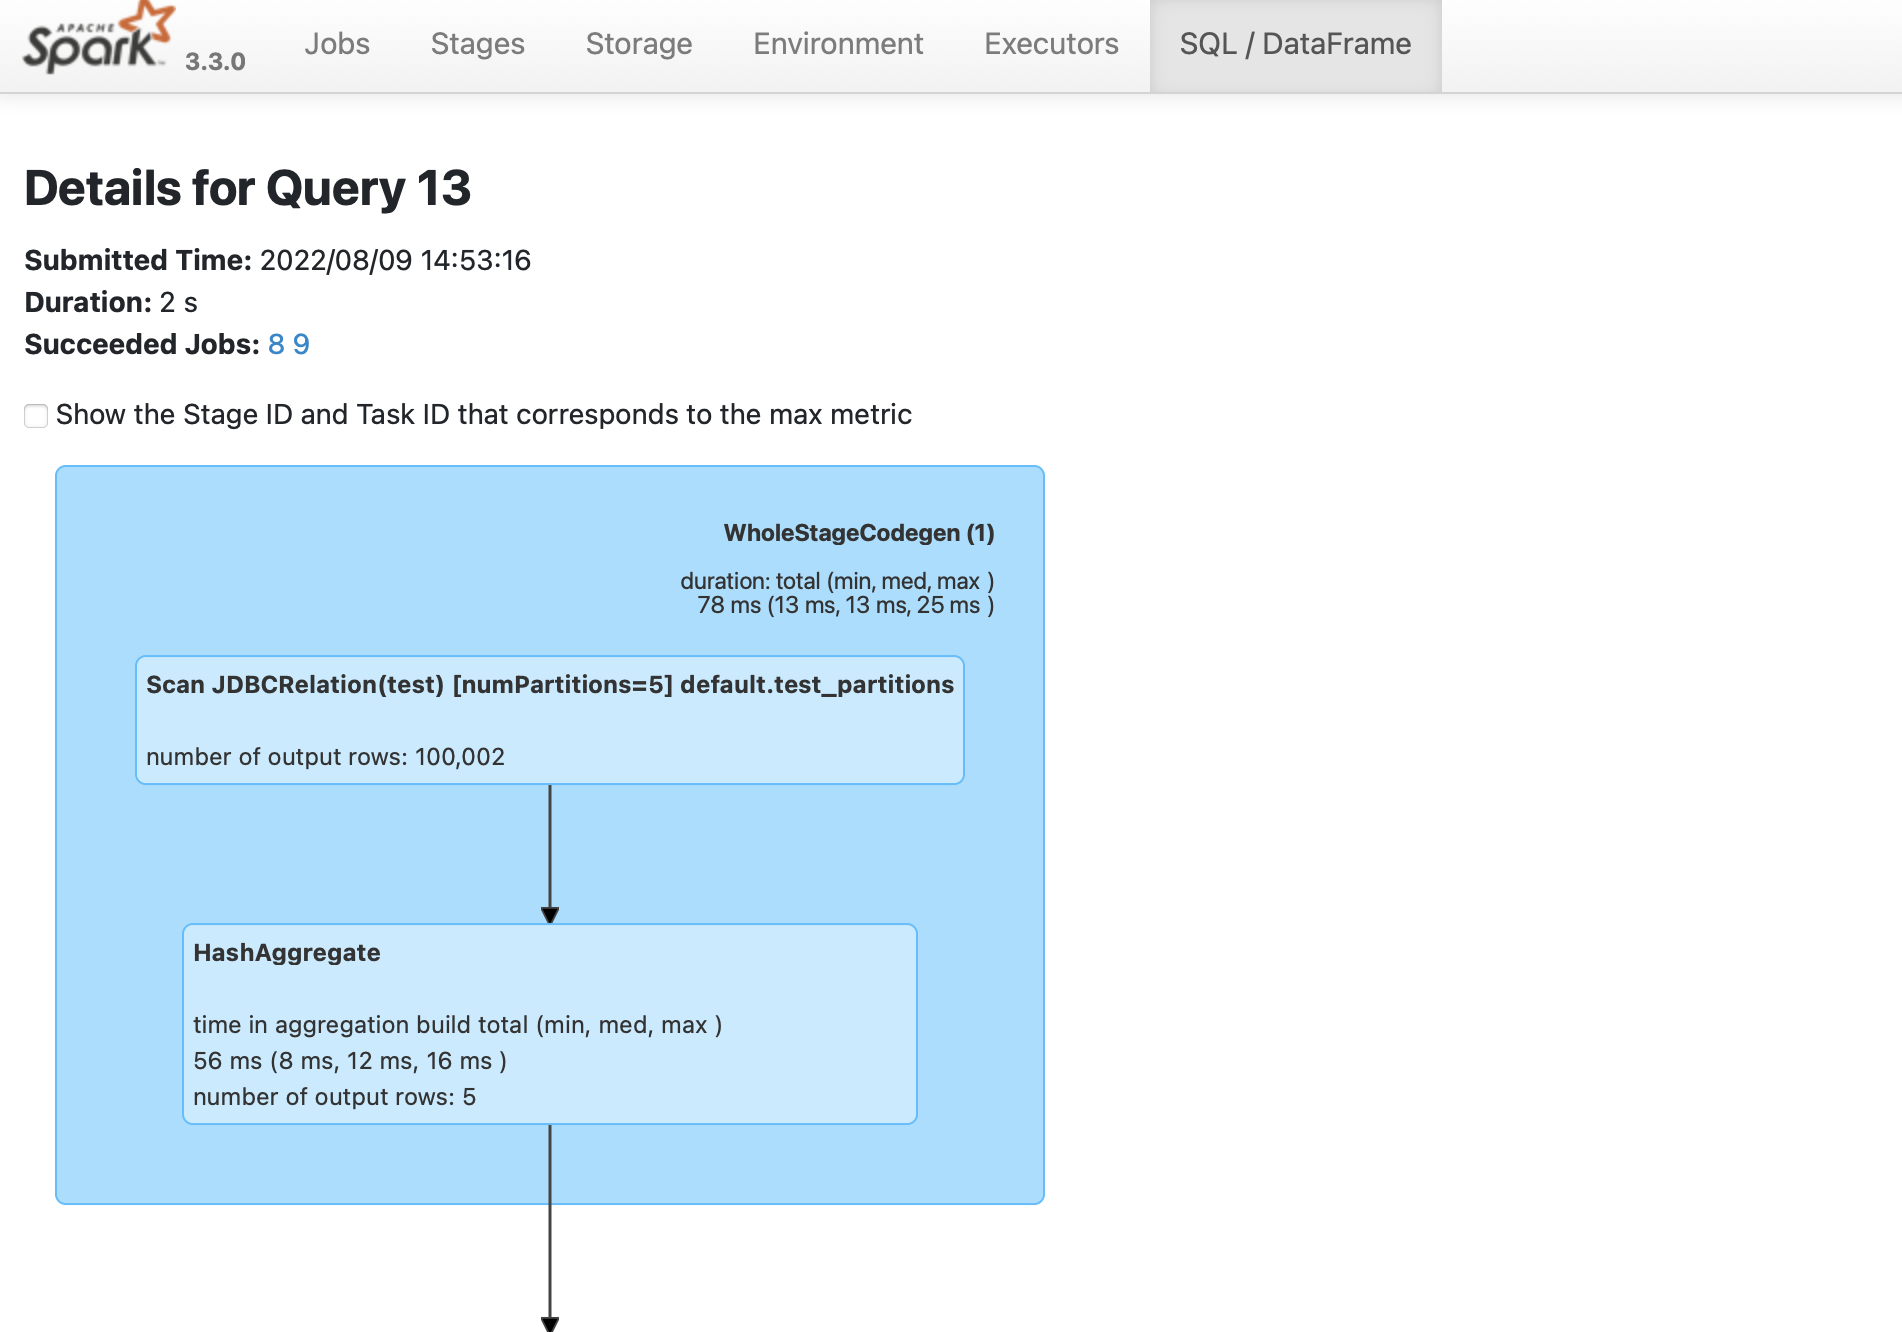
### Verify parallelism
To verify that the spark job is created,
1. Navigate to the Spark UI using . If your port 4040 is in use, then change the port to the one mentioned when you started the [`spark-sql`](#start-scala-spark-shell-with-yugabytedb-driver) shell.
1. From the **SQL/DataFrame** tab, click the last executed SQL statement to see if `numPartitions=5` is displayed as shown in the following illustration: