## Prerequisites
You must have a [multi-zonal](https://cloud.google.com/kubernetes-engine/docs/concepts/types-of-clusters#multi-zonal_clusters) or [regional](https://cloud.google.com/kubernetes-engine/docs/concepts/types-of-clusters#regional_clusters) GKE cluster that has Helm configured. If you have not installed the Helm client (`helm`), see [Installing Helm](https://helm.sh/docs/intro/install/).
The YugabyteDB Helm Chart has been tested with the following software versions:
- GKE running Kubernetes 1.18 (or later) with nodes such that a total of 12 CPU cores and 45 GB RAM can be allocated to YugabyteDB. This can be three nodes with 4 CPU core and 15 GB RAM allocated to YugabyteDB. `n1-standard-8` is the minimum instance type that meets these criteria.
- Helm 3.4 or later
- YugabyteDB docker image (`yugabytedb/yugabyte`) 2.1.0 or later
- For optimal performance, ensure you've set the appropriate [system limits using `ulimit`](../../../../manual-deployment/system-config/#set-ulimits) on each node in your Kubernetes cluster.
The following steps show how to meet these prerequisites.
- Download and install the [Google Cloud SDK](https://cloud.google.com/sdk/downloads/).
- Configure defaults for `gcloud`
Set the project ID as `yugabyte`. You can change this as per your need.
```sh
$ gcloud config set project yugabyte
```
- Install `kubectl`
After installing the Google Cloud SDK, install the `kubectl` command line tool by running the following command.
```sh
$ gcloud components install kubectl
```
Note that GKE is usually 2 or 3 major releases behind the upstream/OSS Kubernetes release. This means you have to make sure that you have the latest `kubectl` version that is compatible across different Kubernetes distributions if that's what you intend to.
- Ensure `helm` is installed
First, check to see if Helm is installed by using the Helm version command.
```sh
$ helm version
```
You should see something similar to the following output. Note that the `tiller` server side component has been removed in Helm 3.
```output
version.BuildInfo{Version:"v3.0.3", GitCommit:"ac925eb7279f4a6955df663a0128044a8a6b7593", GitTreeState:"clean", GoVersion:"go1.13.6"}
```
## 1. Create a GKE cluster
### Create regional cluster
Following command creates a 3-node cluster with 1 node each in the us-central1-a, us-central1-b and us-central1-c zones.
```sh
$ gcloud container clusters create my-regional-cluster \
--machine-type=n1-standard-8 \
--num-nodes 1 \
--region us-central1 \
--node-locations us-central1-a,us-central1-b,us-central1-c
```
```output
...
NAME LOCATION MASTER_VERSION MASTER_IP MACHINE_TYPE NODE_VERSION NUM_NODES STATUS
my-regional-cluster us-central1 1.14.10-gke.17 35.226.36.261 n1-standard-8 1.14.10-gke.17 3 RUNNING
```
As stated in the Prerequisites section, the default configuration in the YugabyteDB Helm Chart requires Kubernetes nodes to have a total of 12 CPU cores and 45 GB RAM allocated to YugabyteDB. This can be three nodes with 4 CPU cores and 15 GB RAM allocated to YugabyteDB. The smallest Google Cloud machine type that meets this requirement is `n1-standard-8` which has 8 CPU cores and 30 GB RAM.
### Create a storage class
We need to specify `WaitForFirstConsumer` mode for the volumeBindingMode so that volumes will be provisioned according to pods' zone affinities.
Copy the contents below to a file named `storage.yaml`.
```yaml
kind: StorageClass
apiVersion: storage.k8s.io/v1
metadata:
name: yb-storage
provisioner: kubernetes.io/gce-pd
allowVolumeExpansion: true
volumeBindingMode: WaitForFirstConsumer
parameters:
type: pd-ssd
fsType: xfs
```
Apply the above configuration to your cluster.
```sh
$ kubectl apply -f storage.yaml
```
## 2. Create a YugabyteDB cluster
### Add charts repository
To add the YugabyteDB charts repository, run the following command.
```sh
$ helm repo add yugabytedb https://charts.yugabyte.com
```
Make sure that you have the latest updates to the repository by running the following command.
```sh
$ helm repo update
```
Validate that you have the updated Chart version.
```sh
$ helm search repo yugabytedb/yugabyte --version {{}}
```
```output
NAME CHART VERSION APP VERSION DESCRIPTION
yugabytedb/yugabyte {{}} {{}} YugabyteDB is the high-performance distributed ...
```
### Create override files
Copy the contents below to a file named `overrides-us-central1-a.yaml`.
```yaml
isMultiAz: True
AZ: us-central1-a
masterAddresses: "yb-master-0.yb-masters.yb-demo-us-central1-a.svc.cluster.local:7100,yb-master-0.yb-masters.yb-demo-us-central1-b.svc.cluster.local:7100,yb-master-0.yb-masters.yb-demo-us-central1-c.svc.cluster.local:7100"
storage:
master:
storageClass: "yb-storage"
tserver:
storageClass: "yb-storage"
replicas:
master: 1
tserver: 1
totalMasters: 3
gflags:
master:
placement_cloud: "gke"
placement_region: "us-central1"
placement_zone: "us-central1-a"
tserver:
placement_cloud: "gke"
placement_region: "us-central1"
placement_zone: "us-central1-a"
```
Copy the contents below to a file named `overrides-us-central1-b.yaml`.
```yaml
isMultiAz: True
AZ: us-central1-b
masterAddresses: "yb-master-0.yb-masters.yb-demo-us-central1-a.svc.cluster.local:7100,yb-master-0.yb-masters.yb-demo-us-central1-b.svc.cluster.local:7100,yb-master-0.yb-masters.yb-demo-us-central1-c.svc.cluster.local:7100"
storage:
master:
storageClass: "yb-storage"
tserver:
storageClass: "yb-storage"
replicas:
master: 1
tserver: 1
totalMasters: 3
gflags:
master:
placement_cloud: "gke"
placement_region: "us-central1"
placement_zone: "us-central1-b"
tserver:
placement_cloud: "gke"
placement_region: "us-central1"
placement_zone: "us-central1-b"
```
Copy the contents below to a file named `overrides-us-central1-c.yaml`.
```yaml
isMultiAz: True
AZ: us-central1-c
masterAddresses: "yb-master-0.yb-masters.yb-demo-us-central1-a.svc.cluster.local:7100,yb-master-0.yb-masters.yb-demo-us-central1-b.svc.cluster.local:7100,yb-master-0.yb-masters.yb-demo-us-central1-c.svc.cluster.local:7100"
storage:
master:
storageClass: "yb-storage"
tserver:
storageClass: "yb-storage"
replicas:
master: 1
tserver: 1
totalMasters: 3
gflags:
master:
placement_cloud: "gke"
placement_region: "us-central1"
placement_zone: "us-central1-c"
tserver:
placement_cloud: "gke"
placement_region: "us-central1"
placement_zone: "us-central1-c"
```
### Install YugabyteDB
Install YugabyteDB in the Kubernetes cluster using the commands below.
For Helm, you have to first create the 3 namespaces.
```sh
$ kubectl create namespace yb-demo-us-central1-a
$ kubectl create namespace yb-demo-us-central1-b
$ kubectl create namespace yb-demo-us-central1-c
```
Now create the overall YugabyteDB cluster in such a way that one third of the nodes are hosted in each zone.
```sh
$ helm install yb-demo-us-central1-a yugabytedb/yugabyte \
--version {{}} \
--namespace yb-demo-us-central1-a \
-f overrides-us-central1-a.yaml --wait
```
```sh
$ helm install yb-demo-us-central1-b yugabytedb/yugabyte \
--version {{}} \
--namespace yb-demo-us-central1-b \
-f overrides-us-central1-b.yaml --wait
```
```sh
$ helm install yb-demo-us-central1-c yugabytedb/yugabyte \
--version {{}} \
--namespace yb-demo-us-central1-c \
-f overrides-us-central1-c.yaml --wait
```
## 3. Check the cluster status
You can check the status of the cluster using various commands noted below.
Check the pods.
```sh
$ kubectl get pods --all-namespaces
```
```output
NAMESPACE NAME READY STATUS RESTARTS AGE
...
yb-demo-us-central1-a yb-master-0 2/2 Running 0 6m54s
yb-demo-us-central1-a yb-tserver-0 2/2 Running 0 6m55s
yb-demo-us-central1-b yb-master-0 2/2 Running 0 3m56s
yb-demo-us-central1-b yb-tserver-0 2/2 Running 0 3m57s
yb-demo-us-central1-c yb-master-0 2/2 Running 0 100s
yb-demo-us-central1-c yb-tserver-0 2/2 Running 0 100s
```
Check the services.
```sh
$ kubectl get services --all-namespaces
```
```output
NAMESPACE NAME TYPE CLUSTER-IP EXTERNAL-IP PORT(S) AGE
...
yb-demo-us-central1-a yb-master-ui LoadBalancer 10.27.249.152 34.71.83.45 7000:31927/TCP 9m33s
yb-demo-us-central1-a yb-masters ClusterIP None 7100/TCP,7000/TCP 9m33s
yb-demo-us-central1-a yb-tserver-service LoadBalancer 10.27.255.103 34.71.106.168 6379:31373/TCP,9042:32627/TCP,5433:30983/TCP 9m33s
yb-demo-us-central1-a yb-tservers ClusterIP None 7100/TCP,9000/TCP,6379/TCP,9042/TCP,5433/TCP 9m33s
yb-demo-us-central1-b yb-master-ui LoadBalancer 10.27.240.40 35.188.198.123 7000:32217/TCP 6m35s
yb-demo-us-central1-b yb-masters ClusterIP None 7100/TCP,7000/TCP 6m35s
yb-demo-us-central1-b yb-tserver-service LoadBalancer 10.27.255.60 34.71.140.1 6379:30036/TCP,9042:31514/TCP,5433:31103/TCP 6m35s
yb-demo-us-central1-b yb-tservers ClusterIP None 7100/TCP,9000/TCP,6379/TCP,9042/TCP,5433/TCP 6m35s
yb-demo-us-central1-c yb-master-ui LoadBalancer 10.27.247.234 34.68.203.224 7000:31090/TCP 4m18s
yb-demo-us-central1-c yb-masters ClusterIP None 7100/TCP,7000/TCP 4m18s
yb-demo-us-central1-c yb-tserver-service LoadBalancer 10.27.243.195 35.223.214.205 6379:31689/TCP,9042:31639/TCP,5433:32685/TCP 4m18s
yb-demo-us-central1-c yb-tservers ClusterIP None 7100/TCP,9000/TCP,6379/TCP,9042/TCP,5433/TCP 4m18s
```
Access the yb-master Admin UI for the cluster at `http://:7000` where `external-ip` refers to one of the `yb-master-ui` services. Note that you can use any of the above three services for this purpose since all of them will show the same cluster metadata.
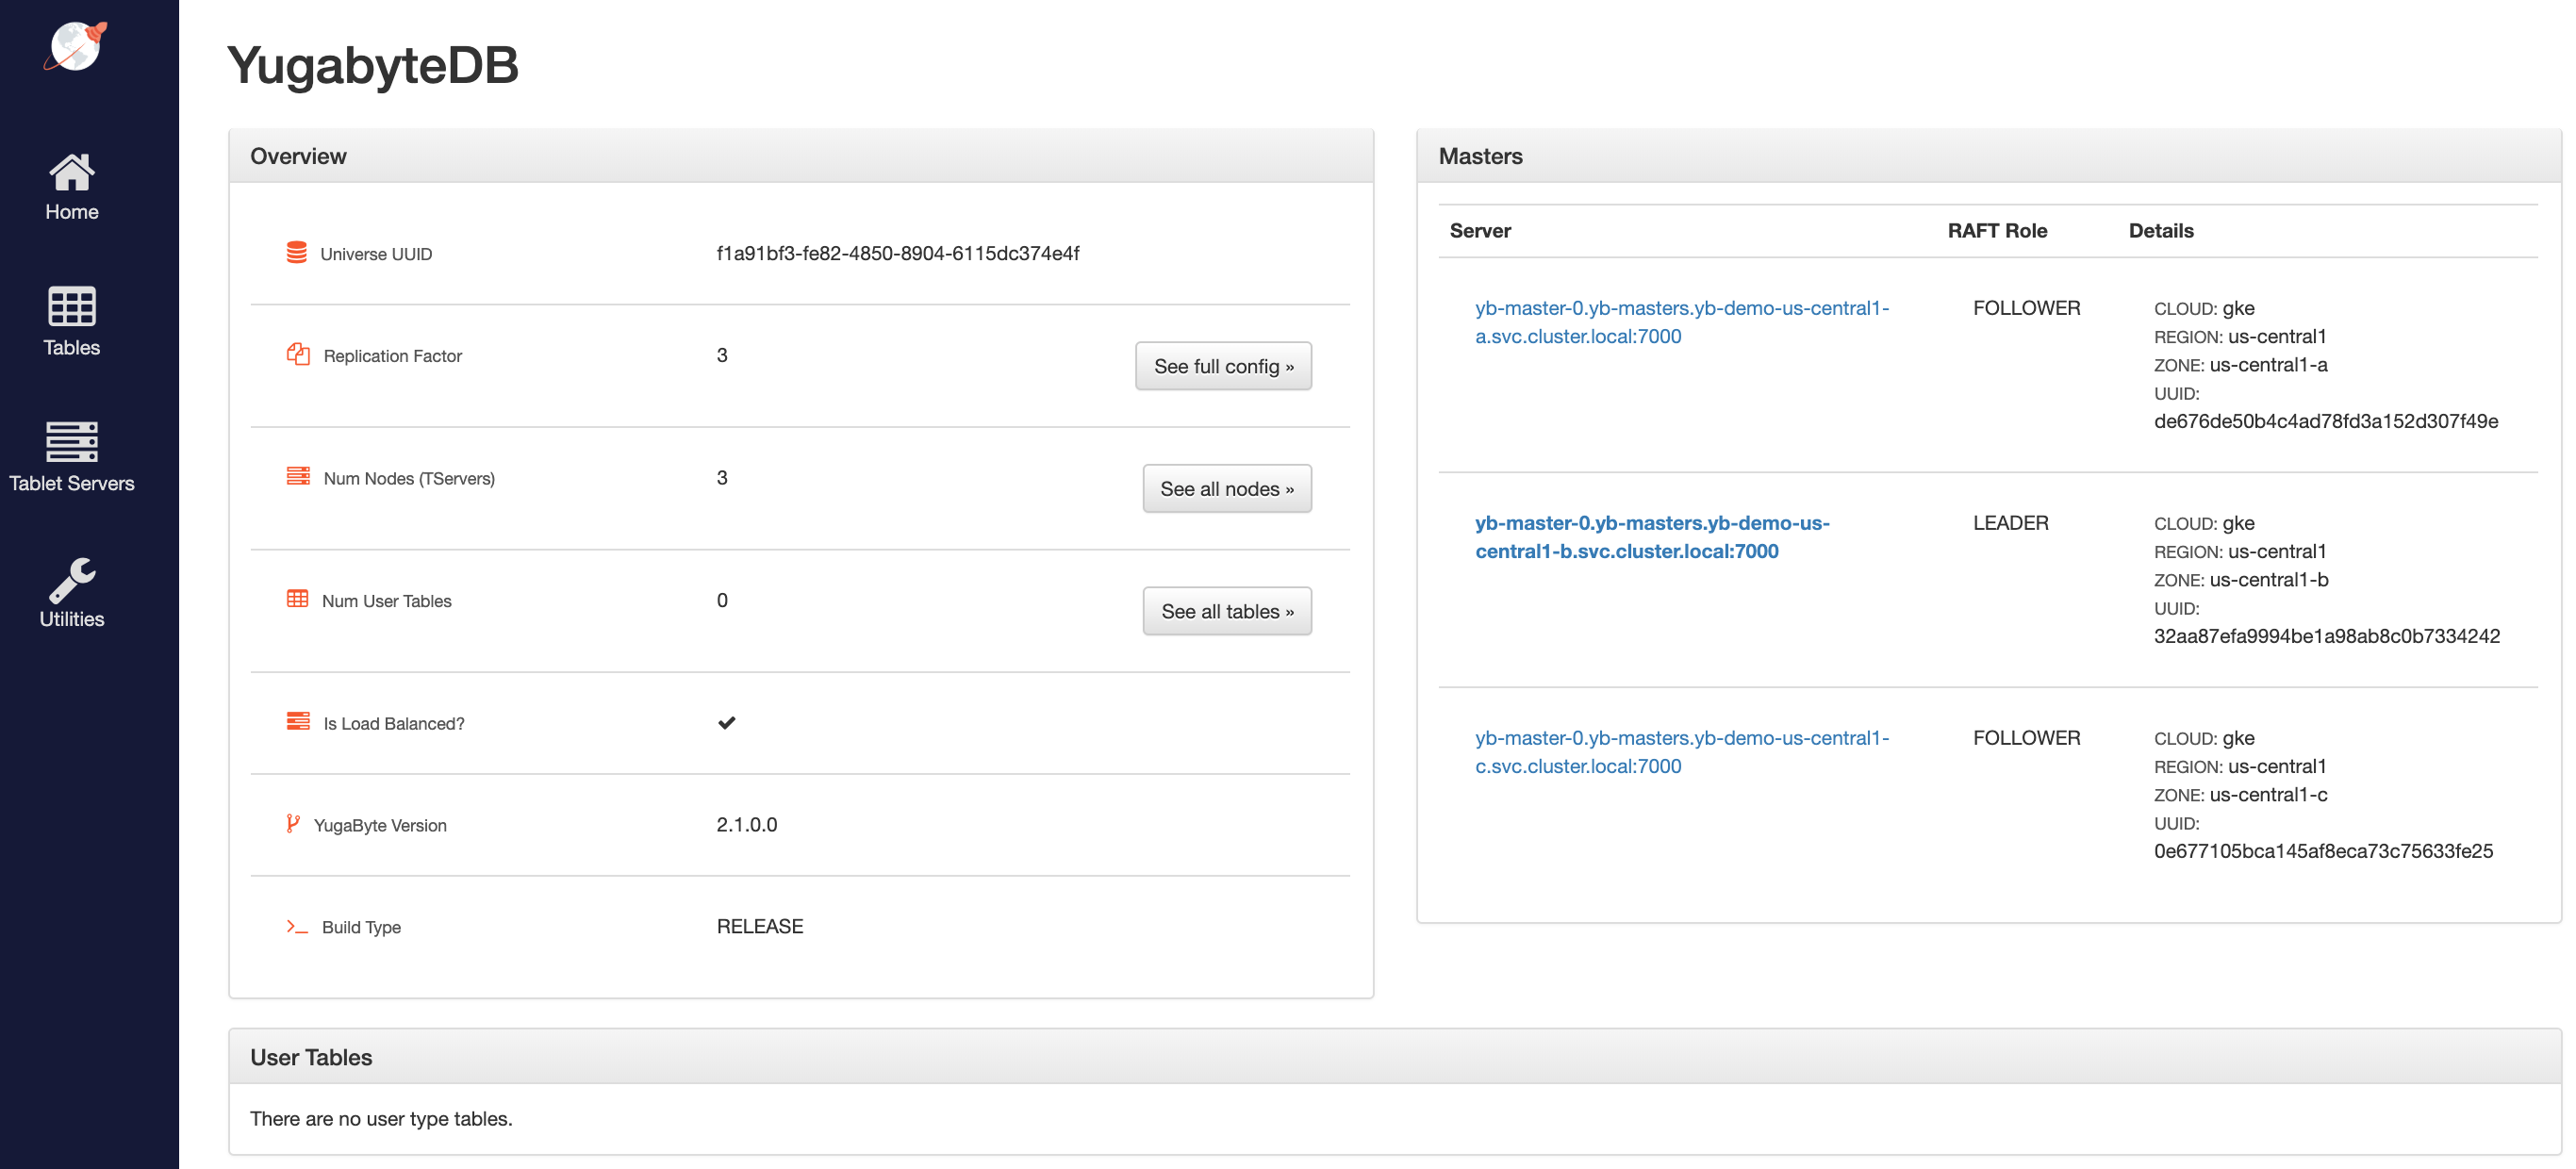
## 4. Configure zone-aware replica placement
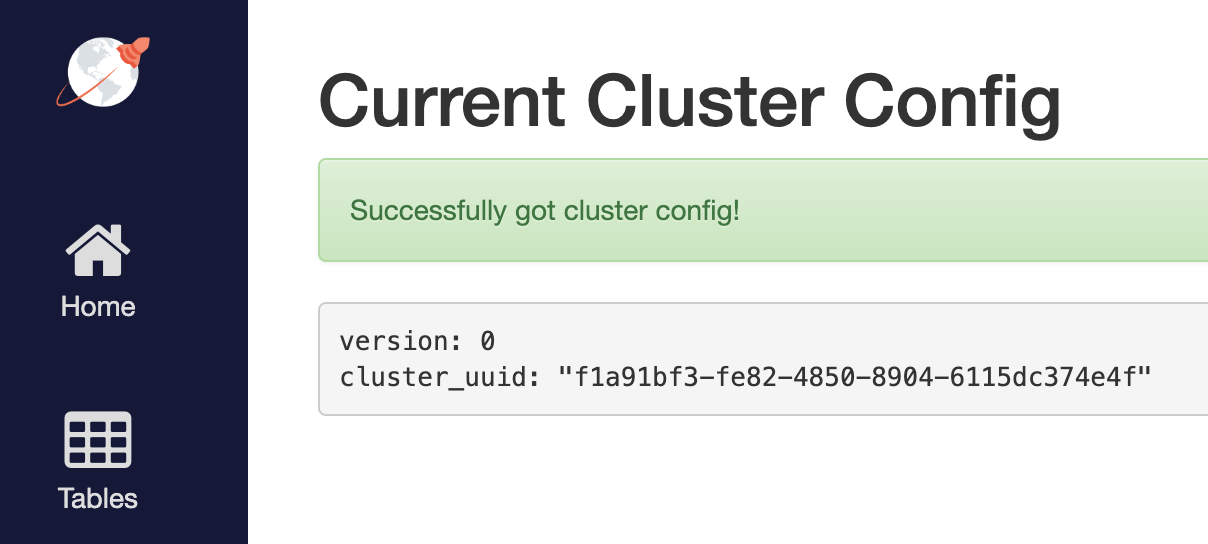
Default replica placement policy treats every yb-tserver as equal irrespective of its `placement_*` setting. Go to `http://:7000/cluster-config` to confirm that the default configuration is still in effect.
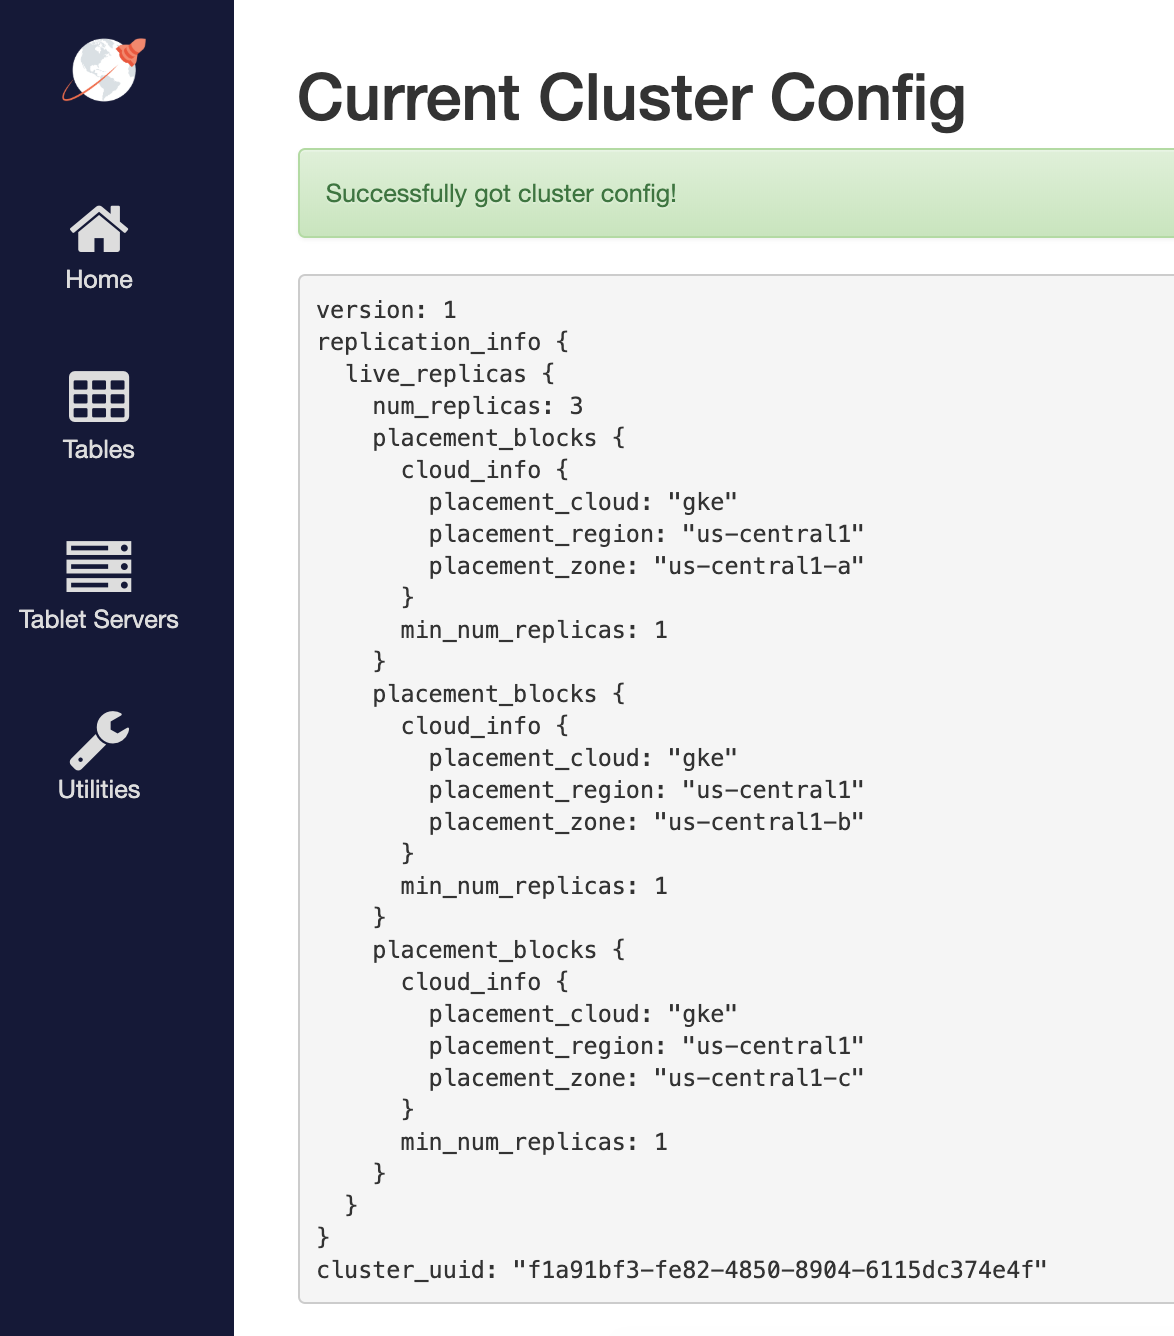
To make the replica placement zone-aware, so that one replica is placed in each zone, run the following command:
```sh
$ kubectl exec -it -n yb-demo-us-central1-a yb-master-0 -- bash \
-c "/home/yugabyte/master/bin/yb-admin --master_addresses yb-master-0.yb-masters.yb-demo-us-central1-a.svc.cluster.local:7100,yb-master-0.yb-masters.yb-demo-us-central1-b.svc.cluster.local:7100,yb-master-0.yb-masters.yb-demo-us-central1-c.svc.cluster.local:7100 modify_placement_info gke.us-central1.us-central1-a,gke.us-central1.us-central1-b,gke.us-central1.us-central1-c 3"
```
To see the new configuration, go to `http://:7000/cluster-config` to see the new configuration.
## 5. Connect using YugabyteDB shells
To connect and use the YSQL Shell (ysqlsh), run the following command.
```sh
$ kubectl exec -n yb-demo-us-central1-a -it yb-tserver-0 -- ysqlsh \
-h yb-tserver-0.yb-tservers.yb-demo-us-central1-a
```
To open the YCQL Shell (ycqlsh), run the following command:
```sh
$ kubectl exec -n yb-demo-us-central1-a -it yb-tserver-0 -- ycqlsh \
yb-tserver-0.yb-tservers.yb-demo-us-central1-a
```
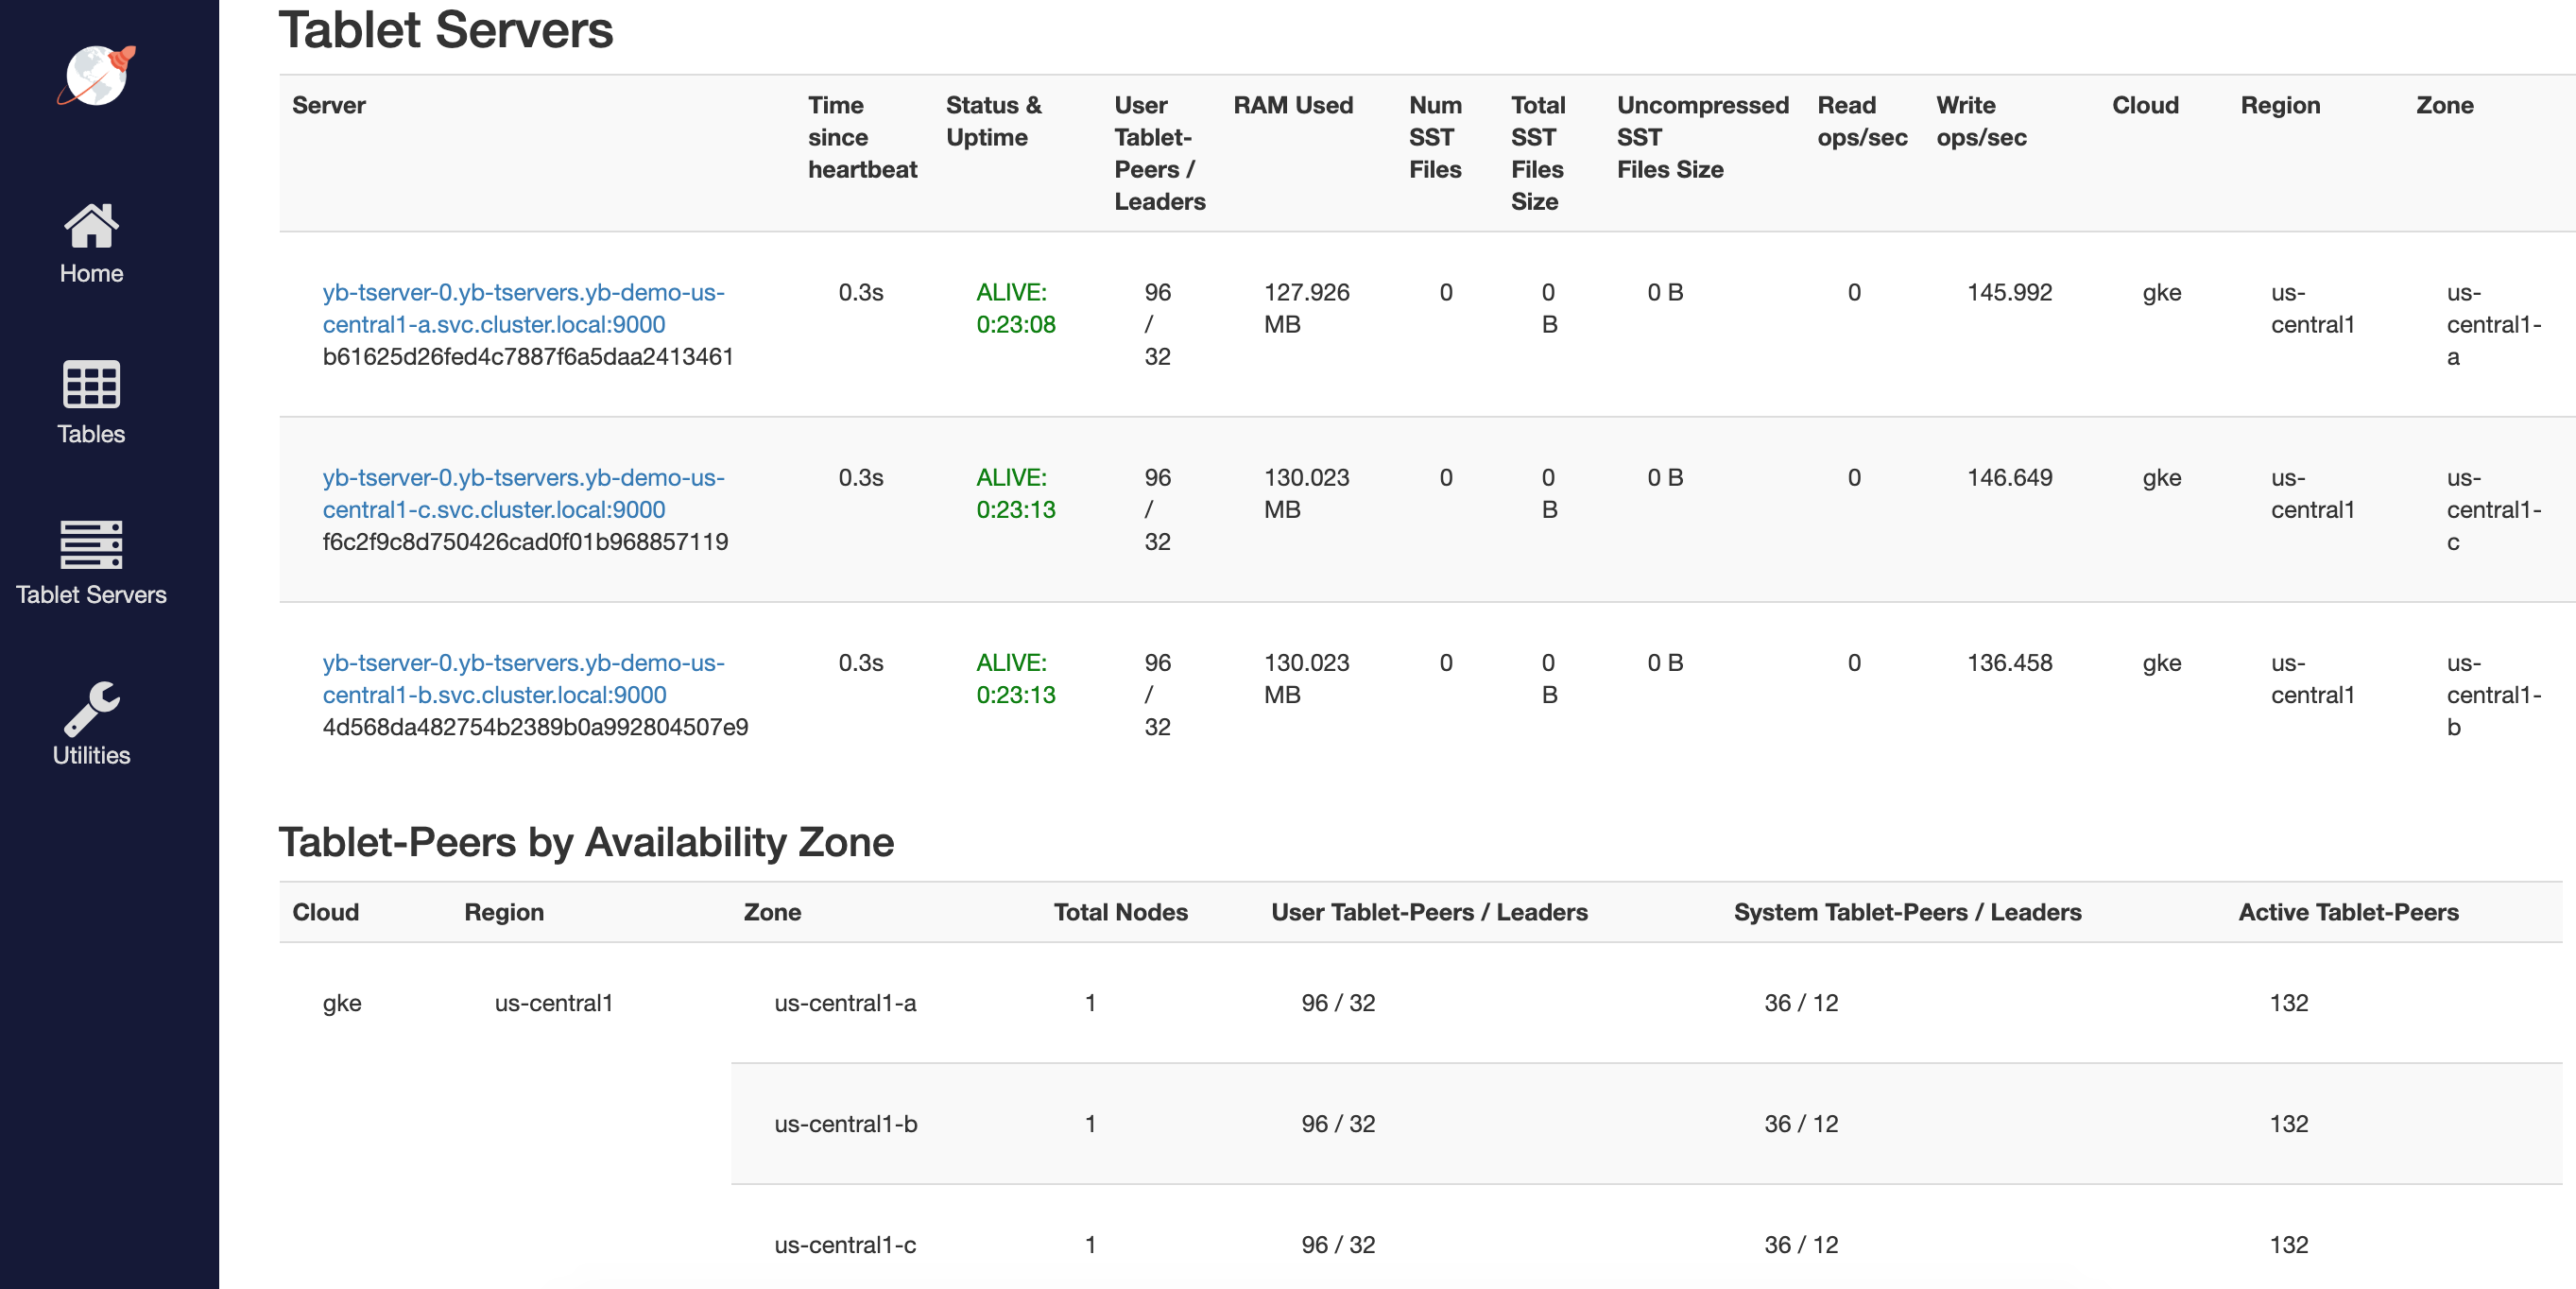
You can follow the [Explore YSQL](/stable/quick-start/explore/ysql/) tutorial and then go to the `http://:7000/tablet-servers` page of the yb-master Admin UI to confirm that tablet peers and their leaders are placed evenly across all three zones for both user data and system data.
## 6. Connect using external clients
To connect an external program, get the load balancer `EXTERNAL-IP` address of the `yb-tserver-service` service and connect using port 5433 for YSQL or port 9042 for YCQL, as follows:
```sh
$ kubectl get services --namespace yb-demo
```
```output
NAME TYPE CLUSTER-IP EXTERNAL-IP PORT(S) AGE
...
yb-tserver-service LoadBalancer 10.98.36.163 35.225.153.214 6379:30929/TCP,9042:30975/TCP,5433:30048/TCP 10s
...
```