## Prerequisites
You must have a Amazon EKS cluster that has Helm configured. Note that Amazon EKS clusters are deployed across multiple zones by default. If you have not installed the Helm client (`helm`), see [Installing Helm](https://helm.sh/docs/intro/install/).
The YugabyteDB Helm chart has been tested with the following software versions:
- Amazon EKS running Kubernetes 1.18 (or later) with nodes such that a total of 12 CPU cores and 45 GB RAM can be allocated to YugabyteDB. This can be three nodes with 4 CPU core and 15 GB RAM allocated to YugabyteDB. `m5.2xlarge` is the minimum AWS EC2 instance type that meets these criteria.
- Helm 3.4 or later
- YugabyteDB docker image (yugabytedb/yugabyte) 2.1.0 or later
- For optimal performance, ensure you've set the appropriate [system limits using `ulimit`](../../../../manual-deployment/system-config/#set-ulimits) on each node in your Kubernetes cluster.
The following steps show how to meet these prerequisites.
- Install and configure the [AWS CLI](https://docs.aws.amazon.com/cli/latest/userguide/installing.html).
- Install [`eksctl`](https://eksctl.io/)
`eksctl` is a basic command line utility for creating and managing Amazon EKS clusters. Detailed instructions for installing eksctl based on the OS of your choice are available at [Getting Started with eksctl](https://docs.aws.amazon.com/eks/latest/userguide/getting-started-eksctl.html). The following instructions apply to macOS.
```sh
$ brew tap weaveworks/tap
$ brew install weaveworks/tap/eksctl
```
Test that your installation was successful.
```sh
$ eksctl version
```
- Install and configure `kubectl` for Amazon EKS
You have multiple options to download and install `kubectl` for your OS. Note that Amazon EKS also vends kubectl binaries that you can use that are identical to the upstream kubectl binaries with the same version. To install the Amazon EKS-vended binary for your operating system, see [Installing kubectl](https://docs.aws.amazon.com/eks/latest/userguide/install-kubectl.html).
- Ensure `helm` is installed
First, check to see if Helm is installed by using the Helm version command.
```sh
$ helm version
```
You should see something similar to the following output. Note that the `tiller` server side component has been removed in Helm 3.
```output
version.BuildInfo{Version:"v3.0.3", GitCommit:"ac925eb7279f4a6955df663a0128044a8a6b7593", GitTreeState:"clean", GoVersion:"go1.13.6"}
```
## 1. Create a EKS cluster
### Create EKS cluster
Create a EKS cluster, if you have not already done so, by running the following command. Note that if you do not specify 3 zones in the `zones` parameter explicitly then EKS may place the 3 nodes in [only 2 zones](https://docs.aws.amazon.com/eks/latest/userguide/network_reqs.html).
```sh
$ eksctl create cluster \
--name yb-multizone \
--version 1.14 \
--region us-east-1 \
--zones us-east-1a,us-east-1b,us-east-1c \
--nodegroup-name standard-workers \
--node-type m5.2xlarge \
--nodes 3 \
--nodes-min 1 \
--nodes-max 4 \
--managed
```
As stated in the Prerequisites section, the default configuration in the YugabyteDB Helm Chart requires Kubernetes nodes to have a total of 12 CPU cores and 45 GB RAM allocated to YugabyteDB. This can be three nodes with 4 CPU cores and 15 GB RAM allocated to YugabyteDB. The smallest AWS instance type that meets this requirement is `m5.2xlarge` which has 8 CPU cores and 32 GB RAM.
### Create a storage class
We need to specify `WaitForFirstConsumer` mode for the volumeBindingMode so that volumes will be provisioned according to pods' zone affinities.
Copy the contents below to a file named `storage.yaml`.
```yaml
kind: StorageClass
metadata:
name: yb-storage
apiVersion: storage.k8s.io/v1
allowVolumeExpansion: true
provisioner: kubernetes.io/aws-ebs
volumeBindingMode: WaitForFirstConsumer
parameters:
type: gp2
fsType: xfs
```
Apply the above configuration to your cluster.
```sh
$ kubectl apply -f storage.yaml
```
## 2. Create a YugabyteDB cluster
### Add charts repository
To add the YugabyteDB charts repository, run the following command.
```sh
$ helm repo add yugabytedb https://charts.yugabyte.com
```
Make sure that you have the latest updates to the repository by running the following command.
```sh
$ helm repo update
```
Validate that you have the updated chart version.
```sh
$ helm search repo yugabytedb/yugabyte --version {{}}
```
```output
NAME CHART VERSION APP VERSION DESCRIPTION
yugabytedb/yugabyte {{}} {{}} YugabyteDB is the high-performance distributed ...
```
### Create override files
Copy the contents below to a file named `overrides-us-east-1a.yaml`.
```yaml
isMultiAz: True
AZ: us-east-1a
masterAddresses: "yb-master-0.yb-masters.yb-demo-us-east-1a.svc.cluster.local:7100,yb-master-0.yb-masters.yb-demo-us-east-1b.svc.cluster.local:7100,yb-master-0.yb-masters.yb-demo-us-east-1c.svc.cluster.local:7100"
storage:
master:
storageClass: "yb-storage"
tserver:
storageClass: "yb-storage"
replicas:
master: 1
tserver: 1
totalMasters: 3
gflags:
master:
placement_cloud: "aws"
placement_region: "us-east-1"
placement_zone: "us-east-1a"
tserver:
placement_cloud: "aws"
placement_region: "us-east-1"
placement_zone: "us-east-1a"
```
Copy the contents below to a file named `overrides-us-east-1b.yaml`.
```yaml
isMultiAz: True
AZ: us-east-1b
masterAddresses: "yb-master-0.yb-masters.yb-demo-us-east-1a.svc.cluster.local:7100,yb-master-0.yb-masters.yb-demo-us-east-1b.svc.cluster.local:7100,yb-master-0.yb-masters.yb-demo-us-east-1c.svc.cluster.local:7100"
storage:
master:
storageClass: "yb-storage"
tserver:
storageClass: "yb-storage"
replicas:
master: 1
tserver: 1
totalMasters: 3
gflags:
master:
placement_cloud: "aws"
placement_region: "us-east-1"
placement_zone: "us-east-1b"
tserver:
placement_cloud: "aws"
placement_region: "us-east-1"
placement_zone: "us-east-1b"
```
Copy the contents below to a file named `overrides-us-east-1c.yaml`.
```yaml
isMultiAz: True
AZ: us-east-1c
masterAddresses: "yb-master-0.yb-masters.yb-demo-us-east-1a.svc.cluster.local:7100,yb-master-0.yb-masters.yb-demo-us-east-1b.svc.cluster.local:7100,yb-master-0.yb-masters.yb-demo-us-east-1c.svc.cluster.local:7100"
storage:
master:
storageClass: "yb-storage"
tserver:
storageClass: "yb-storage"
replicas:
master: 1
tserver: 1
totalMasters: 3
gflags:
master:
placement_cloud: "aws"
placement_region: "us-east-1"
placement_zone: "us-east-1c"
tserver:
placement_cloud: "aws"
placement_region: "us-east-1"
placement_zone: "us-east-1c"
```
### Install YugabyteDB
Install YugabyteDB in the Kubernetes cluster using the commands below.
For Helm, you have to first create the 3 namespaces.
```sh
$ kubectl create namespace yb-demo-us-east-1a
$ kubectl create namespace yb-demo-us-east-1b
$ kubectl create namespace yb-demo-us-east-1c
```
Now create the overall YugabyteDB cluster in such a way that one third of the nodes are hosted in each zone.
```sh
$ helm install yb-demo-us-east-1a yugabytedb/yugabyte \
--version {{}} \
--namespace yb-demo-us-east-1a \
-f overrides-us-east-1a.yaml --wait
```
```sh
$ helm install yb-demo-us-east-1b yugabytedb/yugabyte \
--version {{}} \
--namespace yb-demo-us-east-1b \
-f overrides-us-east-1b.yaml --wait
```
```sh
$ helm install yb-demo-us-east-1c yugabytedb/yugabyte \
--version {{}} \
--namespace yb-demo-us-east-1c \
-f overrides-us-east-1c.yaml --wait
```
## 3. Check the cluster status
You can check the status of the cluster using various commands noted below.
Check the pods.
```sh
$ kubectl get pods --all-namespaces
```
Check the services.
```sh
$ kubectl get services --all-namespaces
```
```output
NAMESPACE NAME TYPE CLUSTER-IP EXTERNAL-IP PORT(S) AGE
default kubernetes ClusterIP 10.100.0.1 443/TCP 20m
kube-system kube-dns ClusterIP 10.100.0.10 53/UDP,53/TCP 20m
yb-demo-us-east-1a yb-master-ui LoadBalancer 10.100.189.217 ad37cdc4667de11ea87920e8fdeea06a-261093161.us-east-1.elb.amazonaws.com 7000:31087/TCP 5m12s
yb-demo-us-east-1a yb-masters ClusterIP None 7100/TCP,7000/TCP 5m12s
yb-demo-us-east-1a yb-tserver-service LoadBalancer 10.100.97.195 ad37e06fb67de11ea87920e8fdeea06a-238172614.us-east-1.elb.amazonaws.com 6379:30334/TCP,9042:31406/TCP,5433:30024/TCP 5m12s
yb-demo-us-east-1a yb-tservers ClusterIP None 7100/TCP,9000/TCP,6379/TCP,9042/TCP,5433/TCP 5m12s
yb-demo-us-east-1b yb-master-ui LoadBalancer 10.100.61.215 a2348e9ce67df11ea9fec12feeb58bc1-1248396869.us-east-1.elb.amazonaws.com 7000:31595/TCP 2m58s
yb-demo-us-east-1b yb-masters ClusterIP None 7100/TCP,7000/TCP 2m58s
yb-demo-us-east-1b yb-tserver-service LoadBalancer 10.100.99.202 a2347e74f67df11ea9fec12feeb58bc1-1599278236.us-east-1.elb.amazonaws.com 6379:31292/TCP,9042:30275/TCP,5433:30450/TCP 2m58s
yb-demo-us-east-1b yb-tservers ClusterIP None 7100/TCP,9000/TCP,6379/TCP,9042/TCP,5433/TCP 2m58s
yb-demo-us-east-1c yb-master-ui LoadBalancer 10.100.0.232 a6cd5518167df11ea9fec12feeb58bc1-1402605575.us-east-1.elb.amazonaws.com 7000:31678/TCP 55s
yb-demo-us-east-1c yb-masters ClusterIP None 7100/TCP,7000/TCP 55s
yb-demo-us-east-1c yb-tserver-service LoadBalancer 10.100.119.40 a6cd628b667df11ea9fec12feeb58bc1-403831649.us-east-1.elb.amazonaws.com 6379:31544/TCP,9042:31541/TCP,5433:32374/TCP 55s
yb-demo-us-east-1c yb-tservers ClusterIP None 7100/TCP,9000/TCP,6379/TCP,9042/TCP,5433/TCP 55s
```
Access the yb-master Admin UI for the cluster at `http://:7000` where `external-ip` refers to one of the `yb-master-ui` services. Note that you can use any of the above three services for this purpose as all of them will show the same cluster metadata.
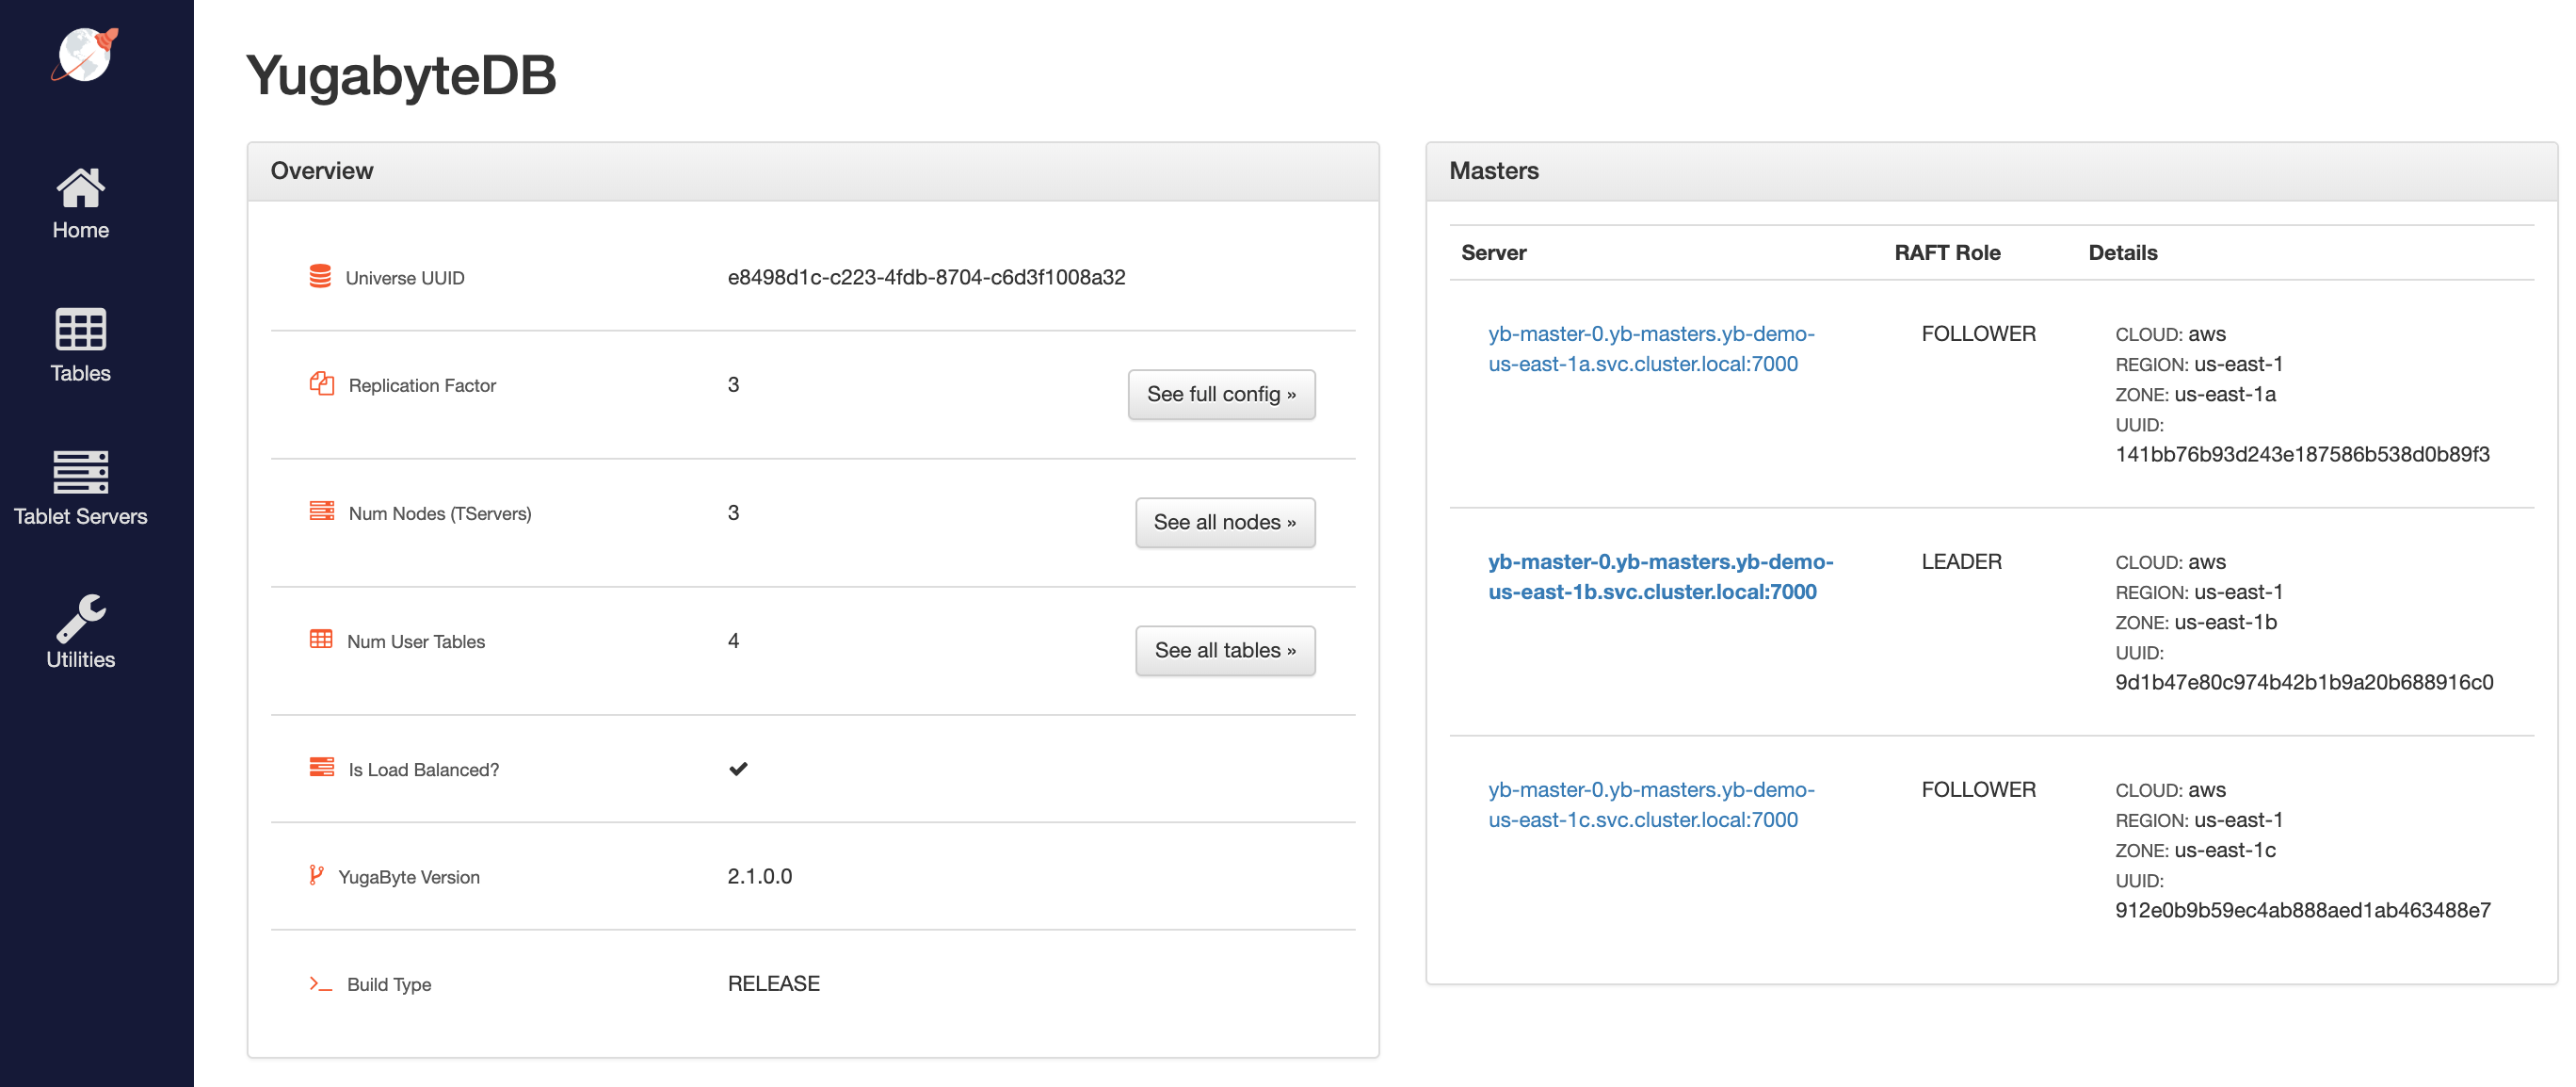
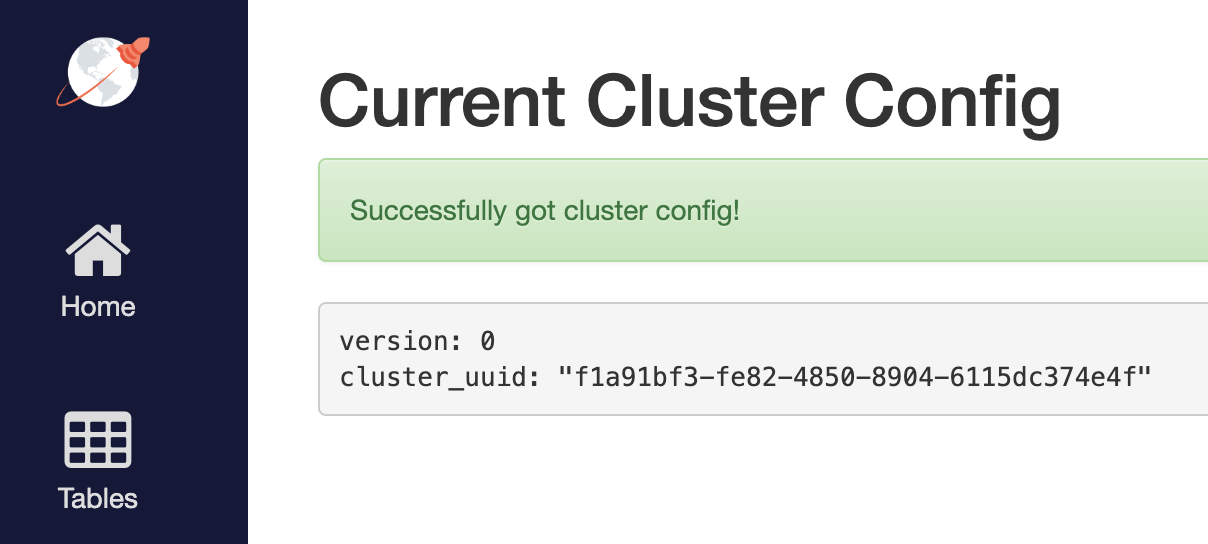
## 4. Configure zone-aware replica placement
Default replica placement policy treats every yb-tserver as equal irrespective of its `placement_*` setting. Go to `http://:7000/cluster-config` to confirm that the default configuration is still in effect.
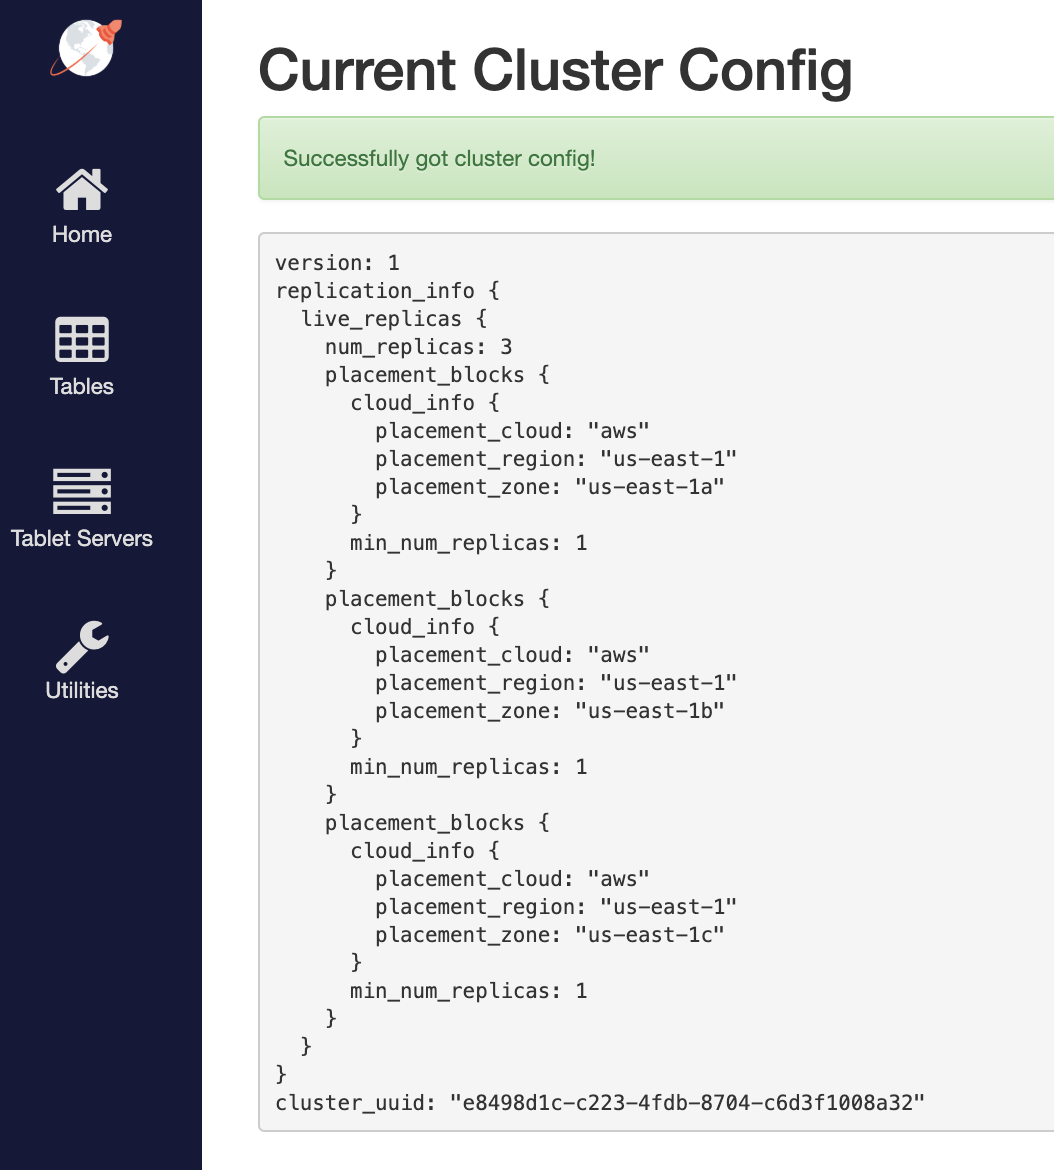
To make the replica placement zone-aware, so that one replica is placed in each zone, run the following command:
```sh
$ kubectl exec -it -n yb-demo-us-east-1a yb-master-0 -- bash \
-c "/home/yugabyte/master/bin/yb-admin --master_addresses yb-master-0.yb-masters.yb-demo-us-east-1a.svc.cluster.local:7100,yb-master-0.yb-masters.yb-demo-us-east-1b.svc.cluster.local:7100,yb-master-0.yb-masters.yb-demo-us-east-1c.svc.cluster.local:7100 modify_placement_info aws.us-east-1.us-east-1a,aws.us-east-1.us-east-1b,aws.us-east-1.us-east-1c 3"
```
To see the new configuration, go to `http://:7000/cluster-config`.
## 5. Connect using YugabyteDB shells
To connect and use the YSQL Shell (ysqlsh), run the following command:
```sh
$ kubectl exec -n yb-demo-us-east-1a -it yb-tserver-0 -- ysqlsh \
-h yb-tserver-0.yb-tservers.yb-demo-us-east-1a
```
To connect and use the YCQL Shell (ycqlsh), run the following command:
```sh
$ kubectl exec -n yb-demo-us-east-1a -it yb-tserver-0 -- ycqlsh \
yb-tserver-0.yb-tservers.yb-demo-us-east-1a
```
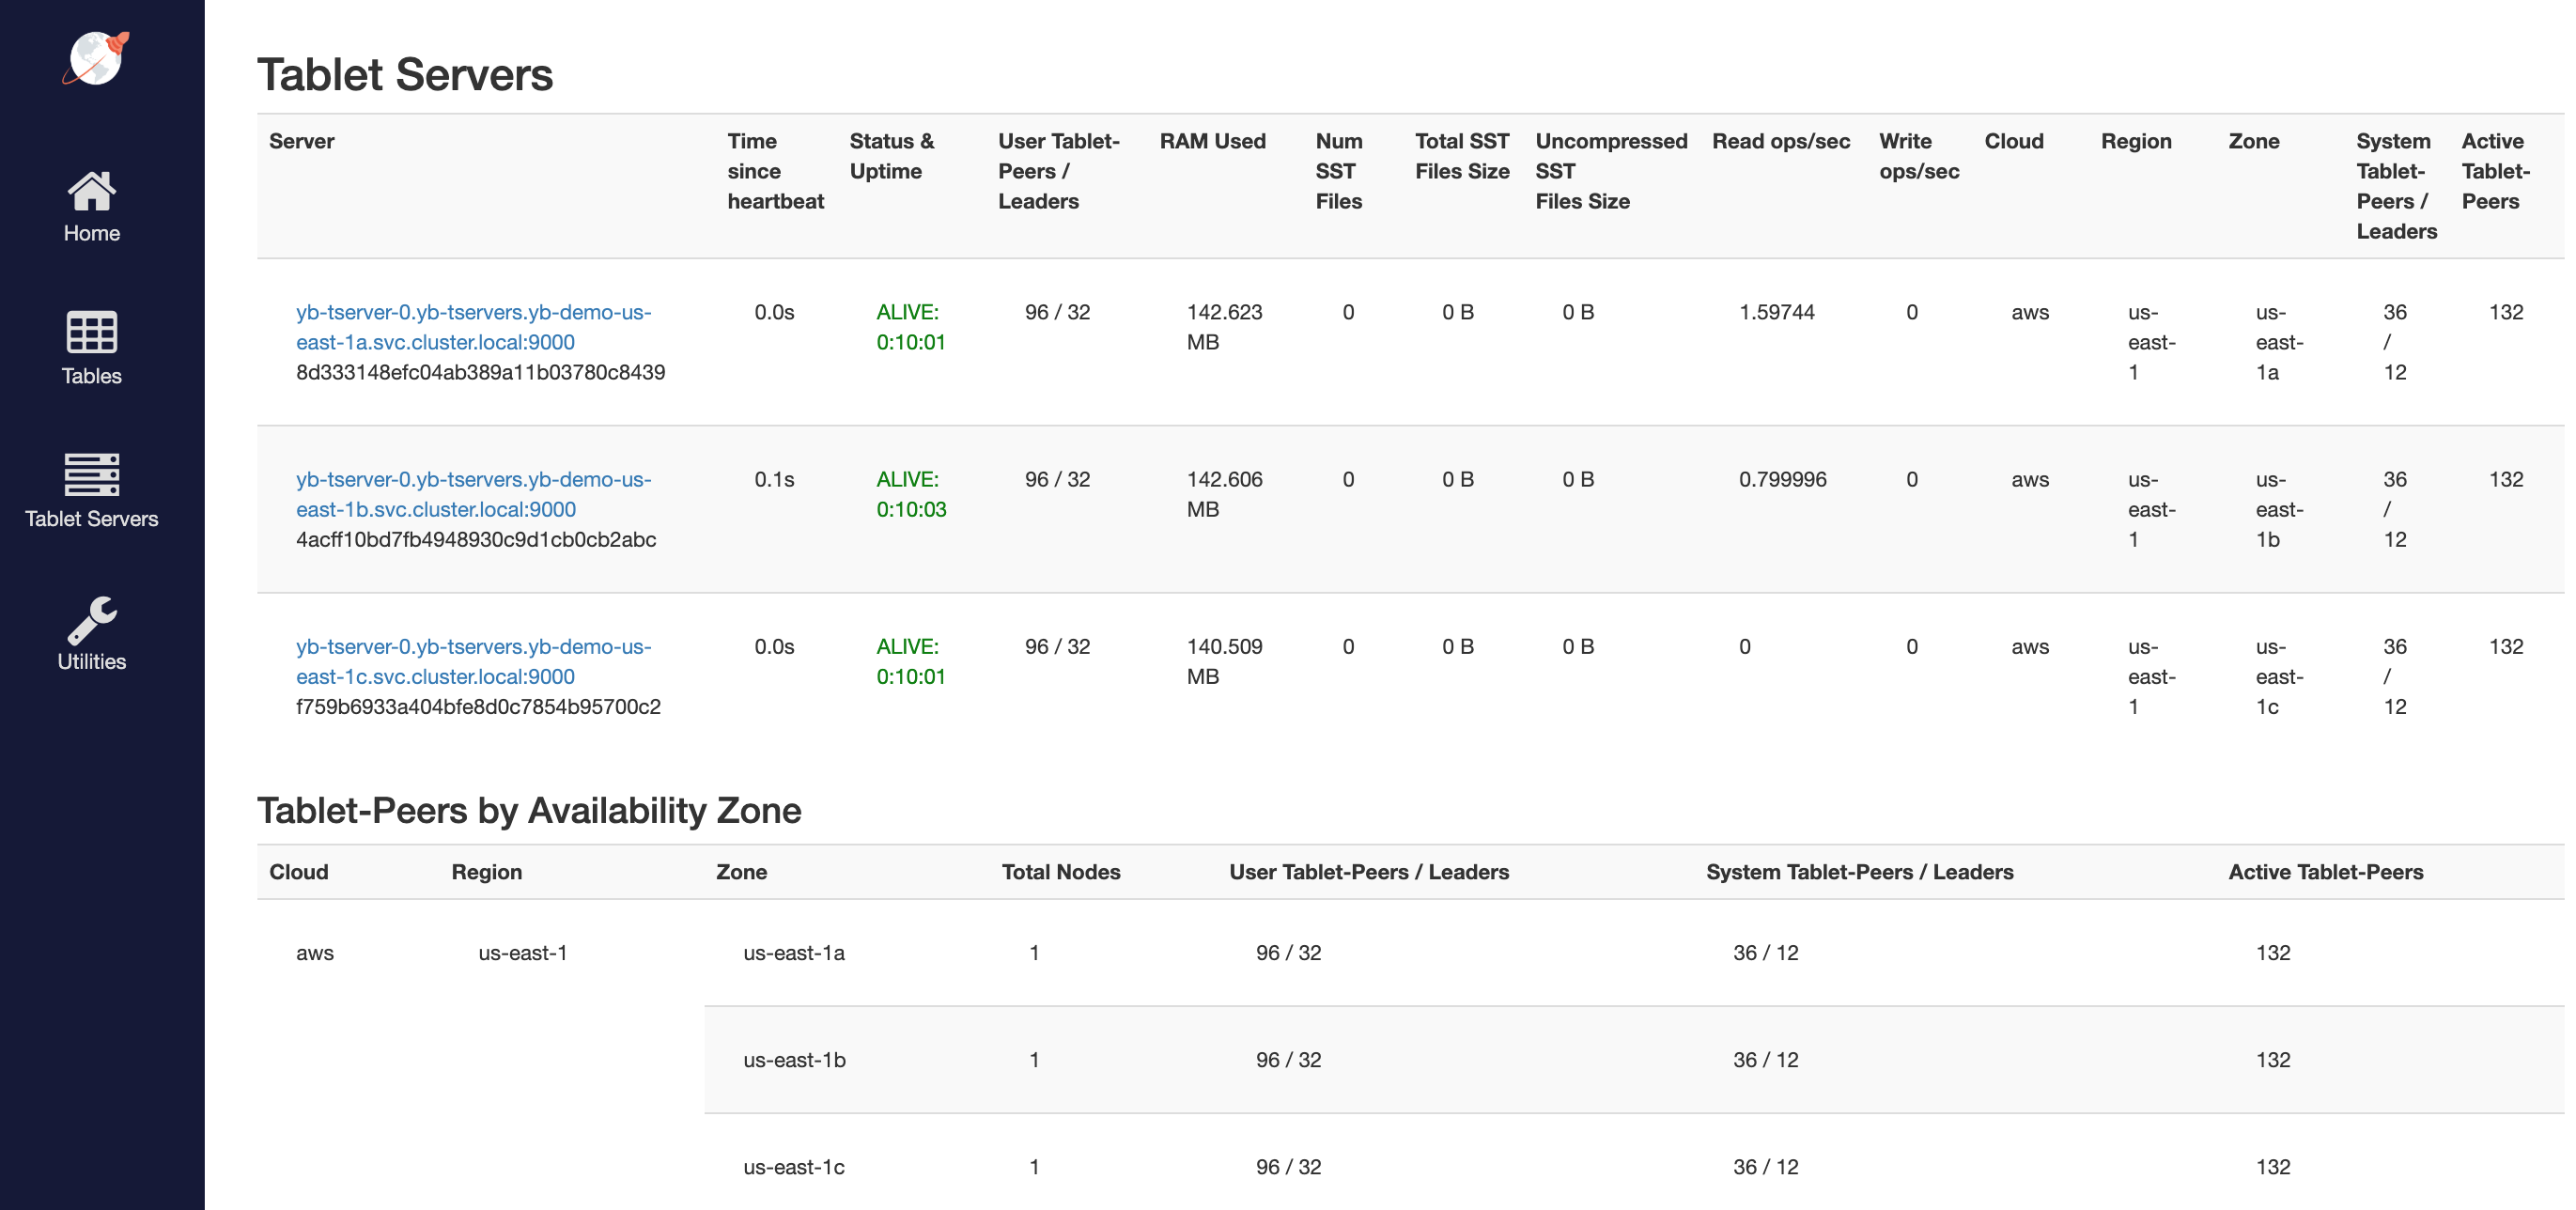
You can follow the [Explore YSQL](/stable/quick-start/explore/ysql/) tutorial and then go to the `http://:7000/tablet-servers` page of the yb-master Admin UI to confirm that tablet peers and their leaders are placed evenly across all three zones for both user data and system data.
## 6. Connect using external clients
To connect an external program, get the load balancer `EXTERNAL-IP` address of the `yb-tserver-service` service and connect using port 5433 for YSQL or port 9042 for YCQL, as follows:
```sh
$ kubectl get services --namespace yb-demo
```
```output
NAME TYPE CLUSTER-IP EXTERNAL-IP PORT(S) AGE
...
yb-demo-us-east-1a yb-tserver-service LoadBalancer 10.100.97.195 ad37e06fb67de11ea87920e8fdeea06a-238172614.us-east-1.elb.amazonaws.com 6379:30334/TCP,9042:31406/TCP,5433:30024/TCP 5m12s
...
```