You can deploy a single multi-region YugabyteDB cluster that spans three [GKE](https://cloud.google.com/kubernetes-engine/docs/) clusters, each running in a different region. Each region also has an internal DNS load balancer set to [global access](https://cloud.google.com/kubernetes-engine/docs/how-to/internal-load-balancing#global_access). This configuration allows pods in one GKE cluster to discover pods in another GKE cluster without exposing any of the DNS information to the world outside your GKE project.
In the example provided in this document, you will use the standard single-zone YugabyteDB Helm chart to deploy one third of the nodes in the database cluster in each of the three GKE clusters.
## Prerequisites
You must have three GKE clusters with Helm configured. If you have not installed the Helm client (`helm`), see [Install Helm](https://helm.sh/docs/intro/install/).
The YugabyteDB Helm chart has been tested with the following software versions:
- GKE running Kubernetes 1.20 or later with nodes such that a total of 12 CPU cores and 45 GB RAM can be allocated to YugabyteDB. This can be three nodes with 4 CPU core and 15 GB RAM allocated to YugabyteDB. `n1-standard-8` is the minimum instance type that meets these criteria.
- Helm 3.4 or later.
- YugabyteDB Docker image (yugabytedb/yugabyte) 2.1.0 or later.
- For optimal performance, ensure you have set the appropriate [system configuration](../../../../manual-deployment/system-config/) on each node in your Kubernetes cluster.
The following steps show how to meet these prerequisites:
- Download and install the [Google Cloud SDK](https://cloud.google.com/sdk/downloads/).
- Configure defaults for `gcloud`.
- Set the project ID to `yugabyte`. You can change this as per your need.
```sh
gcloud config set project yugabyte
```
- Install the `kubectl`command line tool by running the following command:
```sh
gcloud components install kubectl
```
Note that GKE is usually two or three major releases behind the upstream or OSS Kubernetes release. This means you have to make sure that you have the latest `kubectl` version that is compatible across different Kubernetes distributions.
- Ensure `helm` is installed by using the Helm version command:
```sh
helm version
```
Expect an output similar to the following output:
```output
version.BuildInfo{Version:"v3.0.3", GitCommit:"ac925eb7279f4a6955df663a0128044a8a6b7593", GitTreeState:"clean", GoVersion:"go1.13.6"}
```
Note that the `tiller` server side component has been removed in Helm 3.
## Create GKE clusters
You start by creating clusters and then storage classes per zone.
### Create clusters
The following commands create three Kubernetes clusters in three different regions (`us-west1`, `us-central1`, `us-east1`), with one node in each cluster, therefore generating a multi-region multi-cluster Kubernetes configuration:
```sh
gcloud beta container clusters create yugabytedb1 \
--machine-type=n1-standard-8 \
--num-nodes 1 \
--zone us-west1-b \
--release-channel rapid
```
```sh
gcloud beta container clusters create yugabytedb2 \
--machine-type=n1-standard-8 \
--num-nodes 1 \
--zone us-central1-b \
--release-channel rapid
```
```sh
gcloud beta container clusters create yugabytedb3 \
--machine-type=n1-standard-8 \
--num-nodes 1 \
--zone us-east1-b \
--release-channel rapid
```
Use the following command to confirm that Kubernetes contexts have been created:
```sh
kubectl config get-contexts
```
```output
CURRENT NAME CLUSTER ...
gke_yugabyte_us-central1-b_yugabytedb2 gke_yugabyte_us-central1-b_yugabytedb2
* gke_yugabyte_us-east1-b_yugabytedb3 gke_yugabyte_us-east1-b_yugabytedb3
gke_yugabyte_us-west1-b_yugabytedb1 gke_yugabyte_us-west1-b_yugabytedb1
```
Note that [Global access](https://cloud.google.com/kubernetes-engine/docs/how-to/internal-load-balancing#global_access) on load balancers is currently in beta and is available only on GKE clusters created using the `rapid` release channel.
### Create a storage class per zone
You need to ensure that the storage classes used by the pods in a given zone are always pinned to that zone only.
Add the following contents to a file named `gke-us-west1-b.yaml`:
```yaml
kind: StorageClass
apiVersion: storage.k8s.io/v1
metadata:
name: standard-us-west1-b
provisioner: kubernetes.io/gce-pd
parameters:
type: pd-standard
replication-type: none
zone: us-west1-b
```
Add the following contents to a file named `gke-us-central1-b.yaml`.
```yaml
kind: StorageClass
apiVersion: storage.k8s.io/v1
metadata:
name: standard-us-central1-b
provisioner: kubernetes.io/gce-pd
parameters:
type: pd-standard
replication-type: none
zone: us-central1-b
```
Add the following contents to a file named `gke-us-east1-b.yaml`.
```yaml
kind: StorageClass
apiVersion: storage.k8s.io/v1
metadata:
name: standard-us-east1-b
provisioner: kubernetes.io/gce-pd
parameters:
type: pd-standard
replication-type: none
zone: us-east1-b
```
Apply the preceding configuration to your clusters, as follows:
```sh
kubectl apply -f gke-us-west1-b.yaml --context gke_yugabyte_us-west1-b_yugabytedb1
```
```sh
kubectl apply -f gke-us-central1-b.yaml --context gke_yugabyte_us-central1-b_yugabytedb2
```
```sh
kubectl apply -f gke-us-east1-b.yaml --context gke_yugabyte_us-east1-b_yugabytedb3
```
## Set up global DNS
Set up a global DNS system across all three GKE clusters so that pods in one cluster can connect to pods in another cluster.
### Create load balancer configuration for kube-dns
The following YAML file adds an internal load balancer (which is not exposed outside its own Google Cloud region) to Kubernetes built-in `kube-dns` deployment. By default, the `kube-dns` deployment is accessed only by a `ClusterIP` and not a load balancer. You need to allow this load balancer to be [globally accessible](https://cloud.google.com/kubernetes-engine/docs/how-to/internal-load-balancing#global_access) so that each such load balancer is visible to two other load balancers in the other two regions.
Add the following contents to a file named `yb-dns-lb.yaml`:
```yaml
apiVersion: v1
kind: Service
metadata:
annotations:
cloud.google.com/load-balancer-type: "Internal"
networking.gke.io/internal-load-balancer-allow-global-access: "true"
labels:
k8s-app: kube-dns
name: kube-dns-lb
namespace: kube-system
spec:
ports:
- name: dns
port: 53
protocol: UDP
targetPort: 53
selector:
k8s-app: kube-dns
sessionAffinity: None
type: LoadBalancer
```
Note that using external load balancers for this purpose is possible but not recommended from a security perspective (the DNS information for all the clusters would be available for access on the public Internet).
### Apply the configuration to every cluster
Execute the following command to download the `yb-multiregion-k8s-setup.py` script to automate the setup of the load balancers:
```sh
wget https://raw.githubusercontent.com/yugabyte/yugabyte-db/master/cloud/kubernetes/yb-multiregion-k8s-setup.py
```
The script starts out by creating a new namespace in each of the three clusters. Thereafter, it creates three internal load balancers for `kube-dns` in the three clusters. After the load balancers are created, it configures them using Kubernetes ConfigMap in such a way that they forward DNS requests for zone-scoped namespaces to the relevant Kubernetes cluster's DNS server. Finally, it deletes the `kube-dns` pods to allow Kubernetes to bring them back up automatically with the new configuration.
Open the `yb-multiregion-k8s-setup.py` script and edit the `contexts` and `regions` sections to reflect your own configuration, as follows:
```python
# Replace this with your own kubernetes cluster contexts
contexts = {
'us-west1-b': 'gke_yugabyte_us-west1-b_yugabytedb1',
'us-central1-b': 'gke_yugabyte_us-central1-b_yugabytedb2',
'us-east1-b': 'gke_yugabyte_us-east1-b_yugabytedb3',
}
# Replace this with your own `zone`: `region` names
regions = {
'us-west1-b': 'us-west1',
'us-central1-b': 'us-central1',
'us-east1-b': 'us-east1',
}
```
Run the script using the following command:
```sh
python yb-multiregion-k8s-setup.py
```
```output
namespace/yb-demo-us-east1-b created
service/kube-dns-lb created
namespace/yb-demo-us-central1-b created
service/kube-dns-lb created
namespace/yb-demo-us-west1-b created
service/kube-dns-lb created
DNS endpoint for zone us-east1-b: 10.142.15.197
DNS endpoint for zone us-central1-b: 10.128.15.215
DNS endpoint for zone us-west1-b: 10.138.15.237
pod "kube-dns-68b499d58-wn5zv" deleted
pod "kube-dns-68b499d58-h2m28" deleted
pod "kube-dns-68b499d58-4jl89" deleted
```
We now have three GKE clusters that essentially have a global DNS service as long as services use zone-scoped namespaces to access each other.
## Create a YugabyteDB cluster
You start by adding the Helm charts repository, then creating override files, and then proceeding to download YugabyteDB.
### Add charts repository
To add the YugabyteDB charts repository, run the following command:
```sh
helm repo add yugabytedb https://charts.yugabyte.com
```
Make sure that you have the latest updates to the repository by running the following command:
```sh
helm repo update
```
Validate that you have the updated chart version, as follows:
```sh
helm search repo yugabytedb/yugabyte --version {{}}
```
```output
NAME CHART VERSION APP VERSION DESCRIPTION
yugabytedb/yugabyte {{}} {{}} YugabyteDB is the high-performance distributed ...
```
### Create override files
Add the following contents to a file named `overrides-us-west1-b.yaml`:
```yaml
isMultiAz: True
AZ: us-west1-b
masterAddresses: "yb-master-0.yb-masters.yb-demo-us-west1-b.svc.cluster.local:7100,yb-master-0.yb-masters.yb-demo-us-central1-b.svc.cluster.local:7100,yb-master-0.yb-masters.yb-demo-us-east1-b.svc.cluster.local:7100"
storage:
master:
storageClass: "standard-us-west1-b"
tserver:
storageClass: "standard-us-west1-b"
replicas:
master: 1
tserver: 1
totalMasters: 3
gflags:
master:
placement_cloud: "gke"
placement_region: "us-west1"
placement_zone: "us-west1-b"
leader_failure_max_missed_heartbeat_periods: 10
tserver:
placement_cloud: "gke"
placement_region: "us-west1"
placement_zone: "us-west1-b"
leader_failure_max_missed_heartbeat_periods: 10
```
Add the following contents to a file named `overrides-us-central1-b.yaml`:
```yaml
isMultiAz: True
AZ: us-central1-b
masterAddresses: "yb-master-0.yb-masters.yb-demo-us-west1-b.svc.cluster.local:7100,yb-master-0.yb-masters.yb-demo-us-central1-b.svc.cluster.local:7100,yb-master-0.yb-masters.yb-demo-us-east1-b.svc.cluster.local:7100"
storage:
master:
storageClass: "standard-us-central1-b"
tserver:
storageClass: "standard-us-central1-b"
replicas:
master: 1
tserver: 1
totalMasters: 3
gflags:
master:
placement_cloud: "gke"
placement_region: "us-central1"
placement_zone: "us-central1-b"
leader_failure_max_missed_heartbeat_periods: 10
tserver:
placement_cloud: "gke"
placement_region: "us-central1"
placement_zone: "us-central1-b"
leader_failure_max_missed_heartbeat_periods: 10
```
Add the following contents to a file named `overrides-us-east1-b.yaml`:
```yaml
isMultiAz: True
AZ: us-east1-b
masterAddresses: "yb-master-0.yb-masters.yb-demo-us-west1-b.svc.cluster.local:7100,yb-master-0.yb-masters.yb-demo-us-central1-b.svc.cluster.local:7100,yb-master-0.yb-masters.yb-demo-us-east1-b.svc.cluster.local:7100"
storage:
master:
storageClass: "standard-us-east1-b"
tserver:
storageClass: "standard-us-east1-b"
replicas:
master: 1
tserver: 1
totalMasters: 3
gflags:
master:
placement_cloud: "gke"
placement_region: "us-east1"
placement_zone: "us-east1-b"
leader_failure_max_missed_heartbeat_periods: 10
tserver:
placement_cloud: "gke"
placement_region: "us-east1"
placement_zone: "us-east1-b"
leader_failure_max_missed_heartbeat_periods: 10
```
### Install YugabyteDB
Create the YugabyteDB cluster such that one third of the nodes are hosted in each Kubernetes cluster, as follows:
```sh
helm install yb-demo-us-west1-b yugabytedb/yugabyte \
--version {{}} \
--namespace yb-demo-us-west1-b \
-f overrides-us-west1-b.yaml \
--kube-context gke_yugabyte_us-west1-b_yugabytedb1 --wait
```
```sh
helm install yb-demo-us-central1-b yugabytedb/yugabyte \
--version {{}} \
--namespace yb-demo-us-central1-b \
-f overrides-us-central1-b.yaml \
--kube-context gke_yugabyte_us-central1-b_yugabytedb2 --wait
```
```sh
helm install yb-demo-us-east1-b yugabytedb/yugabyte \
--version {{}} \
--namespace yb-demo-us-east1-b \
-f overrides-us-east1-b.yaml \
--kube-context gke_yugabyte_us-east1-b_yugabytedb3 --wait
```
## Check the cluster status
There is a number of commands that you can execute to check the status of the cluster.
Check the pods, as follows:
```sh
kubectl get pods -n yb-demo-us-west1-b --context gke_yugabyte_us-west1-b_yugabytedb1
```
```sh
kubectl get pods -n yb-demo-us-central1-b --context gke_yugabyte_us-central1-b_yugabytedb2
```
```sh
kubectl get pods -n yb-demo-us-east1-b --context gke_yugabyte_us-east1-b_yugabytedb3
```
Check the services, as follows:
```sh
kubectl get services -n yb-demo-us-west1-b --context gke_yugabyte_us-west1-b_yugabytedb1
```
```output
NAME TYPE CLUSTER-IP EXTERNAL-IP PORT(S) AGE
yb-master-ui LoadBalancer 10.31.250.228 35.185.207.11 7000:31185/TCP 91m
yb-masters ClusterIP None 7100/TCP,7000/TCP 91m
yb-tserver-service LoadBalancer 10.31.247.185 34.83.192.162 6379:31858/TCP,9042:30444/TCP,5433:30854/TCP 91m
yb-tservers ClusterIP None 7100/TCP,9000/TCP,6379/TCP,9042/TCP,5433/TCP 91m
```
```sh
kubectl get services -n yb-demo-us-central1-b --context gke_yugabyte_us-central1-b_yugabytedb2
```
```sh
kubectl get services -n yb-demo-us-east1-b --context gke_yugabyte_us-east1-b_yugabytedb3
```
Access the YB-Master Admin UI for the cluster at `http://:7000` where `external-ip` refers to one of the `yb-master-ui` services. Note that you can use any of the three services for this purpose since all of them show the same cluster metadata.
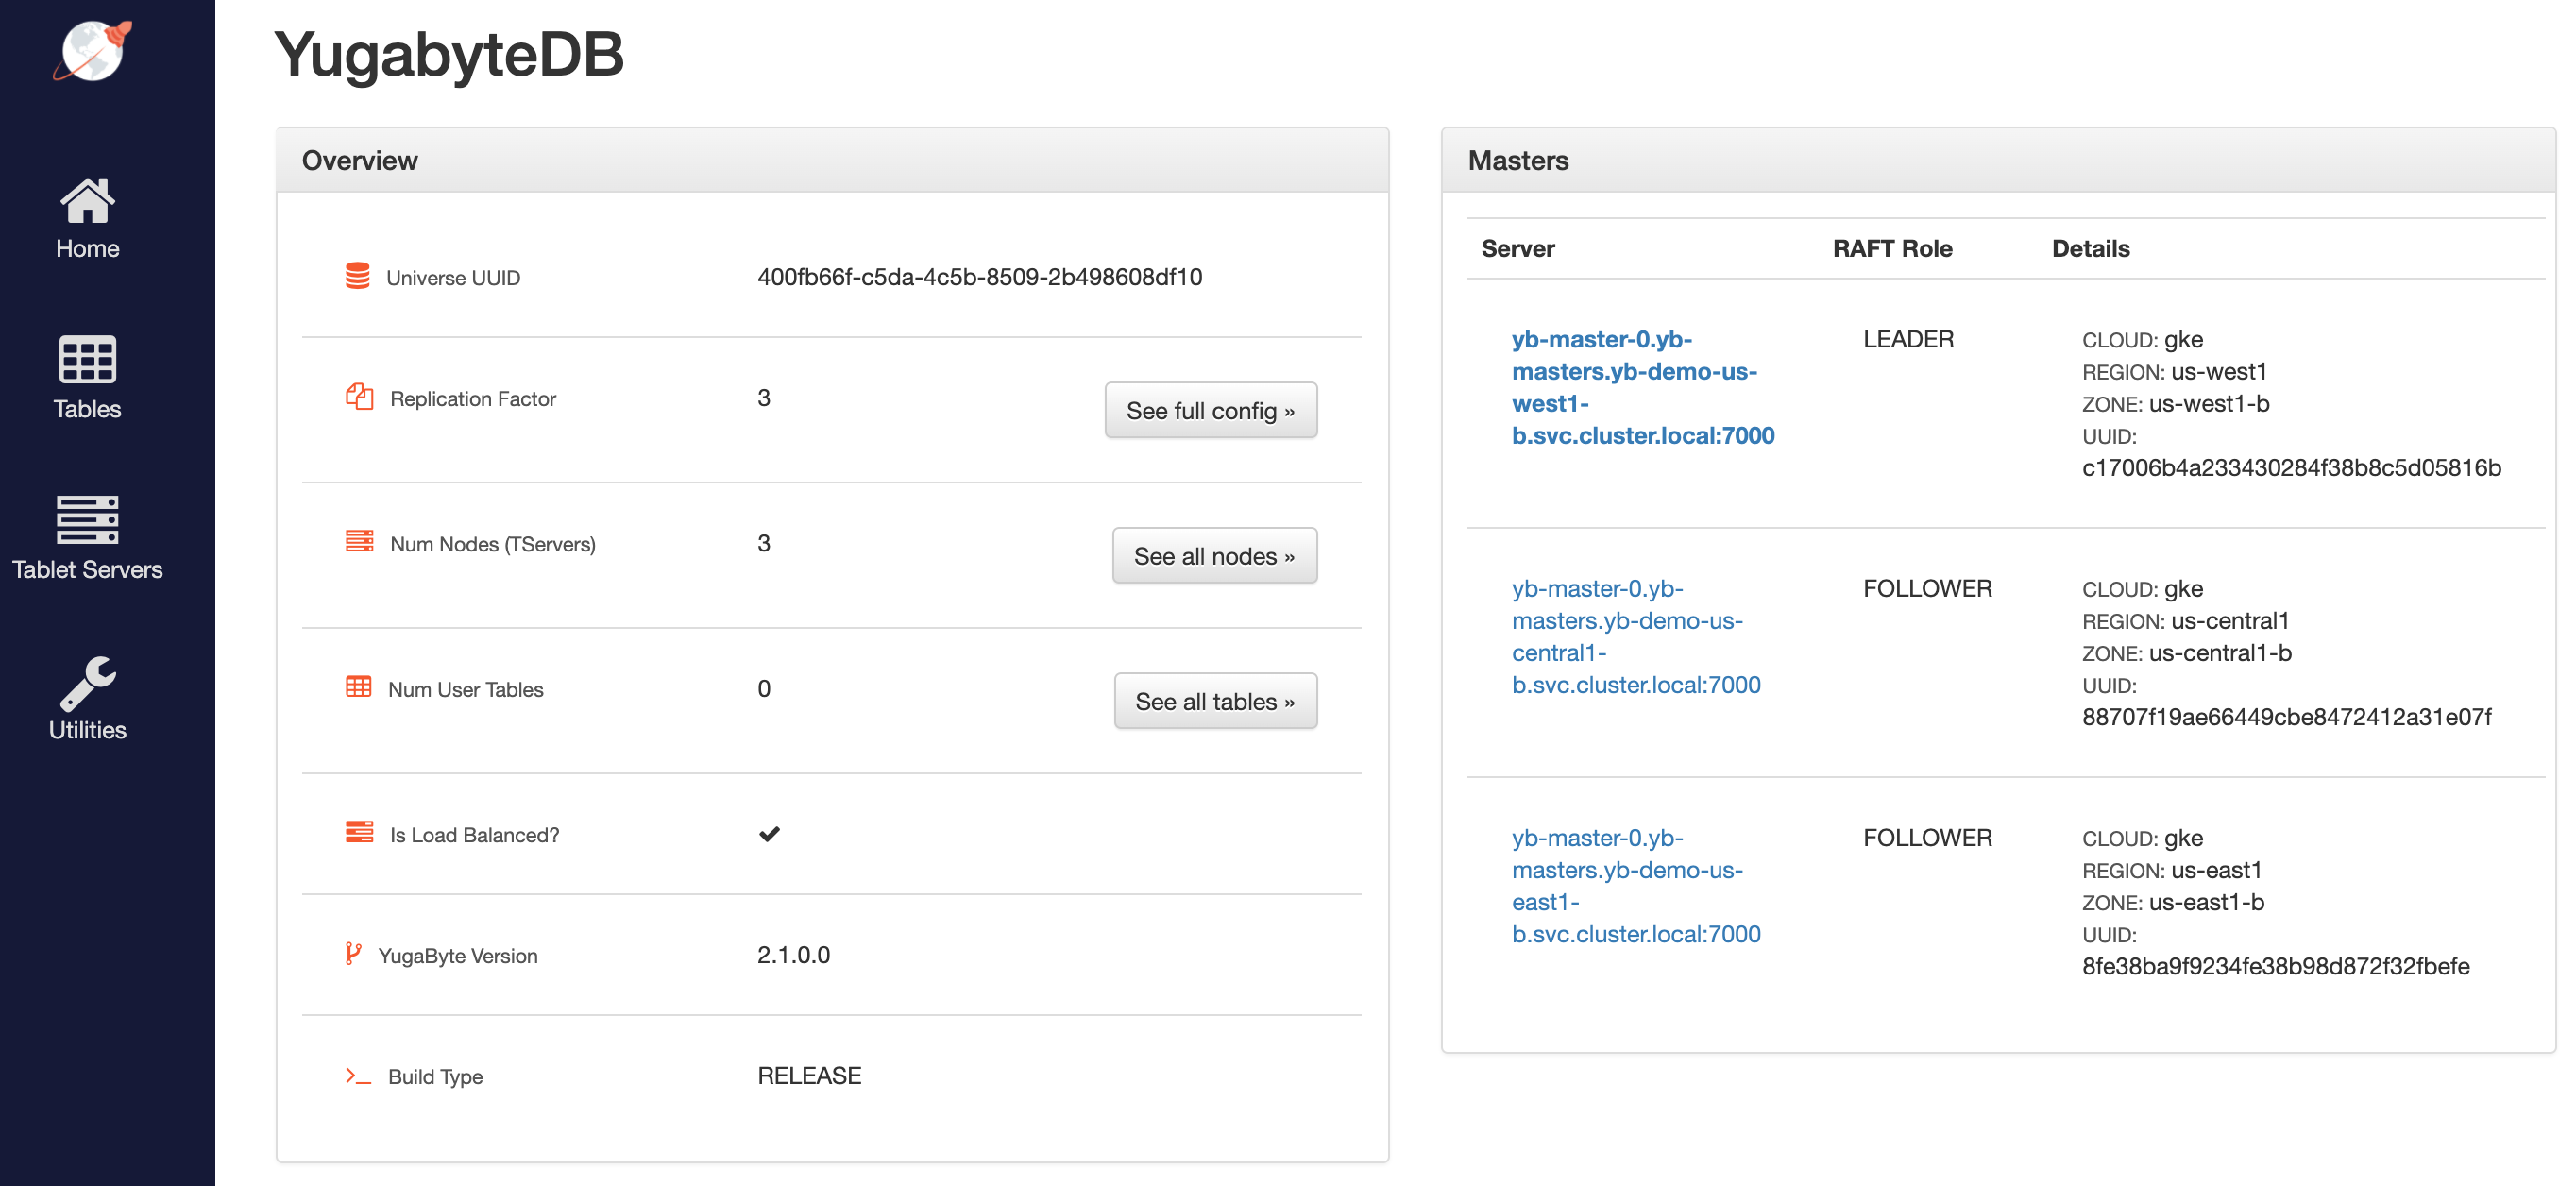
## Configure the region-aware replica placement
The default replica placement policy treats every YB-TServer as equal, irrespective of its `placement_*` flags. To confirm that the default configuration is still in effect, navigate to `http://:7000/cluster-config` and expect to see the following:

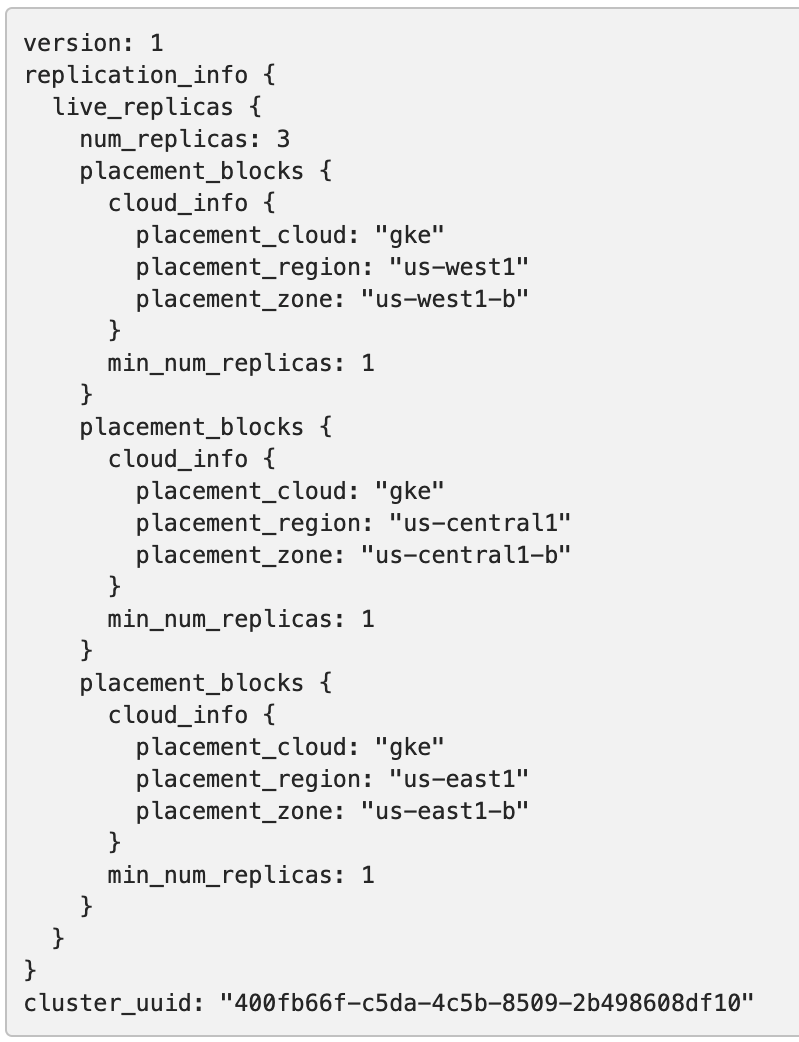
Run the following command to make the replica placement region-aware or cluster-aware so that one replica is placed on each region or cluster:
```sh
kubectl exec -it -n yb-demo-us-west1-b --context gke_yugabyte_us-west1-b_yugabytedb1 yb-master-0 -- bash \
-c "/home/yugabyte/master/bin/yb-admin --master_addresses yb-master-0.yb-masters.yb-demo-us-west1-b.svc.cluster.local:7100,yb-master-0.yb-masters.yb-demo-us-central1-b.svc.cluster.local:7100,yb-master-0.yb-masters.yb-demo-us-east1-b.svc.cluster.local:7100 modify_placement_info gke.us-west1.us-west1-b,gke.us-central1.us-central1-b,gke.us-east1.us-east1-b 3"
```
To view the new configuration, navigate to `http://:7000/cluster-config` and expect to see the following:
## Connect using YSQL and YCQL shells
To connect and use the YSQL Shell (ysqlsh), run the following command:
```sh
kubectl exec -n yb-demo-us-west1-b --context gke_yugabyte_us-west1-b_yugabytedb1 \
-it yb-tserver-0 -- ysqlsh -h yb-tserver-0.yb-tservers.yb-demo-us-west1-b
```
To connect and use the YCQL Shell (ycqlsh), run the following command:
```sh
kubectl exec -n yb-demo-us-west1-b --context gke_yugabyte_us-west1-b_yugabytedb1 \
-it yb-tserver-0 -- ycqlsh yb-tserver-0.yb-tservers.yb-demo-us-west1-b
```
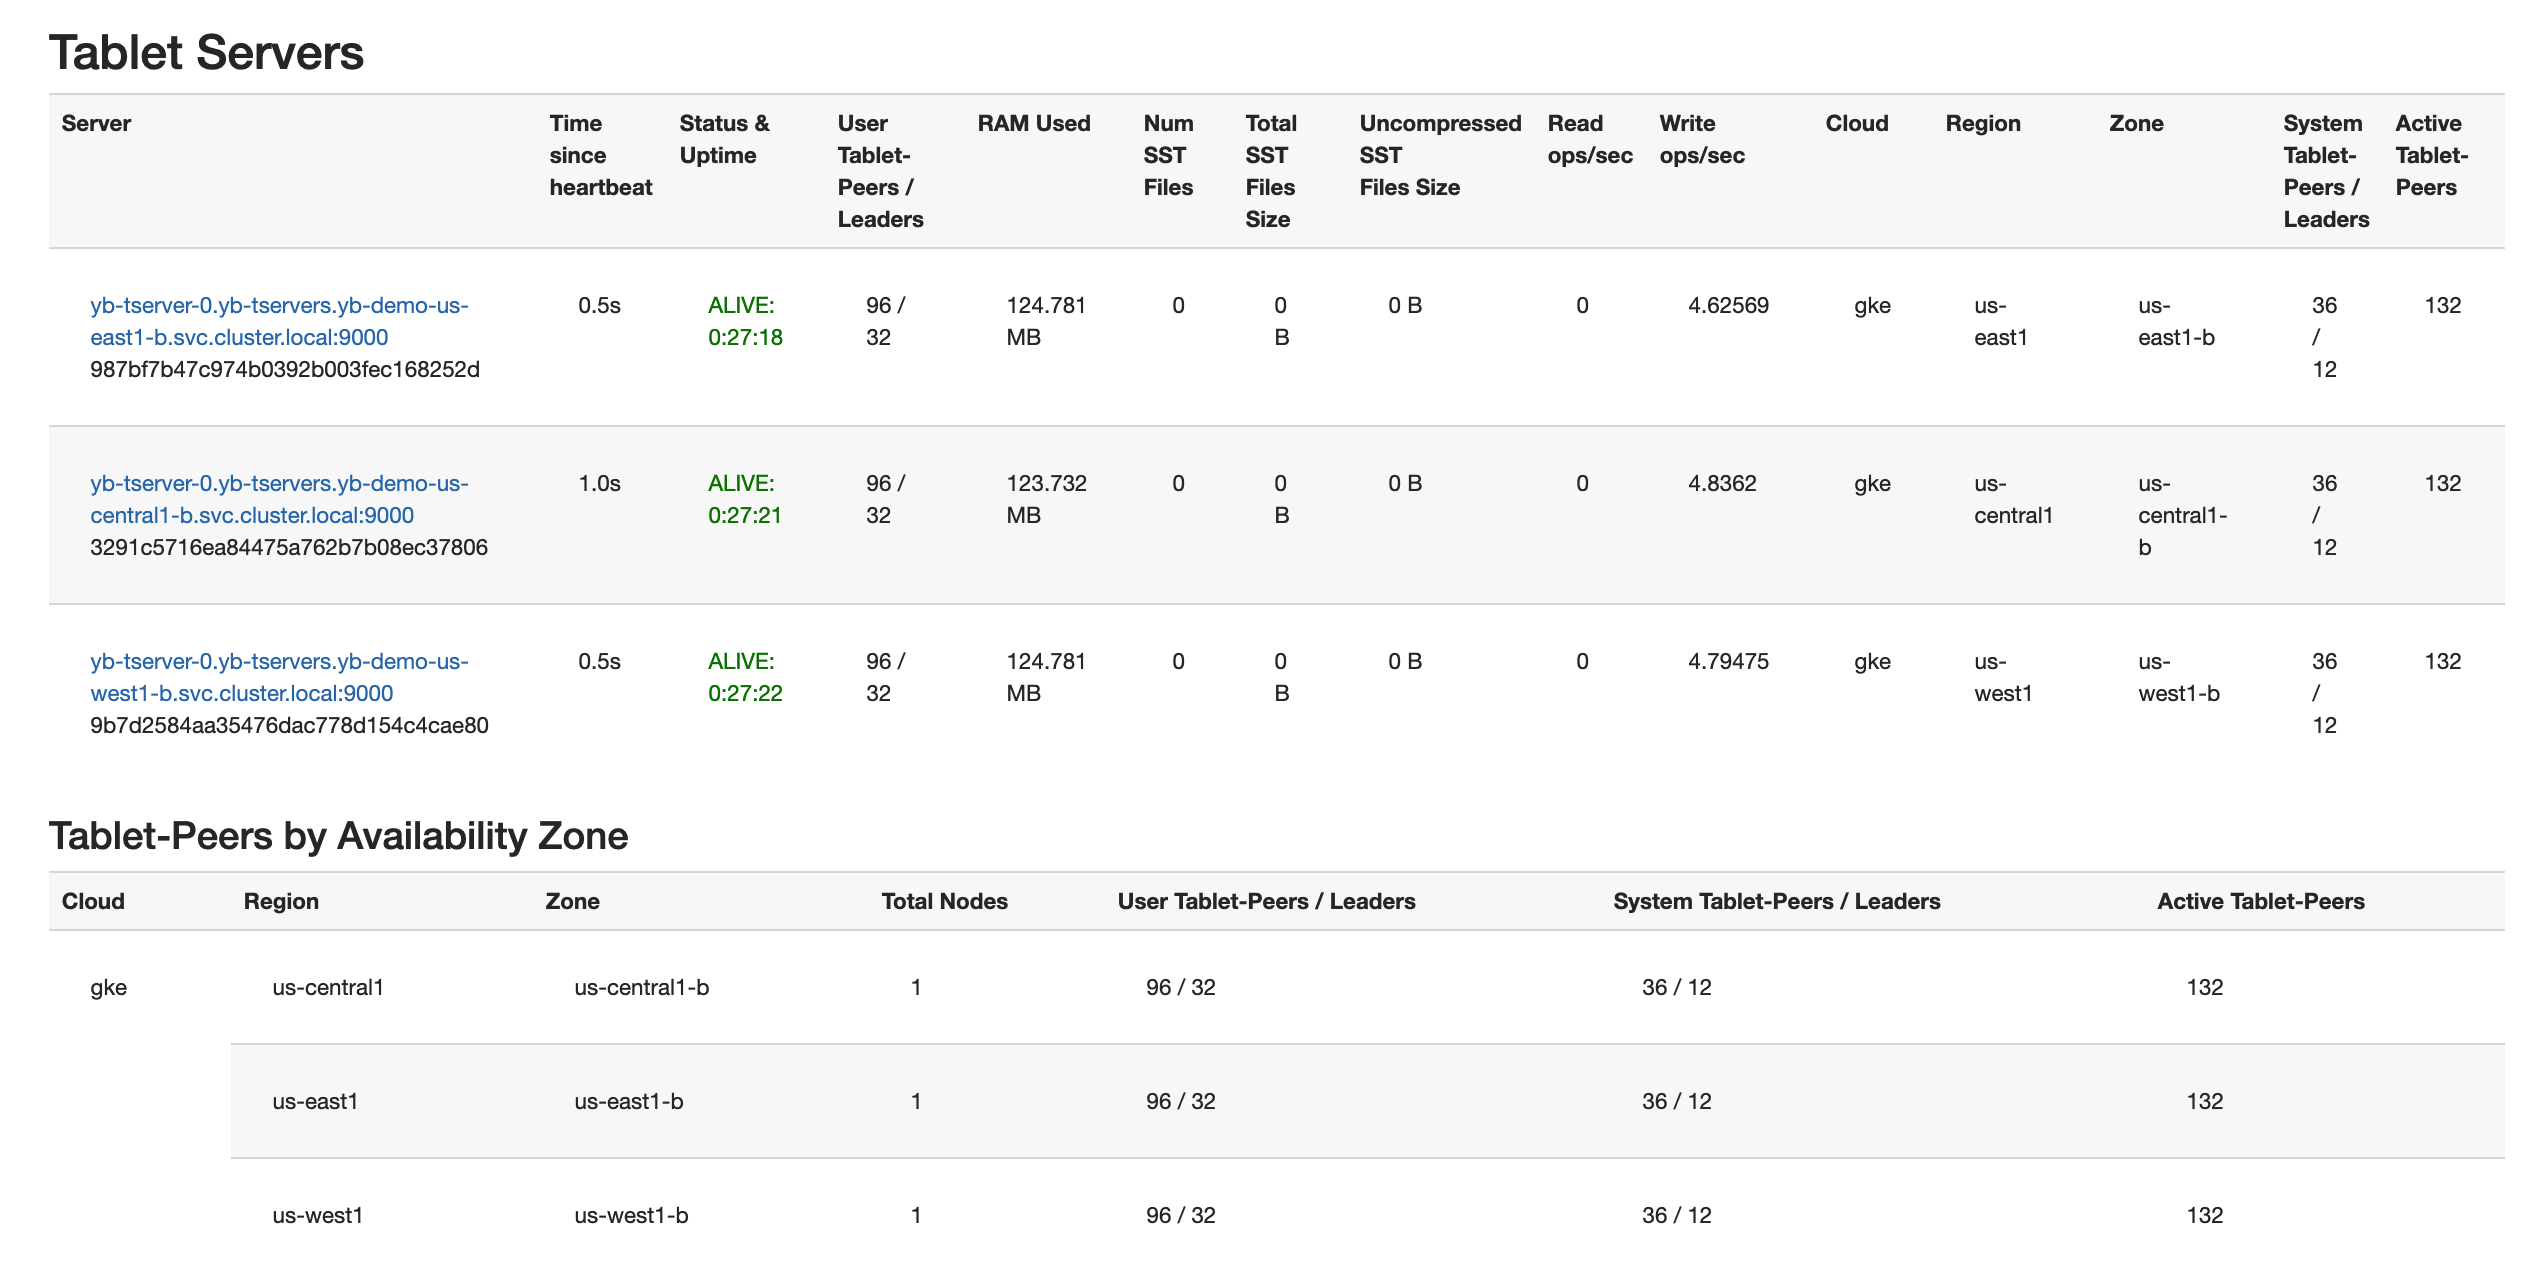
Follow the instructions provided in [Explore YSQL](/stable/quick-start/explore/ysql/) and then browse to `http://:7000/tablet-servers` of the YB-Master Admin UI to confirm that tablet peers and their leaders are placed evenly across all three zones for both user data and system data, as per the following illustration:
## Connect using external clients
To connect an external program, get the load balancer `EXTERNAL-IP` address of the `yb-tserver-service` service and connect using port 5433 for YSQL or port 9042 for YCQL, as follows:
```sh
kubectl get services -n yb-demo-us-west1-b --context gke_yugabyte_us-west1-b_yugabytedb1
```
```output
NAME TYPE CLUSTER-IP EXTERNAL-IP PORT(S) AGE
...
yb-tserver-service LoadBalancer 10.31.247.185 34.83.192.162 6379:31858/TCP,9042:30444/TCP,5433:30854/TCP 91m
...
```
## Test the YugabyteDB cluster resilience
You can test the resilience of the cluster when it is subjected to the complete failure of one region. To simulate such a failure, set the replica count of the YugabyteDB StatefulSets to `0` for the `us-central1` region, as follows:
```sh
kubectl scale statefulset yb-tserver --replicas=0 -n yb-demo-us-central1-b \
--context gke_yugabyte_us-central1-b_yugabytedb2
kubectl scale statefulset yb-master --replicas=0 -n yb-demo-us-central1-b \
--context gke_yugabyte_us-central1-b_yugabytedb2
```
Now rerun the queries from [Connect using YSQL and YCQL shells](#connect-using-ysql-and-ycql-shells) after reconnecting to the nodes in the `us-west1` region to see that there is no impact to the availability of the cluster and the data stored therein. However, there is higher latency for some of the transactions, since the farthest `us-east1` region has to be involved in the write path. In other words, the database cluster is fully protected against region failures but may temporarily experience higher latency, which is a better outcome than a complete outage of the business-critical database service. See [Understanding How YugabyteDB Runs on Kubernetes](https://www.yugabyte.com/blog/understanding-how-yugabyte-db-runs-on-kubernetes/) for details on how YugabyteDB self-heals the replicas when subjected to the failure of a fault domain (the cloud region, in this case) by auto-electing a new leader for each of the impacted shards in the remaining fault domains. The cluster goes back to its original configuration as soon as the nodes in the lost region become available again.